Introduction
What this is for: a short overview of what Edvera does and of the files in your download.
Edvera LMS turns a WordPress site into an online school. You build courses in a dedicated Course Builder, students learn in a distraction-free lesson player, and you sell courses, bundles and files through a built-in checkout.
This manual describes version 1.0.0. It covers installation, every screen, payment setup and the developer API.
Just bought Edvera? Go to Start here: which file to upload, installation with screenshots, setup in 15 minutes and a test sale without real money.
Features
- Course Builder outside wp-admin: chapters, drag-and-drop ordering and six lesson types — text, video, file, quiz, assignment and interactive page.
- Lesson player with progress, resume, completion rules (watch the video, download the file, or a button), drip release and prerequisites.
- Quizzes (multiple choice, true/false, short answer, essay), practice self-tests and CSV export; assignments with file upload or an answer sheet; lesson Q&A, video notes and bookmarks.
- Student dashboard, points, badges and a leaderboard.
- Management panel for enrolment (also in bulk), grading, cohorts and analytics; email reminders; reports.
- Certificates: PDF with a QR code and a public verification page, in your own HTML designs.
- Secure video (stream-only, with a watermark) and protected lesson files.
- Selling through a built-in checkout with Stripe, PayPal, bank transfer and Zarinpal; coupons, bundles and downloads; WooCommerce optional.
- Blocks and shortcodes for any block or classic theme and for page builders that accept shortcodes: course lists (the newest, best sellers, most popular, free, on sale, one category or one instructor) as a grid, list or compact list, single course cards, category grids, a course search box, price and enroll buttons and the student's courses, with copy-ready recipes and a shortcode builder with live preview.
- Appearance settings: brand colours, corner style, font and heading weight for every Edvera screen, with text colours chosen automatically for readable contrast.
- Translations: translation-ready, with complete Arabic, Persian, German and Turkish translations included, and full right-to-left support.
- Privacy, accessibility and multisite: WordPress's personal data export and erasure tools and a suggested privacy policy text; keyboard and screen-reader support; per-site schools on multisite networks. Works with any permalink setting, Plain included.
- AI assistants (MCP): a built-in MCP server, off until you turn it on, lets Claude, ChatGPT, OpenAI Codex, Cursor, n8n and other AI assistants build courses (outlines, chapters, lessons of every type, quizzes, media), manage students (enrolment, grading, questions, certificates) and read reports (overview, drop-off per lesson, learners at risk, sales, CSV) while you chat — with API keys or sign-in, permissions you choose, drafts until you publish and an activity log. See Connect AI assistants (MCP).
- Server checks in WordPress's Site Health, with a clear notice when something Edvera needs is missing, and a record of errors Edvera recovered from.
What is in the download
edvera-lms.zip— the plugin. Upload this file to WordPress, not the whole download (see What you downloaded).optional/edvera-lms-cjk-fonts.zip— an optional add-on that embeds Chinese, Japanese and Korean names in certificate PDFs (see Optional: CJK certificate fonts).START-HERE.html— a one-page quick start in English, Arabic, Persian, German and Turkish.documentation/— this manual, the credits page and the screenshots.licensing/— the GNU GPL v2 and v3 texts and the licences of the bundled fonts and libraries, listed on the credits page.
Conventions
- Menu paths are written like Courses → Settings → Payments. Edvera's admin screens are all under the Courses menu.
- Addresses such as
/studio/are relative to your site address. Onhttps://example.com,/studio/meanshttps://example.com/studio/. They assume pretty permalinks; with Plain permalinks Edvera uses longer query addresses instead, see Site addresses. - Course Builder is the instructor panel at
/studio/. Lesson player is the student view at/learn/. The management panel for students and grading is at/manage/. - Labels in quotes are exact screen labels, so you can find them on the page.
Start here
What this is for: getting from your CodeCanyon download to a working online school and a test sale, in plain steps, without technical knowledge.
Follow the parts below in order. You need a WordPress site where you can log in as an administrator, and the file you downloaded from CodeCanyon. Plan about half an hour: a few minutes for checks, two minutes to install, fifteen minutes to set up, and a few more for a test sale.
- What you downloaded
- Before you install
- Install in 4 steps
- If the upload fails
- First-time setup in 15 minutes
- Your first sale (a test, no real money)
- Updating to a new version
- Moving to another site or to staging
- Getting help
What you downloaded
On CodeCanyon, Downloads → Download → All files & documentation gives you one zip file. Unzip it on your computer first (Windows: right-click it → Extract All; Mac: double-click it). Inside you find the following. (If CodeCanyon's Download menu also offers Installable WordPress file only, that file is the plugin zip on its own and can be uploaded directly.)
| File or folder | What it is | What to do with it |
|---|---|---|
edvera-lms.zip | The plugin itself, about 6.5 MB. | The only file you upload to WordPress to install Edvera. Leave it zipped. |
optional/edvera-lms-cjk-fonts.zip | An optional add-on, about 9.2 MB: the font that embeds Chinese, Japanese and Korean names in certificate PDFs. | Only if your students' names (or course titles) are written in Chinese, Japanese or Korean: install it after Edvera, the same way. See Optional: CJK certificate fonts. |
START-HERE.html | A one-page quick start in English, Arabic, Persian, German and Turkish. | Open it in your web browser. |
documentation/ | This manual (index.html), the credits page and the screenshots. | Open documentation/index.html in your browser. It works offline. |
licensing/ | The licence texts of Edvera and of the fonts and libraries it includes. | Keep it. Nothing to do. |
Upload edvera-lms.zip, not the file you downloaded from CodeCanyon. If you upload the whole download, WordPress answers “The package could not be installed. No valid plugins were found.” and “Plugin installation failed.” Nothing is broken and nothing was changed on your site: unzip the download on your computer and upload the edvera-lms.zip that is inside it.
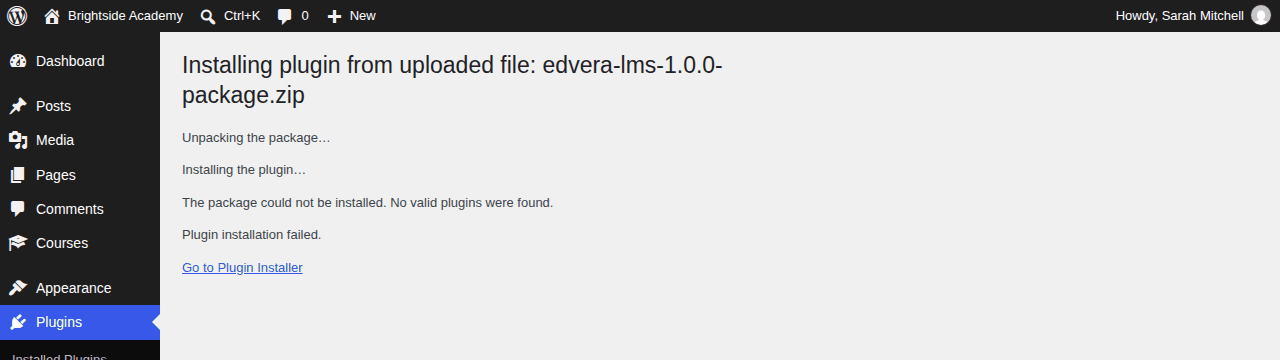
edvera-lms.zip.Before you install
Check these once. Most hosting plans meet them already. Where a check fails, send the line to your hosting company: they can change it for you.
| Check | What you need | How to check |
|---|---|---|
| WordPress | Version 6.5 or newer. | Tools → Site Health → Info, section WordPress, line Version. Update under Dashboard → Updates if it is older. |
| PHP (the language your server runs WordPress with) | Version 8.1 or newer. | Tools → Site Health → Info, section Server, line PHP version. Hosting control panels usually let you choose the PHP version; otherwise ask your host. |
| PHP extensions (add-ons to PHP) | Required: mbstring (certificate PDFs), GD (QR codes, logos and signatures in certificate PDFs) and fileinfo (so Edvera can check what uploaded files really contain). Recommended: intl (more spellings accepted in short-answer quizzes). Optional: Imagick with Ghostscript (preview images of certificate designs). | After installing, Tools → Site Health → Status lists a test labelled Edvera LMS for each required and recommended extension, GD included (also when Imagick is installed, which does not replace GD for certificates). A missing required one is shown as a critical issue, and Edvera's own screens say so too. Before installing: Site Health → Info, section Media Handling, line GD version must show a version, not “Not available”. See Server requirements and Site Health. |
| Memory | A PHP memory limit of 128 MB or more. While it builds a certificate PDF, Edvera asks WordPress for more (up to WordPress's own admin limit, normally 256 MB). | Site Health → Info, section Server, line PHP memory limit. |
| Upload limit | edvera-lms.zip is about 6.5 MB, so an upload limit of 8 MB is enough. The optional add-on for Chinese, Japanese and Korean certificate names is about 9.2 MB and needs 10 MB. 32 MB leaves room for future versions. | Site Health → Info, section Server, lines Upload max filesize and PHP post max size. Lower? See If the upload fails — you can still install. |
| Permalinks (the shape of your web addresses) | Recommended: anything except Plain, so lessons get short addresses such as /learn/12/. Edvera also works with Plain. | Settings → Permalinks. Post name is a good choice. |
| HTTPS | A secure address (https://, a padlock in the browser) on any site that takes payments. | Look at your site's address. Most hosts include a free certificate; ask yours to turn it on. |
Make a backup first. Most hosts offer a one-click backup of files and database in their control panel; a backup plugin works too. Installing Edvera does not change your existing content, but a fresh backup is the safe habit before adding any plugin.
Install in 4 steps
-
In your WordPress admin, open Plugins → Add Plugin and click Upload Plugin at the top. (In WordPress 6.5 to 6.7 the menu item is called Add New Plugin.)
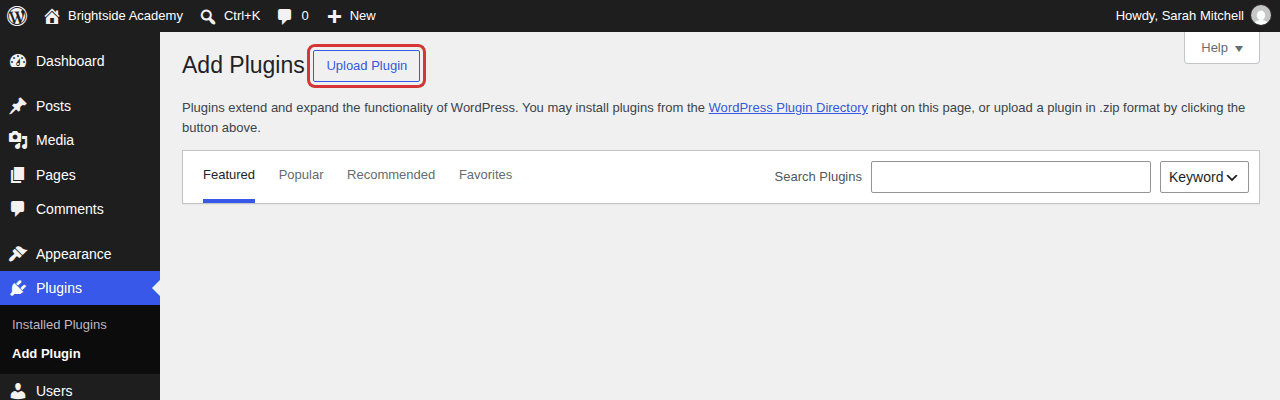
Plugins → Add Plugin, then Upload Plugin. -
Click Choose File (some browsers say Browse…), select
edvera-lms.zipand click Install Now. The upload takes a few seconds on a fast connection, longer on a slow one.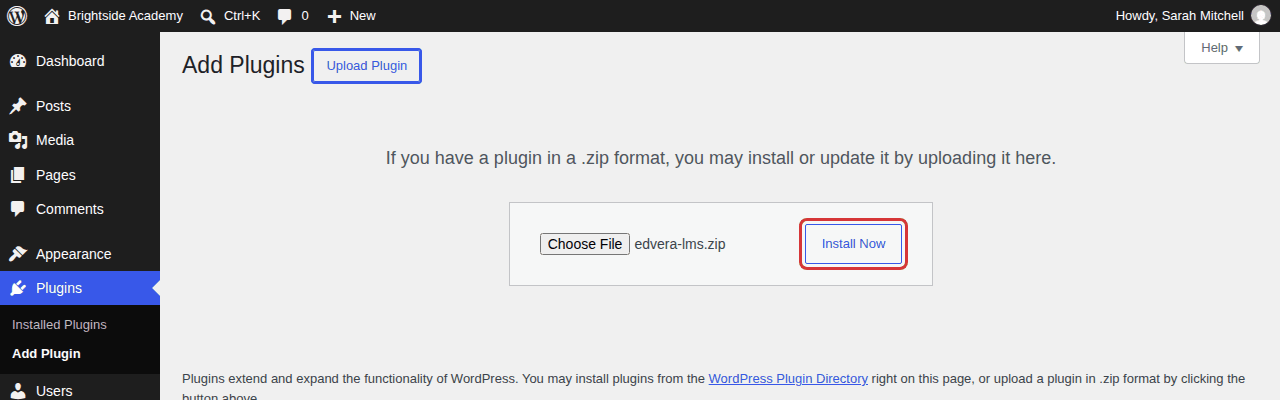
edvera-lms.zip chosen; next, Install Now. -
WordPress says “Plugin installed successfully.” Click Activate Plugin.
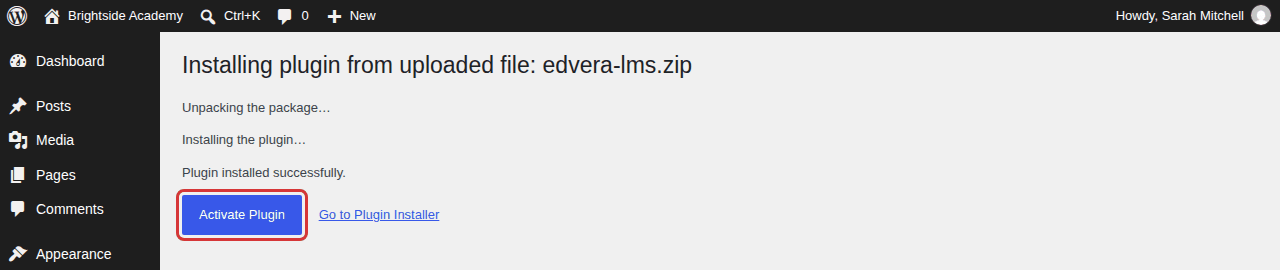
The plugin is installed; next, Activate Plugin. -
Edvera opens Courses → Get started, a checklist of five steps, and a new Courses menu appears on the left. Edvera has already created a Checkout page and a My courses page for you. Continue with First-time setup. (Edvera opens this screen only after its first activation; later you find it under Courses → Get started.) If your server is missing something Edvera needs, an extra step, Server requirements, comes first and names it; see Server requirements and Site Health.
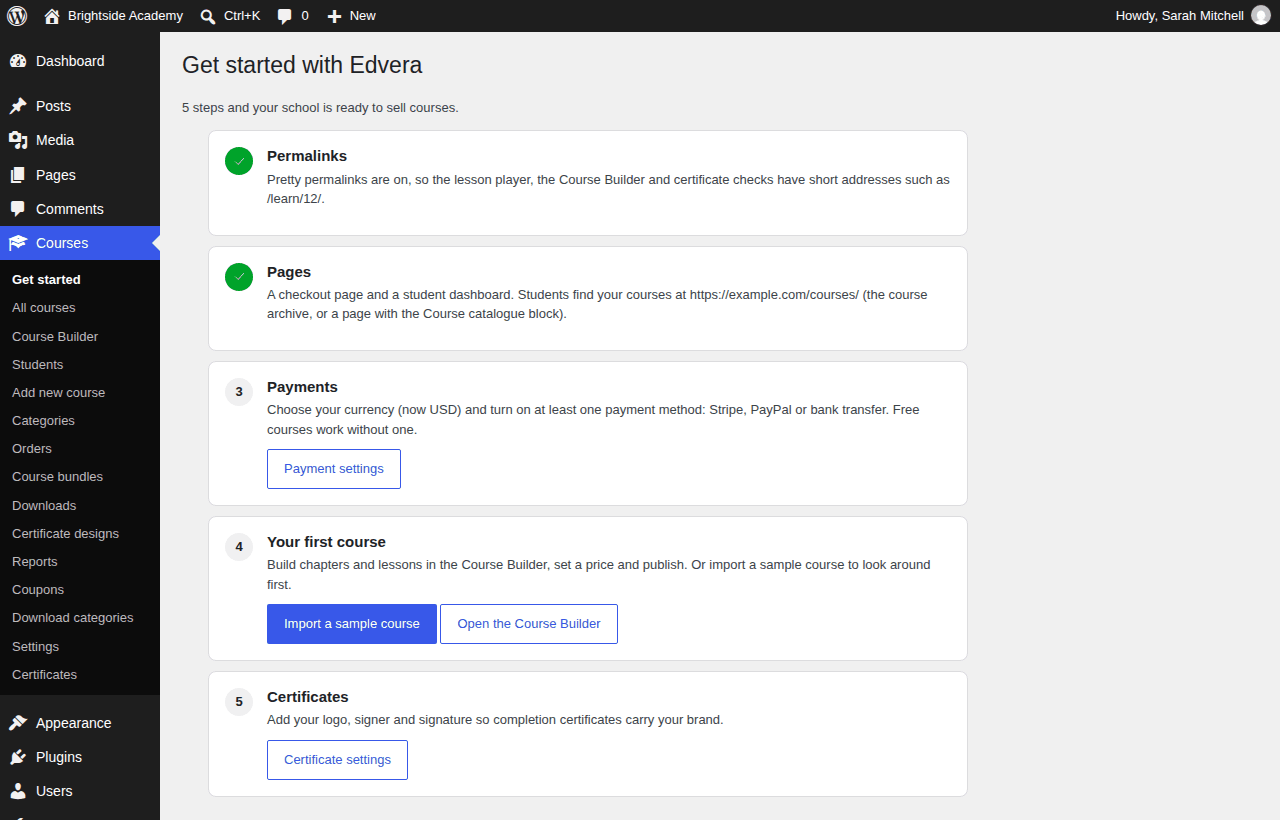
Courses → Get started on a new site. Green ticks mark finished steps.
On a multisite network, activate Edvera for one site in that site's Plugins screen, or for all sites with Network Activate; see Multisite. More about what activation does: Installation.
Chinese, Japanese or Korean names on certificates? Install the optional add-on optional/edvera-lms-cjk-fonts.zip the same way, after Edvera. Everyone else can skip it. See Optional: CJK certificate fonts.
If the upload fails
Find the message you see, then follow its fix. None of these problems damages your site.
- “The uploaded file exceeds the upload_max_filesize directive in php.ini.” or “The link you followed has expired.”
-
Both mean the same thing: your server accepts smaller uploads than the 6.5 MB plugin file (or the 9.2 MB CJK fonts add-on). (The second appears when the file is even larger than the server's total limit for one request; “Please try again.” will not help.) Servers that run nginx may show “413 Request Entity Too Large” instead. You can check the limits in Tools → Site Health → Info → Server (Upload max filesize, PHP post max size). Two ways out:
- Raise the limit. Ask your host: “Please raise
upload_max_filesizeandpost_max_sizeto 32M for my WordPress site.” Many hosting control panels let you change both yourself on their PHP settings page. Then upload again. - Install without uploading through WordPress, with an FTP program (such as FileZilla) or your host's File Manager:
- On your computer, unzip
edvera-lms.zip. You get a folder namededvera-lmswith the fileedvera-lms.phpdirectly inside it. - On the server, open the folder
wp-content/plugins/of your WordPress site. - Upload the whole
edvera-lmsfolder there, so that the plugin file ends up atwp-content/plugins/edvera-lms/edvera-lms.php(not one folder deeper). It holds about a thousand files, so an FTP upload takes a few minutes. With a File Manager it is quicker to uploadedvera-lms.zipintowp-content/plugins/and use the File Manager's Extract command, then delete the zip. - In WordPress, open Plugins → Installed Plugins and click Activate under Edvera LMS.
edvera-lms-cjk-fonts.zip, upload theedvera-cjk-fontsfolder towp-content/plugins/and activate Edvera LMS – CJK certificate fonts after Edvera. - On your computer, unzip
- Raise the limit. Ask your host: “Please raise
- “The package could not be installed. No valid plugins were found.”
- You uploaded the whole CodeCanyon download (or another zip) instead of
edvera-lms.zip. Unzip the download on your computer and upload theedvera-lms.zipinside it; see What you downloaded. - “Destination folder already exists.” and “This plugin is already installed.”
- A copy of Edvera is already on your site, for example from an earlier attempt or an FTP upload. WordPress shows the current and the uploaded version side by side. Click Replace current with uploaded to use the file you just uploaded, or Cancel and go back. Replacing keeps your courses, students, orders and settings; see Updating.
- “The PHP version on your server is …, however the uploaded plugin requires 8.1.” (or the plugin will not activate)
-
Your server runs an older PHP than Edvera needs. If Edvera was copied by FTP, activating it shows “Error: Current PHP version (…) does not meet minimum requirements for Edvera LMS. The plugin requires PHP 8.1.” instead. WordPress refuses the installation or activation, so nothing breaks.
Fix: choose PHP 8.1 or newer in your hosting control panel, or ask your host to switch your site to it, then install again. For an old WordPress the message reads “Your WordPress version is …, however the uploaded plugin requires 6.5.”: update WordPress under Dashboard → Updates first.
If your host switches a site where Edvera is already active to an older PHP later, Edvera pauses instead of breaking the site, with a notice “Edvera LMS needs PHP 8.1 or newer, but this site now runs PHP …, so Edvera is paused …”. Your data stays; see Edvera on an older PHP version.
- A white screen, or “There has been a critical error on this website.”
-
Something on the server stopped with an error. WordPress usually emails the site's admin address a message titled “Your Site is Experiencing a Technical Issue” with a special login link that lets you in safely, so you can deactivate the plugin that failed.
- To switch Edvera off without the admin area, rename the folder
wp-content/plugins/edvera-lms(for example toedvera-lms-off) with FTP or the File Manager. Your school's data stays in the database. Rename it back to turn Edvera on again. - To see the cause, open
wp-config.phpin your site's main folder and, above the line/* That's all, stop editing! Happy publishing. */, add these lines (if a line withWP_DEBUGis already there, change it instead of adding a second one):
Repeat what you did. The error is written todefine( 'WP_DEBUG', true ); define( 'WP_DEBUG_LOG', true ); define( 'WP_DEBUG_DISPLAY', false );wp-content/debug.log. - Send the lines of
debug.logthat mentionedverato support (see Getting help). Afterwards setWP_DEBUGback tofalseand deletedebug.log, because the file can be read from the web.
- To switch Edvera off without the admin area, rename the folder
- “Could not create directory.” and “Plugin installation failed.”
- WordPress is not allowed to write into
wp-content/plugins/on your server. Ask your host to fix the folder permissions (“WordPress cannot create folders inwp-content/plugins”), or install by FTP as described under the upload limit. If WordPress asks for “Connection Information” (an FTP host name, user name and password) instead, it cannot write to its own folders at all: enter the FTP details from your host, or ask your host to fix the permissions.
First-time setup in 15 minutes
Work down the checklist on Courses → Get started. A step turns green when it is done. The links lead to the detailed sections of this manual.
Permalinks (1 minute). If the step is not green, click Permalink settings, choose Post name and click Save Changes. Do this before you share links or issue certificates, because certificate QR codes contain the address. Details: Getting started.
Pages (1 minute). Edvera made the Checkout and My courses pages when you activated it, and your course list is at
/courses/. If the step is not green, click Create the missing pages. Add My courses to your site's menu so students find their courses again (block themes: Appearance → Editor → Navigation; classic themes: Appearance → Menus).Payments (5 minutes). Click Payment settings. Choose your currency first (prices are not converted later), then turn on a payment method. To try things out without any account or real money, use Bank transfer as in Your first sale; Stripe and PayPal also have test modes. Step by step: Payment methods. Free courses need no payment method.
Your first course (5 minutes). Click Import a sample course to get a small ready-made course (“Sample course: Study skills”, saved as a draft) and look around. To build your own, click Open the Course Builder: New course, type a title, Add chapter, Add lesson, then the pencil button to write the lesson and Save. Set the price in the WordPress editor (Courses → All courses → Edit → Course settings box → Price), then click Publish course in the Course Builder. Details: Course Builder and Course settings box.
Certificates (3 minutes). Click Certificate settings and fill in the Certificates section: issuer name, logo, signature image, signer name and title. Save. Every course issues a certificate when it is finished unless you turn that off in the Course Builder. Details: Certificates.
If the checklist starts with a Server requirements step, your server is missing something Edvera needs: the step names it, and Open Site Health explains what to ask your host. See Server requirements and Site Health.
Optional: build and run your school by chatting with an AI assistant. Under Courses → AI & MCP you can turn on Edvera's MCP server and connect Claude, ChatGPT, Codex, Cursor or n8n. It is off until you turn it on; see Connect AI assistants (MCP).
Then show your courses on your site. Below the checklist, Show courses on your site opens Courses → Shortcodes: ready-made pieces for your homepage, landing pages and sidebars — the newest courses, best sellers, one category, a search box and more — to copy into a page, with a live preview. See Use Edvera in your own site.
Your language
Edvera includes complete translations into Arabic, Persian, German and Turkish. Choose the language under Settings → General → Site Language (العربية, فارسی, Deutsch or Türkçe) and click Save Changes. WordPress fetches its own translation, and Edvera's screens, emails and new certificates switch to that language by themselves. Arabic and Persian also switch every Edvera screen to right-to-left. Persian shows Persian digits and dates certificates in the Persian calendar; Arabic keeps Western digits, like WordPress in Arabic. Other languages: see Translation and RTL.
Where everything is
| What | Address or menu | Who uses it |
|---|---|---|
| List of all courses | /courses/ (on https://example.com: https://example.com/courses/) | Visitors |
| Signing up | Edvera has no separate sign-up form. A visitor who buys a course, or enrols in a free one, enters a name and email address at checkout, and Edvera creates the account; WordPress emails a link to set a password. You can also add students yourself (Users → Add User, or bulk enrolment), or let people register with WordPress's own form by ticking Anyone can register in Settings → General. | Students |
| Logging in | The normal WordPress login page. Edvera sends visitors there when a page needs an account and brings them back afterwards. | Everyone |
| Student dashboard | The My courses page: courses, progress, files, certificates and orders | Students |
| Lesson player (where students learn) | /learn/<course number>/, opened with Start learning, Continue learning or Continue course | Students |
| Course Builder (where courses are built) | /studio/, or Courses → Course Builder | Administrators, editors, course managers and instructors |
| Management panel (students and grading) | /manage/, or Courses → Students | Instructors and course managers |
| Orders and refunds | Courses → Orders | Administrators |
To let a teacher build courses without full admin rights, edit their user under Users and set the role to Instructor; see Roles and capabilities.
Your first sale (a test, no real money)
This walk-through uses Bank transfer, because it needs no payment account: the buyer is shown your bank details and you confirm the payment yourself. No money moves at any point.
Give a course a price. Courses → All courses → Edit on a published course (or publish the sample course first). In the Course settings box, type a Price, for example
49, and save the course.-
Turn on bank transfer. Courses → Settings → Payments, section Bank transfer: tick Enable, write your account details in Payment instructions (for the test, any text) and click Save Changes.
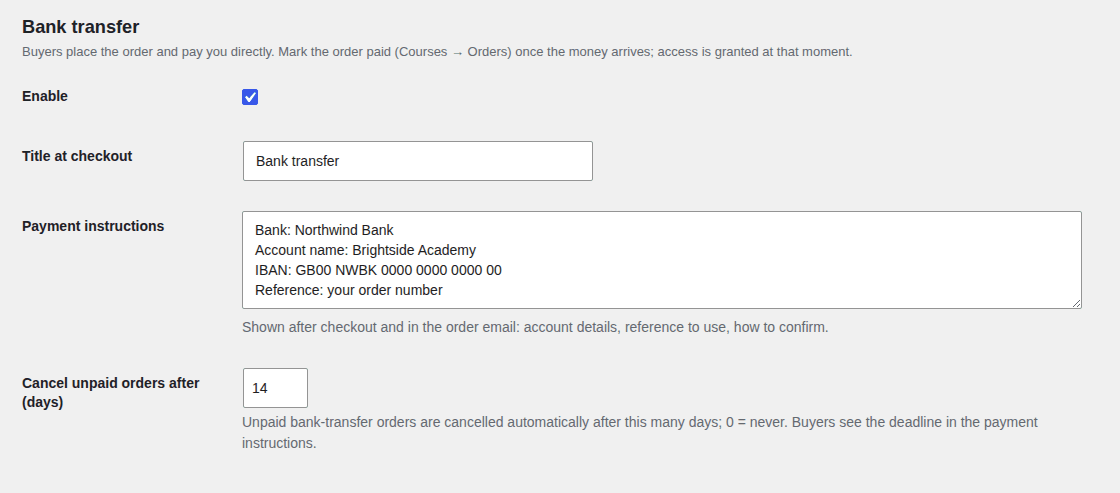
Courses → Settings → Payments, Bank transfer section. -
Buy it as a test buyer. Open a private (incognito) browser window, so that you are not logged in, and open the course page. Click Buy now. At checkout, enter a name and an email address that you can read but that has no account on your site yet (an address with an account is asked to log in first), choose Bank transfer and click Place order and pay. The receipt says “Your order is placed. Access starts once we confirm your payment.”, followed by your instructions and the payment deadline.
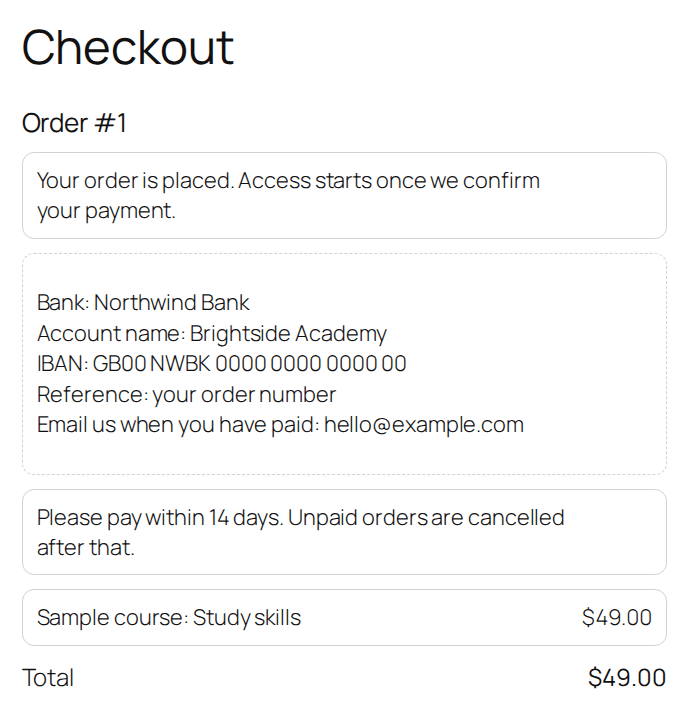
What the buyer sees after a bank-transfer order. -
Confirm the payment. Back in your admin window, open Courses → Orders. The order shows “Awaiting payment confirmation”. Open it and click Mark paid and grant access, then confirm “Mark this order paid? The buyer gets access immediately.” The order becomes Paid, Edvera creates the buyer's account and enrols it in the course, and WordPress emails the buyer a link to set a password.
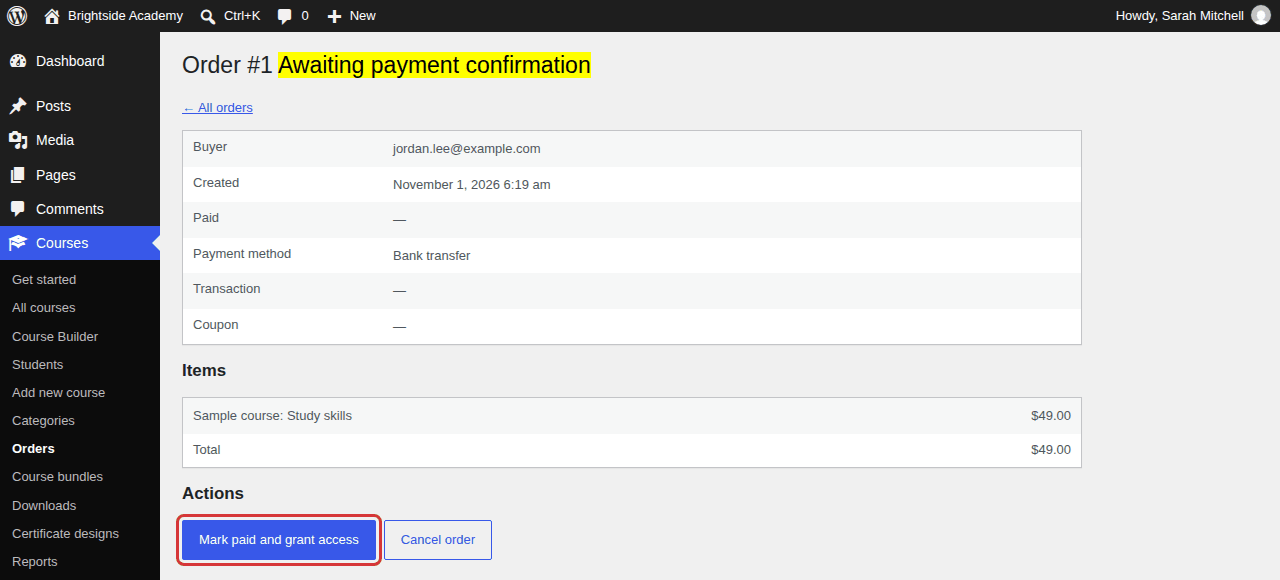
Courses → Orders → the test order. Try a refund. On the same order, click Mark refunded (already refunded elsewhere) and confirm “Mark this order refunded and remove the buyer’s access? No money is sent.” The order becomes Refunded and the access it gave is removed.
Tidy up. Bank transfer has no test mode, so Edvera treats this order as a real one: once it was paid or refunded it cannot be deleted, and it stays in the list, marked Refunded. (Unpaid orders, and every order placed with Stripe, PayPal or Zarinpal in test or sandbox mode, can be deleted; see Deleting orders.) You can delete the test buyer under Users; Edvera then removes their learning data and keeps the order as a record.
Prefer card payments? Turn on Stripe in Test mode as described under Stripe and pay with Stripe's test card 4242 4242 4242 4242 (any future date, any CVC). The order becomes Paid by itself, is labelled Test mode, and the order screen offers Refund through Credit or debit card (Stripe) and Delete order, which removes the test order and the access it gave. When you are ready to sell, replace the test details with your real bank details, or switch Stripe and PayPal to live mode.
Updating to a new version
Back up your site (files and database).
Download the new version from CodeCanyon (Downloads → All files & documentation), unzip it and find
edvera-lms.zip.Upload it exactly as when installing: Plugins → Add Plugin → Upload Plugin → Choose File → Install Now.
-
WordPress shows “This plugin is already installed.” with the current and the uploaded version. Click Replace current with uploaded. WordPress reports “Plugin updated successfully.” and Edvera stays active.
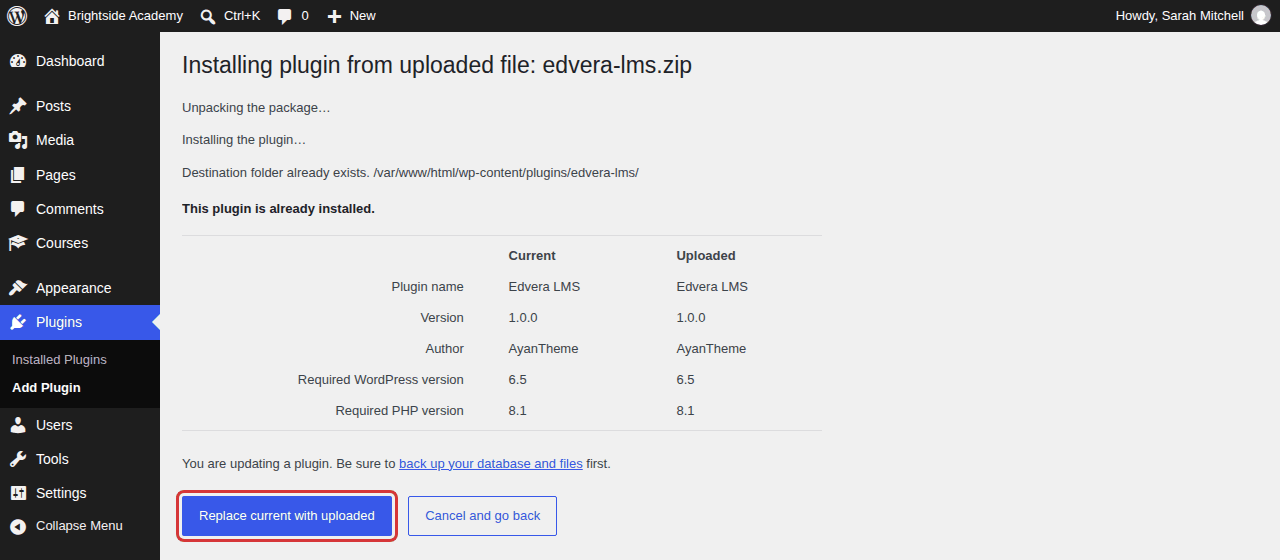
Uploading a copy of Edvera that is already installed.
Your courses, students, progress, orders, certificates and settings are kept: they live in the database, not in the plugin folder. Edvera updates its own tables when needed. Files you changed inside the plugin folder are replaced, so keep your own translations in wp-content/languages/plugins/ (see Translation). More: Updating.
Moving to another site or to staging
Edvera keeps everything in two places: the database (courses, lessons and settings, plus its own tables for enrolments, orders, quiz attempts, certificates and access records) and the folder wp-content/uploads/edvera-lms-files/ (protected videos, lesson files, downloads, assignment uploads and interactive pages). A migration plugin or your host's staging or cloning tool that copies the whole database and the whole wp-content folder moves Edvera completely. Check that the tool copies every database table, not only WordPress's standard ones, and that it does not skip large files in uploads.
After the move:
- Log in on the new site, open Settings → Permalinks and click Save Changes once.
- Open a course in the lesson player and a lesson file to check that everything is there. On nginx servers, add the rule from Protecting stored files again and test it.
- Payments: the webhook address contains your site address. In Stripe and PayPal, change the webhook to the new “Webhook URL” shown in Courses → Settings → Payments. A new Stripe endpoint has a new signing secret: paste it into Edvera too.
- Certificates: PDFs downloaded before the move have the old address in their QR code; PDFs downloaded afterwards use the new one. Ask your host to redirect the old domain to the new one, so older QR codes keep working.
On a staging or test copy, switch Stripe to Test mode and PayPal to Sandbox mode before anyone uses it, and turn off Send course reminders (Courses → Settings → Emails): a copy of a live site otherwise takes real payments and emails your real students.
Getting help
First look under Troubleshooting and FAQ: most questions are answered there. Support comes from AyanTheme, Edvera's author, through Edvera's item page on CodeCanyon: the Comments tab (public questions) and the Support tab (how to reach the author for help). AyanTheme's profile: themeforest.net/user/ayantheme.
A good support request contains:
- your WordPress and PHP versions (Tools → Site Health → Info; the Copy site info to clipboard button there copies everything at once, including the Edvera LMS section with Edvera's version, its server checks and recent errors, see Site Health), the Edvera version (Plugins) and your theme;
- what you did, what you expected and what happened instead, with the exact message and screenshots;
- when there was an error, the lines from
wp-content/debug.logthat mentionedvera(see how to create it); - your purchase code, which proves you bought Edvera. You find it in your Envato account under Downloads → Download → License certificate & purchase code. Send it only through private support, never in public comments.
Never post passwords, secret keys (such as sk_live_…) or your purchase code in public comments. If support needs to look at your site, agree on a safe way in private.
Support follows Envato's item support policy: it covers questions about using Edvera and fixing problems (bugs) in it. It does not cover customisation, such as changing how Edvera looks or works for your site, or writing extra code.
Words used in this manual
What this is for: the words this manual uses, each explained in a line, with a link to where it is covered.
- Course
- A set of lessons with its own page, price and certificate, which students enrol in. See Courses.
- Chapter
- A named group of lessons inside a course, such as “Getting started”, shown as a section of the course outline. See Chapters and ordering.
- Lesson
- One step of a course: a text, a video, files to download, a quiz, an assignment or an interactive page. See Lesson types.
- Enrolment
- A student's access to a course. It starts with a purchase, a free sign-up, a bundle, or when you add the student yourself, and can be for life or for a number of days. The screens spell it “enrollment”. See How access works.
- Drip
- Releasing lessons over time: on a date, or a number of days after the student enrolled. See Drip and prerequisites.
- Prerequisite
- A lesson that must be completed before another one opens. See Drip and prerequisites.
- Bundle
- Several courses and downloads sold together as one item, often for less than the items separately. See Bundles.
- Download
- A file you sell or give away on its own, such as an e-book or a template, outside any course. See Downloads.
- Coupon
- A discount code, such as
SUMMER20, that buyers type at checkout. See Coupons. - Payment method (gateway)
- The service that takes the buyer's money: Stripe, PayPal, Zarinpal, or bank transfer, which you confirm yourself. See Payment methods.
- Webhook
- A message that Stripe or PayPal sends to your site by itself, for example “this payment succeeded” or “this payment was refunded”, so an order is updated even when the buyer closes the page early. You set it up once by copying the “Webhook URL” from Edvera to Stripe or PayPal. See Stripe and PayPal.
- Test mode / sandbox mode
- A practice setting of Stripe (“Test mode”), PayPal and Zarinpal (“Sandbox mode”) in which payments are simulated with test cards or test accounts and no real money moves. Each mode has its own keys. Orders placed in this mode are labelled Test mode and can be deleted (see Deleting orders). Turn it off to take real payments.
- Secret key, client ID, signing secret
- Codes from your Stripe or PayPal account that let Edvera create payments and check that messages really come from them. Keep them private, like passwords. See Payment methods.
- Cohort
- A named group of students taking a course together, with a class schedule. See Cohorts.
- Course Builder, lesson player, management panel
- Edvera's three full-screen workspaces: where instructors build courses (
/studio/), where students learn (/learn/), and where instructors manage students and grading (/manage/). - Permalinks
- WordPress's setting for the shape of web addresses (Settings → Permalinks). Any choice except Plain gives Edvera short addresses such as
/learn/12/. See Site addresses. - Shortcode and block
- Two ways to put a part of Edvera, such as a list of courses, on one of your pages. A block is added in WordPress's block editor; a shortcode is a short text in square brackets, such as
[edvera_courses], that you paste into a page, a widget or a page builder. See Use Edvera in your own site. - MCP (Model Context Protocol)
- An open standard that lets AI assistants such as Claude or ChatGPT use the tools of other software. Edvera includes an MCP server, so an assistant can build courses, manage students and read reports on your site while you chat with it. See Connect AI assistants (MCP).
- API key
- A long secret starting with
edv_that lets an assistant such as Claude Code, Codex or Cursor act as you on your site, with the permissions you chose. Created and revoked under Courses → AI & MCP and shown only once; treat it like a password. See API keys and permissions. - OAuth connector
- The way Claude and ChatGPT connect without a key: they send you to your own site, you log in and approve the permissions on a consent screen, and they receive tokens of their own that you can disconnect at any time. See Claude.
- Permission (scope)
- What one key or connection may do: Read, Content, Students, Commerce or Analytics. It never goes beyond what the WordPress account behind it may do. See API keys and permissions.
- Site Health
- WordPress's check-up screen for your server (Tools → Site Health). Edvera adds its own checks there. See Server requirements and Site Health.
Requirements
What this is for: the exact technical requirements, for you or your hosting company to check. The plain-language version is Before you install.
| Item | Requirement |
|---|---|
| WordPress | 6.5 or later. Tested up to 7.1. |
| PHP | 8.1 or later. |
| PHP extensions | mbstring (required) — for certificate PDFs and QR codes and for text in every script. Without it, certificates still verify online but cannot be downloaded as PDF. GD (required) — draws the QR code of certificates as an image and puts PNG logos and signatures into certificate PDFs. Without it, QR codes are drawn as vector graphics, but PNG logos and signatures may be missing. Imagick does not replace GD here; Edvera's own Site Health test reports a missing GD even while Imagick is installed. fileinfo (required) — lets Edvera check the real type of files uploaded to lessons and interactive pages. Without it, uploads are checked by their file name only. intl (recommended) — recommended by WordPress for language-aware text; in Edvera it lets short-answer quizzes also match full-width and other presentation forms of letters, see Short-answer matching. Edvera works without it. Imagick with Ghostscript (optional) — only for the preview images of certificate designs. |
| Bundled libraries | The PDF and QR code libraries in the plugin's vendor/ folder must be complete (they are, in the original edvera-lms.zip). |
| Uploads folder | wp-content/uploads/ must be writable by the web server: Edvera keeps certificate working files, downloadable files and certificate previews there. |
| PHP memory | 128 MB or more recommended. While it builds a certificate PDF, Edvera raises the limit to WordPress's admin memory limit (WP_MAX_MEMORY_LIMIT, 256 MB by default) where the server allows it. |
| Upload size | To upload edvera-lms.zip (about 6.5 MB) under Plugins → Add Plugin, PHP's upload_max_filesize and post_max_size must be at least 8 MB; for the optional CJK fonts add-on (about 9.2 MB), 10 MB. 32 MB is recommended. With lower limits, install by FTP, see If the upload fails. The same limits cap the videos and files you upload into Edvera. |
| Permalinks | Any setting (Settings → Permalinks). Any structure other than Plain is recommended: the Course Builder, lesson player, management panel and verification page then get short addresses such as /learn/12/. With Plain they work too, with query addresses such as ?edvera_learn=1&edvera_lcourse=12 (see Site addresses). |
| Web server | Apache or LiteSpeed read the bundled .htaccess. On nginx, add one rule. |
| WP-Cron | Must run. Edvera uses daily tasks to cancel unpaid orders and, when you turn them on, to send course reminders. |
| Outgoing HTTPS | Needed only for the payment methods you enable (Stripe, PayPal, Zarinpal) and for their Test connection button. |
| Theme | Any block or classic theme. |
| Multisite | Supported, activated per site or network-wide. Each site is a school of its own, see Multisite. |
| WooCommerce | Not required. Optional bridge, see WooCommerce. |
| Certificate fonts for Chinese, Japanese and Korean | Optional: the CJK certificate fonts add-on. Without it, these names use the PDF viewer's own Asian fonts. |
Use HTTPS on any site that takes payments. Edvera checks the PHP version, the extensions, the libraries and the uploads folder itself, see Server requirements and Site Health.
Server requirements and Site Health
What this is for: seeing at a glance whether your server has everything Edvera needs, and what to ask your hosting company when something is missing.
Edvera checks your server itself and reports in WordPress's own check-up screen, Tools → Site Health. On its Status tab every check is a test with the badge Edvera LMS: a missing required item shows as a critical issue (red badge), a missing recommended one as a recommendation (blue badge), and passed checks are listed under Passed tests. Each test says what the item is for and, when it is missing, what to ask your host.
| Check | Level | What it is for, and what happens without it |
|---|---|---|
| PHP 8.1 or newer | Required | Edvera is written for PHP 8.1 and newer. On an older PHP it does not run; see Edvera on an older PHP version. |
| GD PHP extension | Required | Draws the QR code on certificates and puts your logo and signature images into certificate PDFs. Without it, QR codes are drawn as vector graphics instead, but PNG logos and signatures may be left out of the PDF. |
| mbstring PHP extension | Required | Creates certificate PDFs and QR codes and handles text in every script (Arabic, Persian, Chinese and others). Without it, certificates still verify online but cannot be downloaded as PDF. |
| fileinfo PHP extension | Required | Checks the real type of files uploaded to lessons and interactive pages. Without it, uploads are checked by their file name only. |
| Certificate PDF library | Required | The PDF and QR code libraries bundled in the plugin's vendor/ folder. When the folder is missing or incomplete (for example after an interrupted FTP upload), certificates verify online but cannot be downloaded as PDF. Fix: upload edvera-lms.zip again under Plugins → Add Plugin → Upload Plugin; replacing the plugin files keeps your data. |
| Writable uploads folder | Required | Edvera keeps certificate working files, downloadable files and certificate previews in wp-content/uploads/, and you need the folder to upload images. The test shows the folder; when WordPress cannot write to it, ask your host to make it writable for the web server. |
| intl PHP extension | Recommended | Recommended by WordPress for language-aware text handling. Edvera works without it; with it, short-answer quizzes also match full-width and other presentation forms of letters (see Short-answer matching). |
| Pretty permalinks | Recommended | Short addresses such as /learn/12/; with Plain permalinks Edvera works with longer addresses. The test links to Settings → Permalinks. See Site addresses. |
| HTTPS | Recommended | Turn on HTTPS before you take real payments: buyers expect a secure checkout, and in live mode Stripe and PayPal only send their payment confirmations (webhooks) to HTTPS addresses. Test and sandbox payments work without it. |
| Upload and memory limits | Information | Always passes; it shows the largest file you can upload (lesson files, downloads, images), the PHP memory limit and the limit WordPress raises it to while it creates a certificate PDF, where the host allows it. Ask your host to raise the upload limit if your lesson files or downloads are larger. |
The Edvera LMS section of Site Health → Info
The Info tab of Site Health has an Edvera LMS section with Edvera's version, one line per check above with its result, the upload and memory limits (“largest upload / PHP memory limit / limit for certificate PDFs”), Certificate fonts for Chinese, Japanese and Korean (“Embedded (CJK certificate fonts add-on)” or “Not embedded: PDF viewers use their own fonts”, see Optional: CJK certificate fonts) and Errors in the last 7 days. The Copy site info to clipboard button includes it: paste it into support requests.
When something required is missing
- A notice on Edvera's admin screens (for administrators): “Edvera LMS: this server is missing something Edvera needs. Missing: …. Certificates still verify online; Tools → Site Health explains what each one is for and what to ask your host.”, with an Open Site Health button.
- A step on Courses → Get started: Server requirements comes first in the checklist, with the same list (“This server is missing … Ask your host to add it; Tools → Site Health explains what each one is for.”) and an Open Site Health button. The notice is not repeated on that screen. A server with everything required keeps the usual five steps.
Both disappear by themselves once your host has fixed the problem. Missing recommended items appear only in Site Health.
Recorded errors
When Edvera recovers from an error — a certificate PDF or its QR code that could not be created, or a certificate design preview that failed — visitors get a message instead of a broken page, and Edvera records the error for you. It keeps the last 20 (in the option edvera_error_log). While any of them is from the last 7 days, Tools → Site Health → Status shows the test “Edvera LMS recorded n errors in the last 7 days” with the latest five: date and time, what failed (for example certificate_pdf) and the message. With WP_DEBUG_LOG on (see how to turn it on), each error is also written to wp-content/debug.log.
When a certificate PDF cannot be created
The certificate stays valid and verifiable; only its PDF is missing. A student or visitor who opens the PDF gets a page titled “Certificate PDF not available” with a link, “Check the certificate online”, to its verification page, and one of these messages:
- “The certificate PDF could not be created on this server. The certificate itself is valid and can be checked online. The problem was recorded for the site administrator.” — the PDF library ran into an error; it is listed under Recorded errors. A PDF that stops because PHP runs out of memory or time is recorded too (“A certificate PDF stopped with a PHP error: …”).
- “Certificate PDFs are not available on this site right now: the server is missing the mbstring PHP extension. The certificate itself is valid and can be checked online.”
- “Certificate PDFs are not available: the PDF library is missing from this installation.”
On Courses → Certificates, administrators see a matching notice while the library or mbstring is missing. A QR code that cannot be drawn is left out of the PDF and recorded; the certificate still shows its ID and verification address.
Edvera on an older PHP version
WordPress refuses to install or activate Edvera on a PHP older than 8.1 (see this message). If your host later switches a site where Edvera is active to an older PHP, Edvera pauses instead of breaking the site: it stops loading, so its courses, player and checkout are not available, and users who can manage plugins see this notice in wp-admin:
“Edvera LMS needs PHP 8.1 or newer, but this site now runs PHP …, so Edvera is paused: its courses, player and checkout are not available. Nothing was deleted — courses, students and orders are kept. Ask your host to switch the site to PHP 8.1 or newer and Edvera starts again by itself.”
Tools → Site Health → Status shows the same as a critical issue, “Edvera LMS needs PHP 8.1 or newer”. Once the site runs PHP 8.1 or newer again, Edvera carries on where it left off.
For developers How the checks work and how to add your own: Loading and requirements.
Installation
What this is for: what activation does on your site, plus the details for nginx servers, updates and multisite networks.
The same steps with screenshots, and a fix for every upload error, are in Start here.
- In WordPress, open Plugins → Add Plugin → Upload Plugin (Add New Plugin in WordPress 6.5 to 6.7).
- Choose
edvera-lms.zipand click Install Now. (Or unzip it and copy theedvera-lmsfolder to/wp-content/plugins/.) - Click Activate.
On activation Edvera:
- creates its database tables;
- creates two pages if they are missing — Checkout (checkout block) and My courses (student dashboard) — and selects them in Courses → Settings → General;
- registers its addresses (
/studio/,/learn/,/manage/and others); - opens Courses → Get started the first time it is activated.
On a multisite network, activate it on one site in that site's Plugins screen, or for every site with Network Activate in Network Admin → Plugins, see Multisite.
Edvera remembers which pages it created, so that uninstalling can remove exactly those (see Uninstalling). The Instructor and Course manager roles are added on the first page load after activation.
Optional: CJK certificate fonts
Certificate PDFs embed fonts for Latin, Cyrillic, Greek, Arabic-script, Hebrew, Thai and Indic names (see PDF and languages). The font for Chinese, Japanese and Korean is large (17 MB), so it comes as a separate, optional plugin, Edvera LMS – CJK certificate fonts: optional/edvera-lms-cjk-fonts.zip in your download, about 9.2 MB. This keeps edvera-lms.zip small enough for the upload limit of most hosts.
- With the add-on, Chinese, Japanese and Korean names (and course titles) are embedded in the certificate PDF with the WenQuanYi Zen Hei font, so every PDF viewer and printer shows them the same way.
- Without it, certificates work as before: these names use the PDF viewer's own Asian fonts instead of being embedded. Install the add-on when your students write their names in Chinese, Japanese or Korean; everyone else can skip it.
Install and activate Edvera LMS first. The add-on only adds a font to Edvera's certificates: without an active Edvera it does nothing, and the Plugins screen says “Edvera LMS – CJK certificate fonts adds fonts to the certificates of Edvera LMS. Install and activate Edvera LMS to use it.”
Open Plugins → Add Plugin → Upload Plugin, click Choose File, select
edvera-lms-cjk-fonts.zipfrom theoptionalfolder of your unzipped download (leave it zipped) and click Install Now.Click Activate Plugin. New and existing certificates use the font the next time their PDF is opened, because PDFs are created when they are opened.
The add-on needs an upload limit of 10 MB. With a lower limit, unzip it on your computer, upload the edvera-cjk-fonts folder to wp-content/plugins/ with FTP or your host's File Manager and activate it under Plugins (as for Edvera, see If the upload fails). The add-on has no settings and stores nothing in the database, so deactivating or deleting it leaves nothing behind. To check that it works, look for “Embedded (CJK certificate fonts add-on)” in the Edvera LMS section of Site Health → Info. Update it like Edvera, by uploading a newer edvera-lms-cjk-fonts.zip and choosing Replace current with uploaded.
Protecting stored files
Lesson files, protected videos, downloads, assignment uploads and interactive pages are stored in wp-content/uploads/edvera-lms-files/ under random names. They are only ever sent through Edvera's own access checks.
- Apache / LiteSpeed: Edvera writes an
.htaccessfile into the folder that denies direct access. Nothing to do. - nginx: nginx ignores
.htaccess. Add this rule to your server block, then reload nginx:
location ^~ /wp-content/uploads/edvera-lms-files/ { deny all; return 403; }To test, open https://your-site/wp-content/uploads/edvera-lms-files/index.php. 403 Forbidden means the folder is protected. A blank page means it is not.
Managed hosts that run nginx without giving you access to its configuration can usually add this rule on request.
Two more folders get a deny-all .htaccess and an empty index.php: wp-content/uploads/edvera-cert-tmp/, mPDF's working folder for certificate PDFs, and the plugin's own vendor/ folder with the PDF libraries, which are never requested directly. On nginx you can deny them the same way (optional):
location ^~ /wp-content/uploads/edvera-cert-tmp/ { deny all; return 403; }
location ^~ /wp-content/plugins/edvera-lms/vendor/ { deny all; return 403; }
Updating
Upload the new edvera-lms.zip through Plugins → Add Plugin → Upload Plugin and click “Replace current with uploaded” (step by step: Updating to a new version). Your courses, students, orders and settings are stored in the database and stay in place. Edvera updates its own tables when needed.
For developers A site that ran a pre-release copy of Edvera kept the learning data stored with user accounts (completed lessons, points and the like) under network-wide keys. After the update Edvera moves it once, automatically, to the per-site keys described under Multisite: on a single site to that site, on a network to the main site (or, when Edvera is not active on the main site, to the first site that runs it). It works in batches of a few seconds per request, so a very large site finishes over the next requests; until a value has been moved, Edvera reads it from its old place, so no progress goes missing meanwhile. The per-site option edvera_umeta_db (value 1) records that a site is done.
Multisite
Edvera runs on WordPress multisite networks. Every site is a school of its own, with its own courses, students, orders, certificates and settings.
- Network activation sets up every site of the network: its tables, the Checkout and My courses pages and its addresses. On a large network (more than 10,000 sites) only the current site is set up straight away, and every other site the first time an administrator opens its dashboard.
- New sites created while Edvera is network activated are set up automatically.
- Learning data is per site. What Edvera stores with a user account — completed lessons, the resume position, video progress, the last visit, reminder dates, points, streak and badges, video notes, assignment submissions — belongs to the site it was earned on, so progress on one site never shows on another. Only the sign-in phone number (when phone numbers are accepted as an identity) is shared by the whole network.
- Deleting a site (Network Admin → Sites) deletes its Edvera tables and the learning data its users had on that site.
- Uninstalling cleans each site according to its own “Delete all data on uninstall” setting, see Uninstalling.
Getting started
What this is for: the five-step checklist Edvera shows after activation, and what turns each step green.
A guided walk-through of these steps is in First-time setup in 15 minutes.
Courses → Get started is a five-step checklist (six while the server is missing something Edvera needs). A step turns green when it is done. Only administrators see this screen.
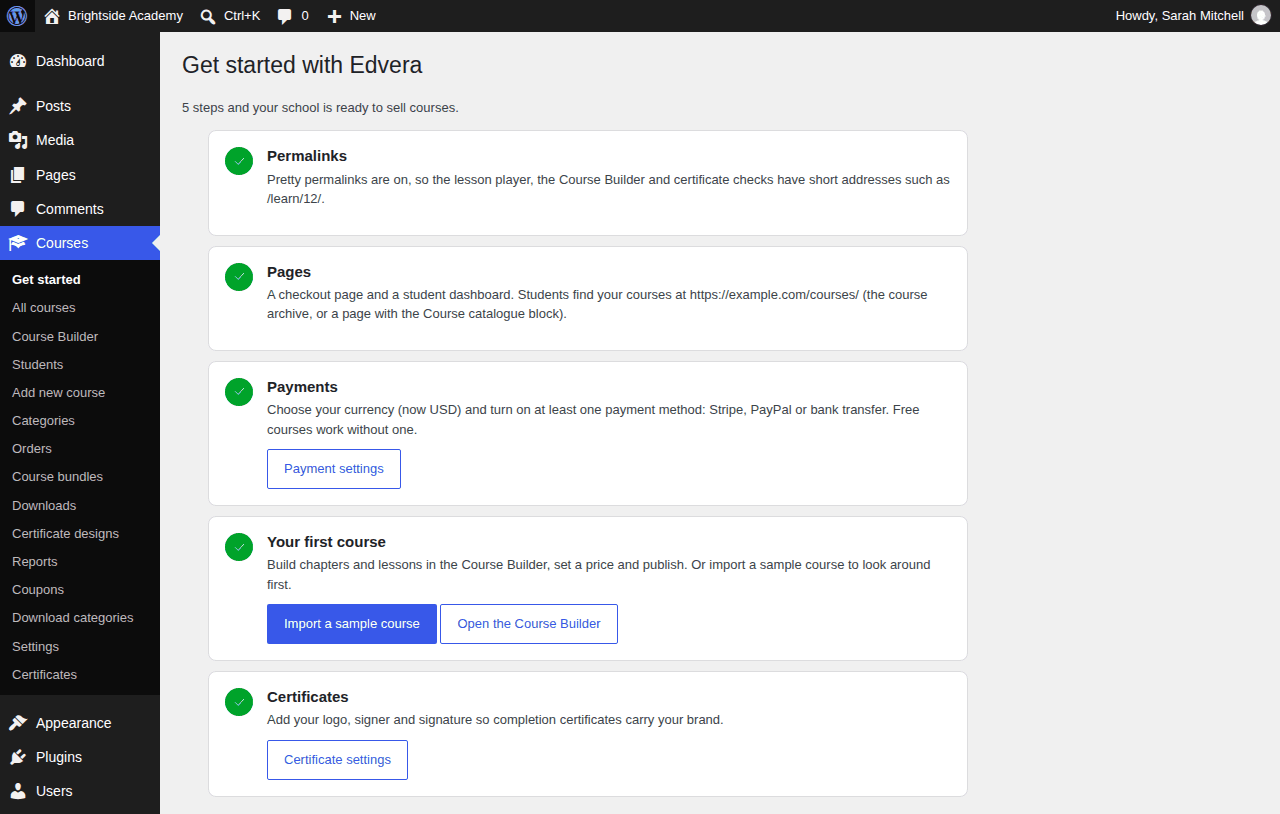
| Step | Done when | Button |
|---|---|---|
| Server requirements (shown only while something required is missing) | Never green: the step appears at the top only while a required check fails, names what is missing (“This server is missing … Ask your host to add it; Tools → Site Health explains what each one is for.”) and disappears once it is fixed. See Server requirements and Site Health. | “Open Site Health” opens Tools → Site Health. |
| Permalinks | Any permalink structure other than Plain is chosen in Settings → Permalinks. The step then says “Pretty permalinks are on, so the lesson player, the Course Builder and certificate checks have short addresses such as /learn/12/.” With Plain it explains that Edvera's addresses look like ?edvera_learn=1&edvera_lcourse=12: they work, but short addresses read better and are easier to share. | “Permalink settings” opens Settings → Permalinks (only while Plain is chosen). |
| Pages | A published checkout page and dashboard page are selected in Settings, and students can find your courses: either the course archive (/courses/ by default) is reachable, or a published page contains the course catalogue (block or [edvera_courses]). The step then names the address, for example “Students find your courses at https://example.com/courses/ …”. | “Create the missing pages” creates the Checkout and My courses pages if needed. Only when the course archive cannot list the courses does it also create a Courses page at /all-courses/ with the course catalogue. |
| Payments | At least one payment method is enabled, configured and supports your currency. | “Payment settings” opens Courses → Settings → Payments. |
| Your first course | At least one course is published. | “Import a sample course” and “Open the Course Builder”. |
| Certificates | A certificate logo or signer name is set. | “Certificate settings” opens Courses → Settings → General. |
Below the checklist, Show courses on your site opens Courses → Shortcodes, with shortcodes and blocks for your homepage, landing pages and sidebars; see Use Edvera in your own site.
While the site uses Plain permalinks, administrators also see a notice on Edvera's other admin screens: “Edvera: your site uses Plain permalinks.”, with the buttons “Permalink settings” and “Keep Plain permalinks”. The second hides the notice for you on this site. It disappears by itself once you choose another structure.
Choose the permalink structure before you hand out links or issue certificates. Query addresses keep working after you switch to pretty permalinks, but short addresses stop working if you later switch to Plain — including the verification address in the QR code of certificate PDFs that were already downloaded.
Sample course
“Import a sample course” creates a draft course called “Sample course: Study skills” with two chapters:
- Getting started — “Welcome” (a free preview text lesson) and “Planning your study time”.
- Practice — “Self-test”, a practice quiz with two questions.
Open it in the Course Builder to look around. Publish it to try the lesson player, buy box and catalogue; the “Your first course” step turns green only once a course is published. Edit or delete the sample at any time.
Courses
What this is for: creating a course and setting its price, access length and enrolment status in the WordPress editor.
A course is a WordPress post of type edvera_course, listed under Courses → All courses. Work is split between two places:
- The WordPress editor (Courses → Add new course, or Edit on a course): title, description (the course page text), excerpt (shown on catalogue cards), course image (featured image), categories, author, and the Course settings box.
- The Course Builder (
/studio/): chapters, lessons, quizzes, the course certificate options, and publishing.
Course categories are managed under Courses → Categories. They can be nested, and the catalogue can filter by them.
Default addresses: course /course/<slug>/, course archive /courses/, category /course-category/<slug>/. Change them under Courses → Settings → General with “Course URL base”, “Course archive base” and “Course category base” (see General settings).
For developers The edvera_course_slugs filter changes these bases in code.
The author of a course matters. Instructors can edit only courses they are the author of. To give an existing course to an instructor, change its author in the editor.
Course settings box
The Course settings box sits in the editor sidebar.
| Field | What it does |
|---|---|
| Status | “Open for enrollment”, “Enrollment closed” or “Archived”. See Course lifecycle. When the course has students, a warning explains what moving it to the Trash would do. |
| Featured course | Marks the course as featured (post meta _edvera_featured). The course catalogue can then show featured courses only: the block's “Featured courses only” setting or [edvera_courses featured="yes"], see Course catalogue. The course list shows “Featured” next to the title. |
| Protect lesson content (discourage copying, saving and printing) | In the lesson player: blocks text selection, copying, the context menu, image dragging and the save, print and view-source shortcuts, and prints a notice instead of the lesson. A deterrent only; screenshots still work. |
| Access length (days) | “0 = lifetime access”. When set, each new enrolment expires this many days after it starts. Existing enrolments keep the expiry they were given. |
| Level | “All levels”, “Beginner”, “Intermediate” or “Advanced”. Shown in the buy box. |
| Price (symbol) | “Empty or 0 = free”. Uses your store currency and decimal separator. |
| Sale price (symbol) | “Optional. Applies only when it is lower than the price.” Used only when a Price is set and the sale price is lower; the regular price is then shown struck through. A sale price typed without a Price is saved as the Price. |
| WooCommerce product | Only when WooCommerce is active and “Sell through WooCommerce” is on. See WooCommerce. |
The box ends with the number of active students. Students whose access period has ended are not counted.
Course students box
A second sidebar box, Course students, shows the number of active enrolments and the first 30 students with how they got access, for example “Order #12”, “Bundle: Photography Starter Path”, “Added by hand”, “Bulk enrollment”, “Cohort”, “Free enrollment” or “WooCommerce order #345”.
To enrol an existing user, type their email address or username in “Email or username to grant access” and click “Grant access”. A message at the top of the box confirms it (“… now has access to this course.”), says that the student already had access, or explains that no user has that email address or username. Create the account first (Users → Add User) for someone who is not registered yet.
Course list
Courses → All courses adds the columns Lessons, Students, Enrollment (state) and Price, and labels featured courses “Featured” next to their title. Row actions and bulk actions change the state: “Close enrollment”, “Reopen enrollment”, “Archive”, “Unarchive”.
Course lifecycle
You can stop selling a course without taking it away from the people who bought it.
| State | Catalogue and search | Course page | New enrolments and sales | Current students |
|---|---|---|---|---|
| Open for enrollment (default) | Listed | Visible | Allowed | Full access |
| Enrollment closed | Listed | Visible; the buy box says “Enrollment in this course is closed.” | Blocked | Keep access |
| Archived | Hidden from the catalogue, archive, category pages, search, REST API, sitemaps and embeds | “Page not found” for everyone except its students and editors | Blocked | Keep access |
| Trash | Hidden | Gone | Blocked | Lose access until the course is restored |
| Deleted permanently | The course's lessons, enrolments, progress and quiz attempts are deleted. Orders and issued certificates are kept. | |||
Unpublished (draft) courses cannot be bought or enrolled in. Before you move a course with students to the Trash, Edvera asks for confirmation and suggests archiving instead.
Course Builder
What this is for: building a course's chapters, lessons and quizzes in the instructor panel at /studio/.
The Course Builder is a focused panel for instructors, outside wp-admin. Open /studio/ on your site, or Courses → Course Builder in wp-admin; administrators also find an “Open the Course Builder” button on Courses → Get started. Give the address to your instructors.
Who can use it: administrators, editors and course managers (all courses) and instructors (their own courses). Visitors who are not logged in are sent to the login page and back. Other users see “Access denied”.
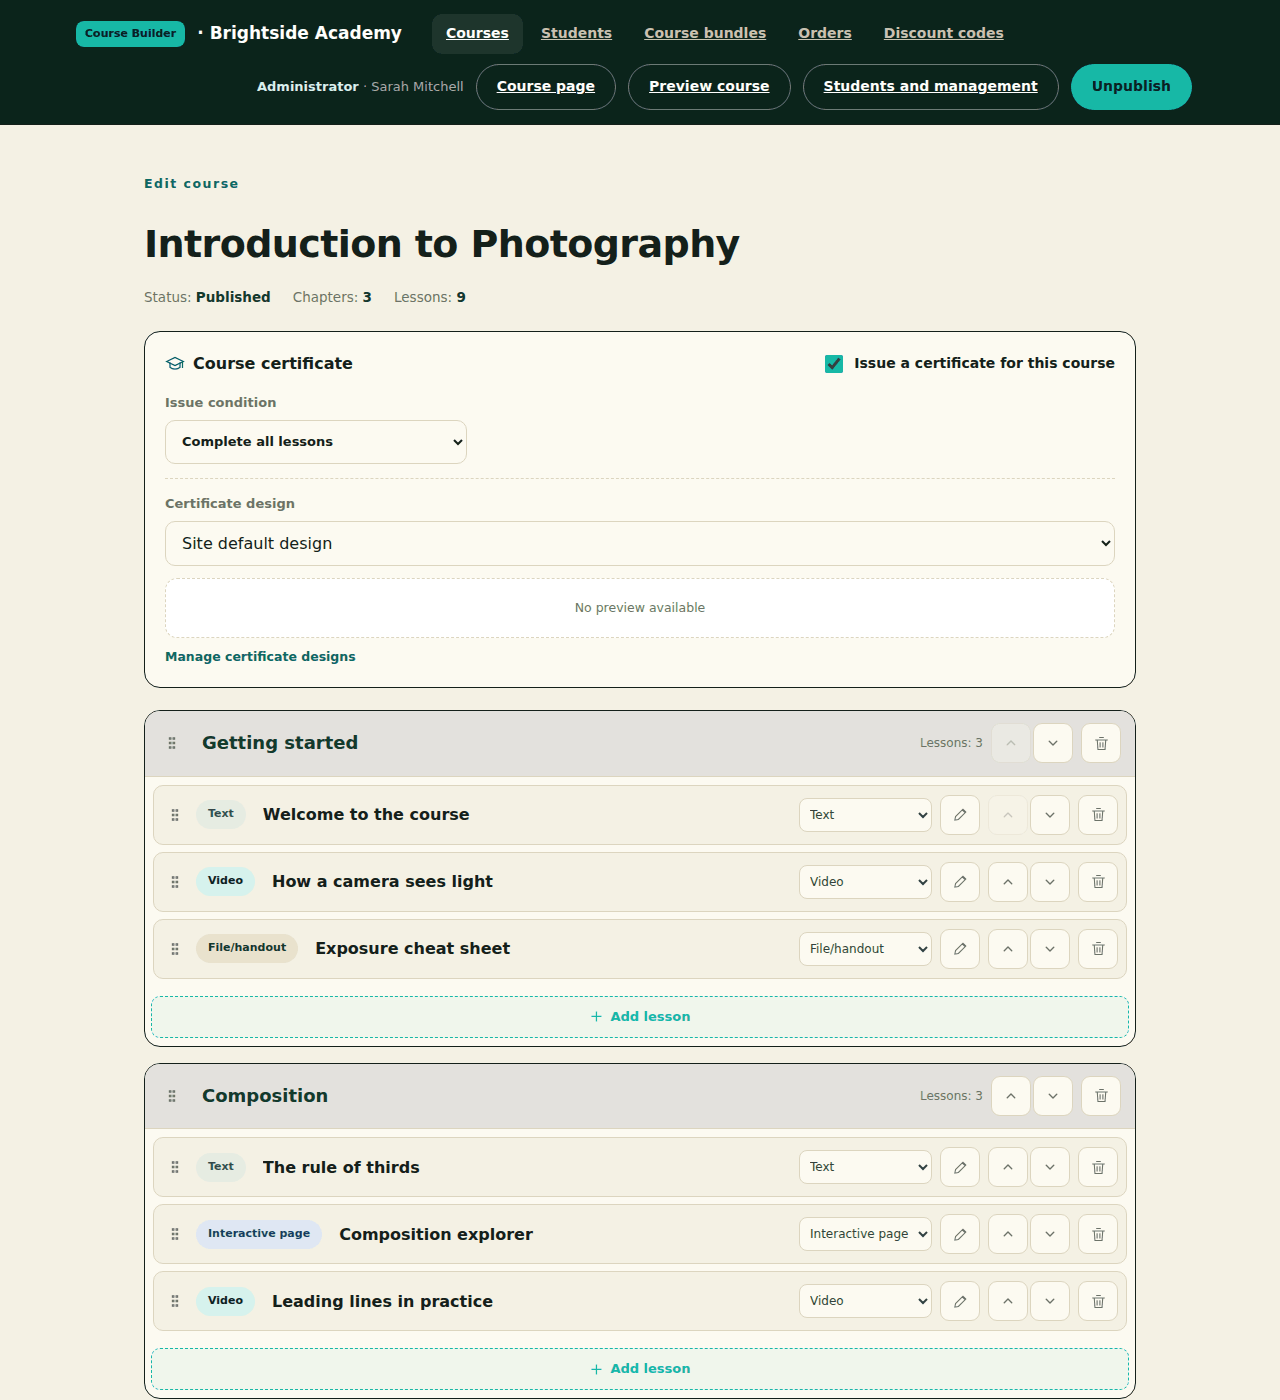
/studio/<course id>/.Course list
/studio/ lists the courses you can edit (published, draft, pending and private), with search and “All”, “Published” and “Draft” filters. Each card shows lesson, chapter and student counts and has:
- an edit button (“Start building”, “Continue building” or “Edit content”);
- “Preview”, which opens the course in the lesson player;
- a “Course actions” menu: “Close enrollment” or “Reopen enrollment”, “Archive” or “Unarchive”, and “Move to Trash” (with a warning when the course has students).
The top bar links to “Courses” and, depending on your role, “Students” (the management panel), “Course bundles”, “Orders” and “Discount codes”. On the right it shows your name with your role: “Administrator”, “Course manager” or “Instructor”.
Creating a course
Click “New course” or the “Create a new course” card. Edvera creates a draft called “Untitled course” and opens it. Type the title at the top of the page; it saves when you leave the field.
Course header
- “Course page” — the public page (or its preview while it is a draft).
- “Preview course” — the course in the lesson player.
- “Students and management” — the management panel for this course.
- “Publish course” / “Unpublish” — shown to users allowed to publish.
There is no global save button. Titles, chapters, ordering and the certificate box save immediately; the status area shows “Saving…”, “Saved” or “Couldn’t save — please try again”. The lesson and quiz editors have their own “Save” button.
Set the course image, description, categories, price and other course settings in the WordPress editor.
Course certificate box
- “Issue a certificate for this course” — on by default.
- “Issue condition” — “Complete all lessons”, “Average quiz score” or “Both (completion + average score)”.
- “Minimum average score (%)” — for the score conditions; default 60.
- “Certificate design” — “Site default design” or one of your certificate designs, with its preview image. When you can open Courses → Certificate designs, a “Manage certificate designs” link leads there.
Chapters and ordering
- “Add chapter” adds a chapter called “New chapter”. Click its name to rename it.
- Reorder chapters by dragging their handle, or with the up and down buttons.
- Drag a lesson by its handle to another place in its chapter, or into another chapter (an empty one too). The up and down buttons also move lessons: at the top or bottom of a chapter they move the lesson into the previous or next chapter.
- The trash button (“Delete”) on a chapter deletes it and moves its lessons to the Trash. On a lesson it moves that lesson to the Trash.
- “Add lesson” in a chapter adds a text lesson called “New lesson” and puts the cursor in its name, so you can type the title straight away. Change its type in the row's type menu, then click the pencil button (“Edit content”) to edit its content.
- After a move with the up and down buttons, or after deleting a lesson, the keyboard focus stays on the moved lesson or in the same chapter.
New lessons are drafts
A lesson added with “Add lesson” starts as a draft: its row shows a “Draft” badge (“Students don’t see this lesson until you save it in the lesson editor.”), and it is left out of the lesson player, the curriculum and the lesson count — also in “Preview course” — so students of a live course never see an empty “New lesson”. The first click on “Save” in its lesson editor (or, for a quiz, in the quiz editor) publishes it. Renaming the lesson or changing its type in the list does not.
A lesson that was unpublished elsewhere, for example set to draft in the WordPress editor, also shows “Draft”, but saving it in the Course Builder does not publish it.
Lesson types
| Type | Student sees | Completes by |
|---|---|---|
| Text | Rich text with images, embedded videos and custom HTML/CSS. | “Mark as complete” button |
| Video | A video (uploaded protected file, YouTube, Vimeo, Aparat or a direct link), an optional description, private notes and bookmarks, and an “Attachments” list with the lesson's other files (handouts, slides). The protected video itself is never listed. | Watching 90% of the video, when the lesson uses “Watch the full video” and the video is an uploaded file or a direct link to a video file. Otherwise the “Mark as complete” button. |
| File/handout | An “Attachments” list with download links and an optional description. | Downloading one of the files, when the lesson uses “Download the file”. Otherwise the “Mark as complete” button. |
| Quiz | A quiz, see Quizzes. | Passing the quiz |
| Assignment | The task, an optional answer sheet and a file upload, see Assignments. | Submitting |
| Interactive page | Your own self-contained HTML page (a simulation, a concept map, a workshop…) in a frame with a “Full screen” button, and an optional description. See Interactive pages. | “Mark as complete” button |
New lessons use the “Manual” completion rule until you choose another one in the lesson editor. See Completion, progress and resume for what students see.
Editing a lesson
Click the pencil button, “Edit content”, on a lesson. A dialog titled “Lesson content” opens with these fields, depending on the type.
The lesson and quiz editors are modal dialogs: the page behind them is inactive and the Tab key stays inside. Esc, the close button or a click outside the dialog closes it. If you changed something without saving, Edvera first asks “You have unsaved changes. Close without saving?”. When the dialog closes, the keyboard focus returns to the lesson's pencil button. “Save” saves the lesson, closes the dialog and, for a new lesson, publishes it (see New lessons are drafts).
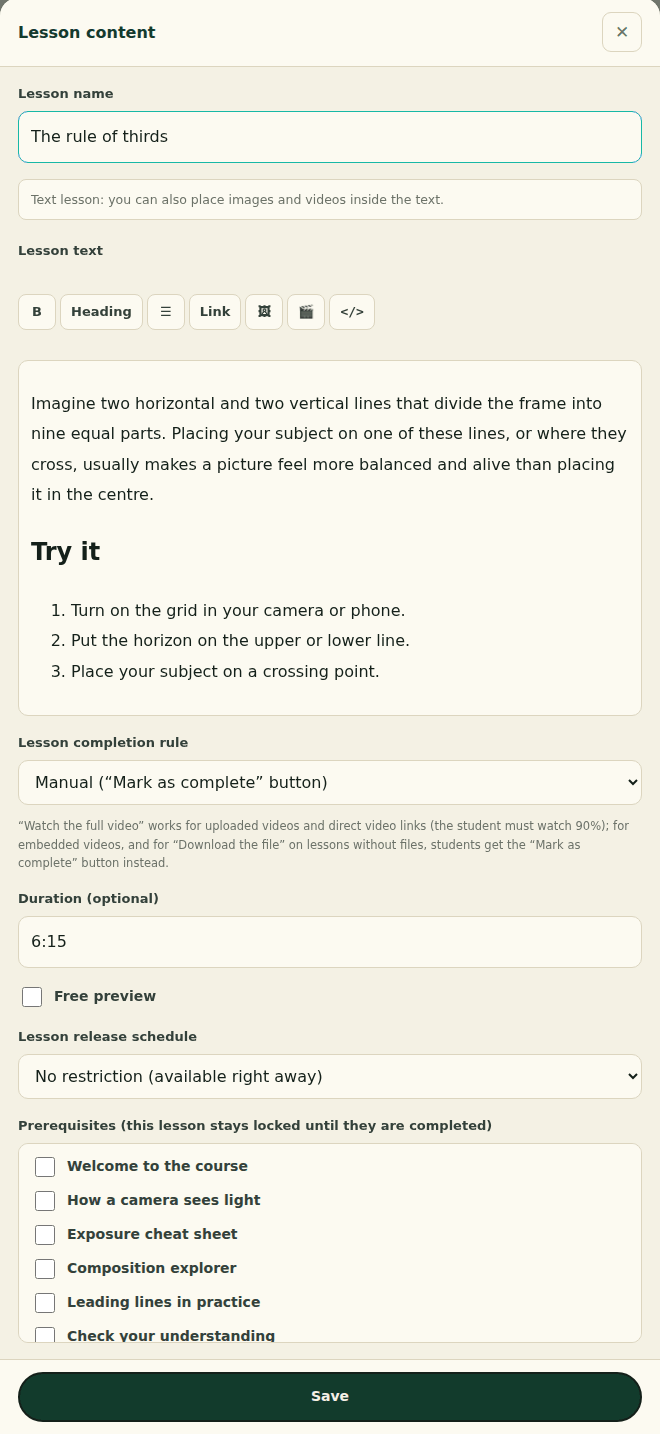
| Field | Types | Notes |
|---|---|---|
| Lesson name | All | |
| Lesson text | Text, Assignment | Toolbar: bold, heading, list, link, “Insert image” (JPEG, PNG, GIF or WebP, stored in the Media Library), “Insert video” (the address or embed code of a YouTube, Aparat or Vimeo video, or a direct link) and “Edit code (HTML/CSS)”. Scripts and event handlers are removed when saved. The editor writes in your site's text direction (right to left on Persian, Arabic or Hebrew sites); the code view is always left to right. |
| Video source — For video lessons | Video | “No video”, “Uploaded video (protected)”, “Aparat”, “YouTube”, “Vimeo” or “Direct link”. For all but uploads, paste the video's address, or the embed code that YouTube, Vimeo or Aparat give you, in “Video URL or embed code”. From embed code Edvera keeps only the video's address and sets the matching source. Embed code from any other site is refused: “This embed code is not from a supported video site (YouTube, Vimeo, Aparat). Paste the video’s address instead.” For “Uploaded video (protected)”, upload an MP4 or WebM file under Attachments (see Secure video). |
| Attachments | Video, File | “Add file” uploads a file into protected storage. In a video lesson, files other than the protected video are listed for students under “Attachments”. Allowed: pdf, zip, doc, docx, ppt, pptx, xls, xlsx, jpg, jpeg, png, mp3, m4a, mp4, m4v, webm, txt. The hint below the list shows your server's actual upload limit, for example “max 64 MB”. |
| Interactive page | Interactive page (and any lesson that already has a page) | Upload, replace, preview or remove the lesson's HTML page. See Interactive pages. |
| Description (optional) | Video, File, Interactive page | Text shown with the video, file list or page. For interactive pages it has the full toolbar, images and videos included. |
| Answer sheet | Assignment | See Assignments. |
| Lesson completion rule | All except Quiz | “Watch the full video”, “Download the file” or “Manual (“Mark as complete” button)”. “Watch the full video” works for video lessons with an uploaded video or a direct link to a video file (MP4, WebM, OGG or M3U8): the student must watch 90%. “Download the file” works for File lessons that have at least one file. In every other case (a YouTube, Vimeo or Aparat video, a lesson without files, another lesson type) students get the “Mark as complete” button instead. See Completion. |
| Duration (optional) | All except Quiz | Free text such as 12:30. Shown in the curriculum. |
| Free preview | All except Quiz | Any logged-in visitor can open this lesson without buying the course. |
| Lesson release schedule | All except Quiz | See Drip and prerequisites. |
| Prerequisites | All except Quiz | Lessons that must be completed first. |
Quiz editor
For a quiz lesson, the pencil button opens the quiz editor.
| Field | Default | Notes |
|---|---|---|
| Self-test | Off | A practice quiz: after submitting, students see the correct answer and explanation for each question. The score does not count toward the certificate. |
| Passing score (%) | 60 | 0–100. |
| Attempts (0 = unlimited) | 0 | |
| Quiz total score | 20 | The full mark shown to students. |
| Scoring method | Split evenly | “Split evenly across questions” or “Separate score for each question”. The second adds a “Grade” field to each question and warns when the grades add up to more than the total. |
Click “Add question” and choose the type:
- Multiple choice — at least two options; mark the correct one.
- True/false.
- Short answer — the “Correct answer”. Matching ignores letter case, spacing, the kind of digits and common Arabic/Persian spelling variants, see Short-answer matching.
- Essay — graded by hand, see Grading essays.
Each question except essays can have an “Answer explanation (optional — shown after submission in self-tests)”, up to 1000 characters. Questions without text, multiple-choice questions with fewer than two options and short-answer questions without an answer are dropped when you save.
“Export quiz” downloads the quiz as a JSON file; “Import quiz” loads one, so you can reuse quizzes between lessons and sites.
Interactive pages
An Interactive page lesson shows one of your own HTML pages inside the lesson: a simulation, a concept map, a drag-and-drop exercise or a workshop you built elsewhere.
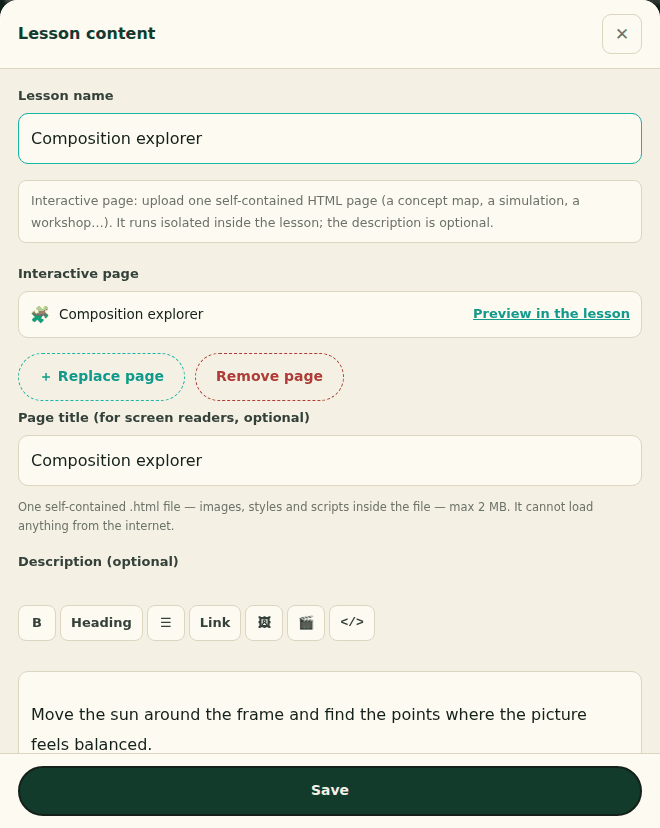
- Add a lesson and set its type to “Interactive page”, then click the pencil button.
- Click “Upload HTML page” and choose one
.html(or.htm) file. The largest accepted file is 10 MB, or your server's upload limit when that is lower; the hint under the button shows the limit that applies. - Optionally fill in “Page title (for screen readers, optional)”. When it is empty, Edvera uses the page's own
<title>. - “Preview in the lesson” opens the lesson in the player. “Replace page” uploads a new version; “Remove page” deletes it.
- Click “Save” to save the rest of the lesson (name, description, rule, schedule).
The file must be a real HTML page: other files, empty files and files over the limit are refused with a message. Write it as one self-contained file, with its styles, scripts, images (as data: addresses) and fonts inside. The page runs in a sandboxed frame without network access: it cannot load anything from the internet, read your site or the student's account, or send data anywhere.
Students see the page in a screen-sized frame with a “Full screen” button; the page scrolls inside the frame. It is never published at a public address: each viewer gets a personal link that expires after four hours, and only people who may open the lesson (enrolled students, free-preview visitors and the course's editors) can load it. On courses with “Protect lesson content”, copying and printing are blocked inside the page too. Interactive page lessons complete with the “Mark as complete” button.
Course pages and catalogue
What this is for: how courses appear to visitors: the course page with its buy box and outline, and the catalogue of all courses.
Edvera works with any theme. On a single course page it adds, through the page content:
- the buy box;
- the course description;
- the curriculum (“Course content”).
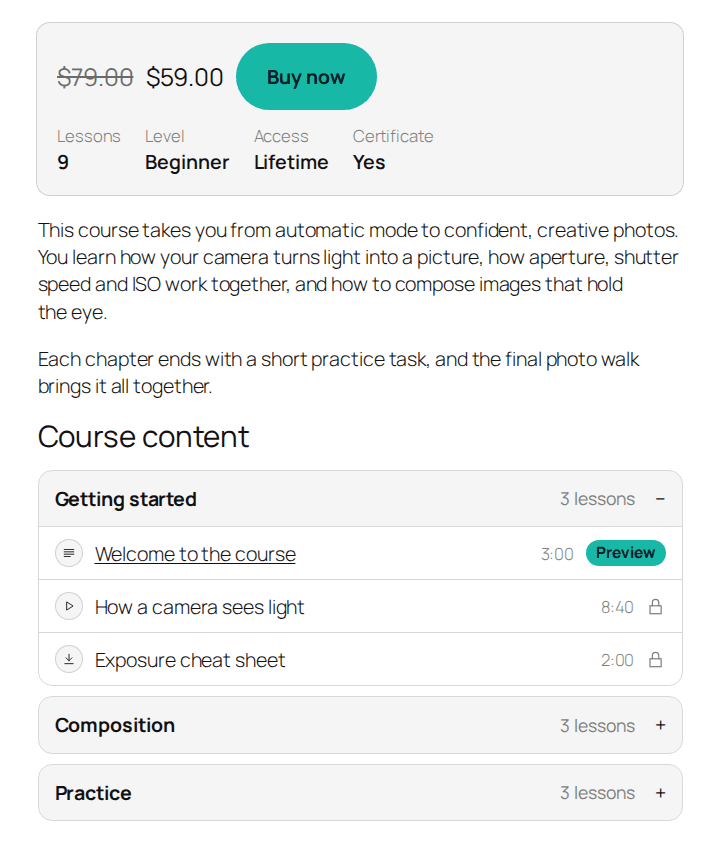
To place these parts yourself, turn off “Add the buy box and curriculum to course pages” in Courses → Settings → General and use the course shortcodes or blocks. The automatic layout also steps aside on a course whose content already contains the Course buy box or Course curriculum block, or the [edvera_course_buy] or [edvera_course_curriculum] shortcode.
Buy box
- For students: “Your progress” with a progress bar, and “Continue learning”.
- For everyone else: the price (a sale shows the regular price struck through) and “Buy now”, or “Free” and “Enroll for free”. When the course cannot be bought, the reason is shown, for example “Enrollment in this course is closed.”
- Details: “Lessons”, “Level”, “Access” (days or “Lifetime”), “Students” (only when “Show the number of students on course pages” is on) and “Certificate”.
Curriculum outline
One collapsible section per chapter, the first one open. Each lesson shows its type icon, title, duration and state: a check mark when completed, a “Preview” tag on free lessons, and a lock icon when locked (read out as “Locked” by screen readers). Lesson titles link to the player when the visitor has access or the lesson is a free preview.
Course catalogue
The catalogue (the Course catalogue block or [edvera_courses]) shows published courses as cards: image, title, excerpt, lesson count and price. Archived courses are left out; closed courses stay listed. Above the cards, “All categories”, “Search courses” and “Filter” narrow the list, and “Previous” and “Next” page through it.
Each catalogue can also choose which courses it shows and in what order:
- Featured courses only — only courses with “Featured course” ticked in their Course settings box. Use it for a “Featured courses” band on the home page.
- Only these courses — a list of course IDs, for example
12, 5, 9. Without another order they appear in the order you typed. When none of the IDs can be used, the catalogue shows “No courses found.” instead of every course. - Order by — newest first (the default), “Date published”, “Last updated”, “Title”, “Price” (the current price, so a sale price counts; free courses are cheapest), “Most students”, “Best selling (most paid orders)”, “Custom order (menu order)” or “Random”, with a Direction (ascending or descending). Each order has its natural default direction: newest first for dates, A–Z for titles, cheapest first for prices, most first for students and sales.
- More choices — only free, paid or on-sale courses, one instructor's or one level's courses, categories or courses to leave out; and the look: a grid, a list or a compact list, the number of columns, the parts of each card (category, button and more), a heading with a “View all courses” link, and the filter and page links on or off.
These options combine with each other and with the category and search filters. Every option with its shortcode name is in Course catalogue options; ready-made lists for a homepage are in Recipes.
“Custom order (menu order)” sorts by the Order number in each course's “Page attributes” box in the editor (lower numbers first). Courses with the same number are sorted by title.
Lesson player
What this is for: the screen where students take their lessons, and what they see in it.
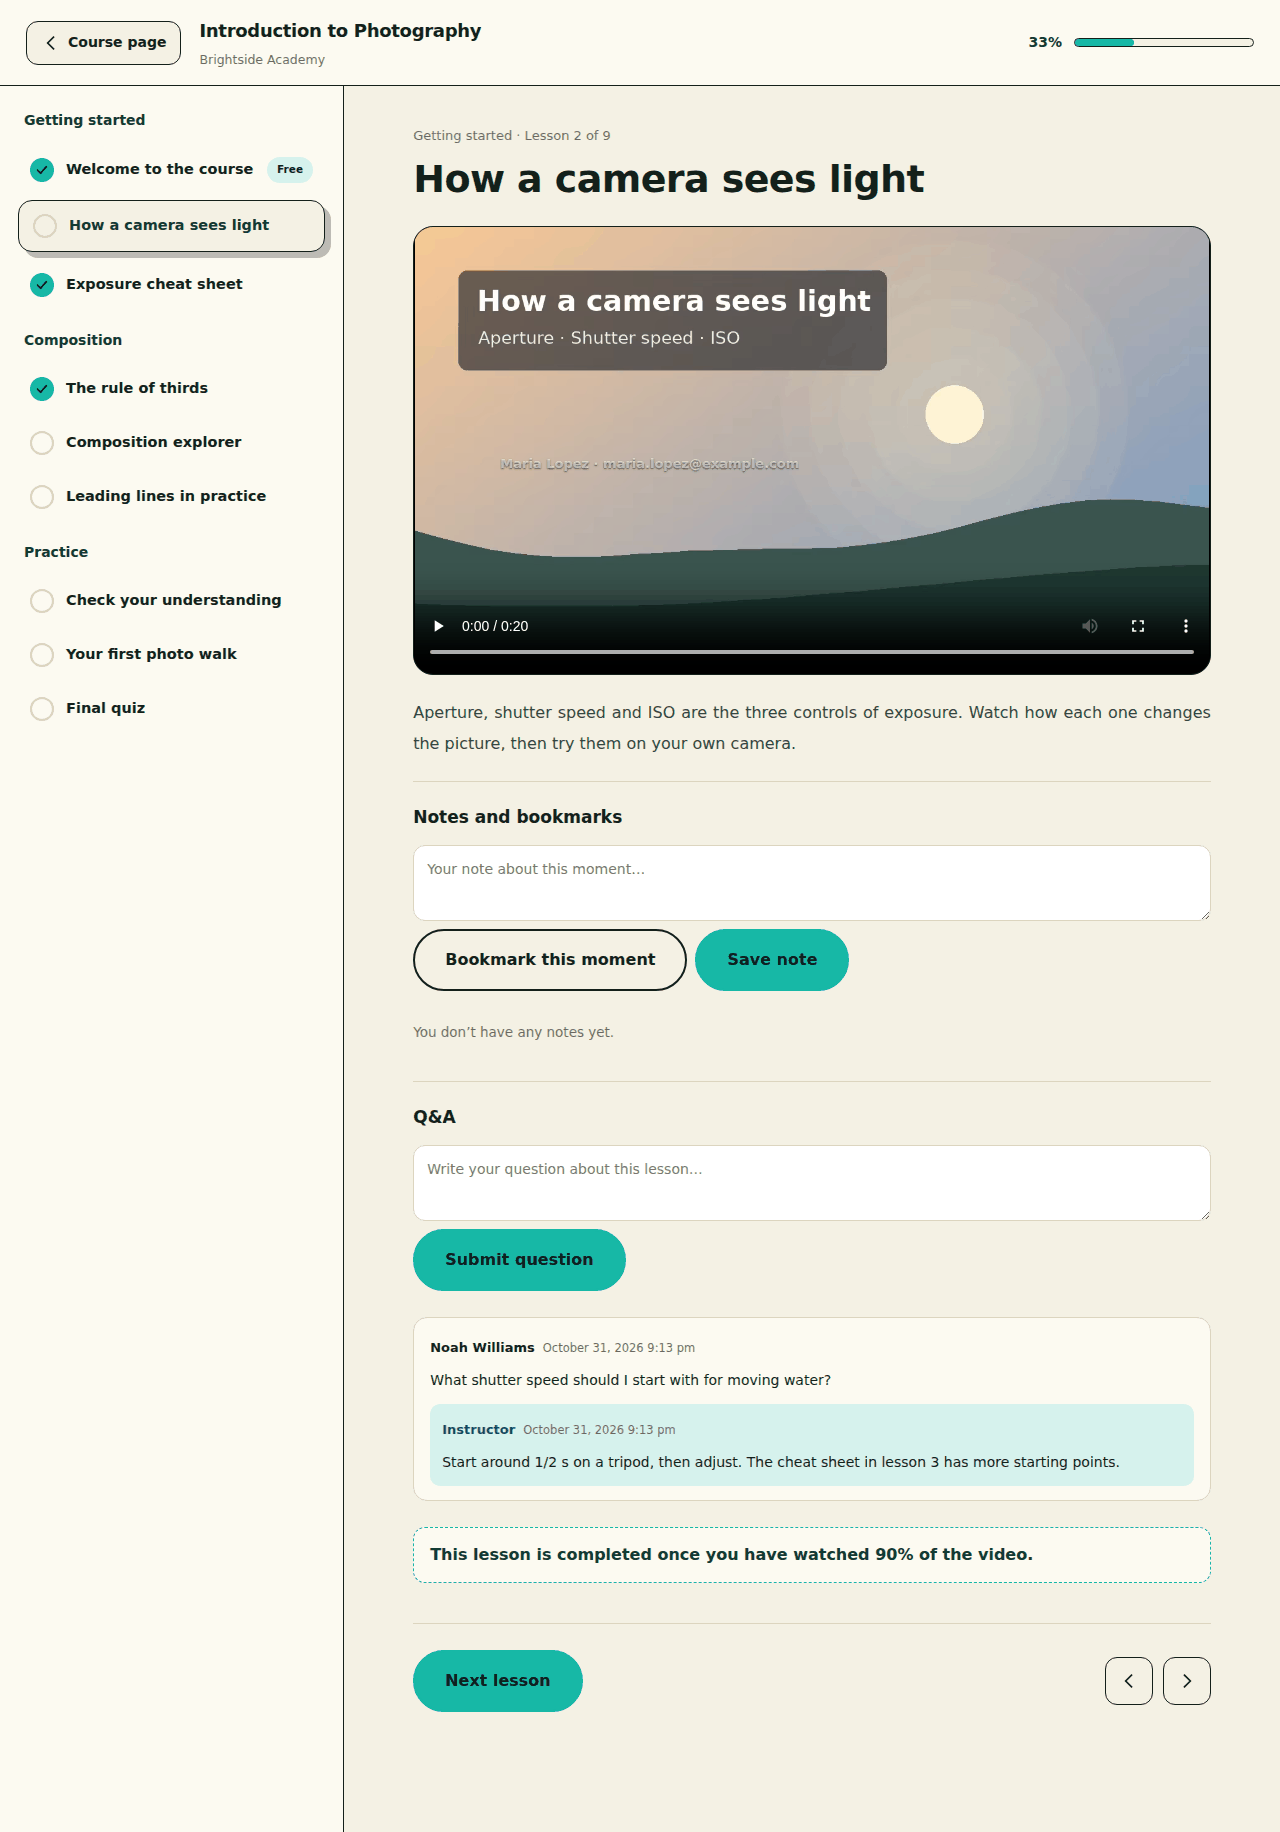
Students learn at /learn/<course id>/, or /learn/<course id>/<lesson id>/ for one lesson. The player is a full page of its own, so your theme's header and footer are not shown.
Who can open a lesson
- Every visitor must log in, also for free previews.
- Students with an active, unexpired enrolment open every lesson, subject to drip and prerequisites.
- Logged-in users without access can open free-preview lessons only. Other lessons send them to the course page.
- People who can edit the course (its instructor, course managers and editors) open every lesson in preview, for example with “Preview course” in the Course Builder. A “Preview” label replaces the progress bar and a note says “Preview: you are viewing this course as its editor. Your progress isn’t recorded, and quizzes and assignments can’t be submitted.” They are not enrolled or counted as students. Quizzes show their questions without a submit button.
- Administrators open every course with full access, like an enrolled student.
- A course in the Trash is closed to its students until it is restored.
Layout
- Top bar: “Course page” link, course title and the percentage complete.
- Sidebar: chapters and lessons. A check mark on completed lessons, “Free” on free previews, a lock icon when the student is not enrolled, a clock icon with “Scheduled” (release date) and a lock icon with “Prerequisite”. Hover a scheduled or prerequisite lesson to see why it is locked.
- Lesson: chapter name and “Lesson X of N”, the content, then the main button (or a line that says how the lesson completes) and previous and next arrows.
- Phones: the lesson list opens from a “Course content” button, and the main actions stay in a bar at the bottom.
Completion, progress and resume
Each lesson completes by its completion rule, and the rule is enforced on the server, not only in the page:
- Manual: “Mark as complete → Next lesson” records the lesson and moves on. On the last lesson the button reads “Mark as complete”; finished lessons show “Completed”.
- Watch the full video (an uploaded video, or a direct link to a video file): there is no button. The line “This lesson is completed once you have watched 90% of the video.” and a “Next lesson” button are shown instead. The player reports the parts of the video actually played, and the server checks the report against the time that has passed, so skipping to the end does not complete the lesson. When 90% has been watched, the lesson completes by itself and the line changes to “You have completed this lesson.”
- Videos embedded from YouTube, Vimeo or Aparat cannot report what was watched, so those lessons get the “Mark as complete” button whatever their rule.
- Download the file (File lessons with files): the line “This lesson is completed once you download one of its files.” The first download completes the lesson.
- Quiz lessons complete when the student passes (a self-test completes on any submission). Assignments complete on submission.
- Progress is the share of the course's lessons completed. Only lessons that are in the course now count: a completed lesson that was later removed from the course or unpublished no longer counts, so “X of Y lessons” never exceeds Y. A course is finished when every lesson is complete and every graded quiz has a passing attempt.
- Opening
/learn/<course id>/without a lesson resumes at the last lesson the student completed.
Certificate on the last lesson
When the course issues certificates, the last lesson shows one of three things: “Course certificate issued” with “Download certificate” and the verification code; a form asking for the student's full name; or what is still needed to earn it.
Drip and prerequisites
What this is for: releasing lessons on a schedule, or only after other lessons are completed.
Set these per lesson in the Course Builder lesson editor.
| Setting | Option | Effect |
|---|---|---|
| Lesson release schedule | “No restriction (available right away)” | Open as soon as the student is enrolled. |
| “On a specific date” + “Unlock date” | Opens at 00:00 site time on that date. Students see “This lesson unlocks on date.” | |
| “A number of days after enrollment” + “Days after enrollment” | Counted from the date the student was first enrolled (0–3650 days). | |
| Prerequisites (this lesson stays locked until they are completed) | Tick other lessons of the course | Students see “Complete these lessons first: …”. |
Locks apply in the player, to “Mark as complete”, to quiz submissions and to file downloads. Anyone who can edit the course bypasses them. Free-preview lessons are not locked for visitors who are not enrolled.
Quizzes
What this is for: how quizzes are scored, retaken, graded by hand and exported.
A quiz is a lesson of type Quiz, built in the quiz editor.
- Scored on the server. Correct answers are never sent to the browser.
- Students see “Total score”, “Passing score”, “Attempts: X of Y” and “Your best result”. A score at or above the passing score passes.
- Students may retake a quiz while they have attempts left, also after passing. The best attempt counts. When attempts run out: “You have used all the attempts allowed for this quiz.”
- There is no time limit, and questions are not shuffled.
Short-answer matching
A short answer is correct when it matches the “Correct answer” after both have been brought into the same form, so equivalent spellings count:
- letter case is ignored, and spaces at the ends are removed;
- any run of spaces, tabs, line breaks, non-breaking spaces or zero-width joiners and non-joiners counts as one space (so
میخواهمwritten with a zero-width non-joiner matchesمی خواهمwritten with a space); - Persian digits (۰–۹) and Arabic-Indic digits (٠–٩) count as 0–9, so
۱۲,١٢and12match; - the Arabic letters ي and ى count as the Persian ی, and the Arabic ك as the Persian ک; the tatweel (ـ) and Arabic short-vowel marks (harakat) are ignored;
- when the PHP intl extension is available, full-width and presentation forms count as the plain letters (for example
ABCmatchesabc).
Punctuation and spelling still count: colour does not match color.
For developers The edvera_quiz_normalize_answer filter changes the comparison, for example to ignore punctuation or accept several spellings (see Filters).
Practice self-tests
A quiz marked “Self-test” shows a “Self-test” tag. After each attempt the student sees, per question, “Your answer”, “Correct answer” and “Explanation”; “Try again” starts over. Self-tests complete the lesson on any submission and never count toward certificates or the “Average quiz score” condition.
Grading essays
A quiz with an essay question is saved as awaiting grading. The student sees “Your answer has been submitted; your final score will be available after the instructor grades it.” Grade it in the management panel under “Quiz grading”, or on any page with the Essay grading block or the [edvera_grading] shortcode (add course="ID" to show one course only). Instructors see the answers of their own courses; course managers, editors and administrators see every course. Points per answer are capped at the question's weight. A passing grade completes the lesson and checks the certificate.
Exporting results (CSV)
Courses → Reports → “Quizzes — answers and scores” lists every quiz with at least one submission. “Download CSV” exports User, Email, Date, Grade, Out of, Percentage, Status, then one column per question with the student's answer. Status is “Passed”, “Failed”, or “Awaiting grading” for an essay attempt the instructor has not graded yet. The file is UTF-8 with a byte-order mark, so spreadsheet programs read non-Latin text correctly.
Assignments
What this is for: letting students hand in work (a file or typed answers) and grading it.
An assignment lesson shows the task (the lesson text) and lets the student submit work. Choose the format in the lesson editor:
- File upload (no answer boxes): the student uploads one file. Allowed: pdf, doc, docx, ppt, pptx, xls, xlsx, txt, zip, rar, jpg, jpeg, png, gif, mp3, mp4 — within WordPress's own upload rules and size limit.
- Answer sheet: add “Answer box” items (label, hint, and size “Single line”, “Multiple lines” or “Long text”) and “Section heading” items. The student types the answers in the lesson; drafts are kept in their browser until they click “Submit answers”. “Let the student attach a file as well” adds an optional file field.
Submitting completes the lesson. Students can update their answers or replace their file at any time; a new submission clears the grade. Uploaded files are moved into protected storage and are available only to the student and to the people who may grade the course: its instructor, course managers, editors and administrators.
Grading
In the management panel (/manage/<course id>/) open the “Assignments” tab. Instructors grade the assignments of their own courses only. Each assignment lists the students who submitted, with “View answers” and the file link. Enter a “Grade” (free text, such as 18/20 or A) and optional feedback, then click “Save”. The student sees “Your grade” and the feedback in the lesson. Grades are feedback only: they do not affect completion or certificates. No emails are sent on submission or grading.
Q&A and video notes
What this is for: questions students ask under a lesson, and their private notes on videos.
Lesson Q&A
Every lesson except quizzes has a “Q&A” section for students with access. Students post questions (up to 2000 characters), and every student of the course can read them. The course's instructor, course managers, editors and administrators answer them; answers are labelled “Instructor”. Students cannot reply. Unanswered questions are listed in the management panel's “Questions” tab. No notification emails are sent.
Notes and bookmarks
Video lessons have a private “Notes and bookmarks” panel. Notes are visible only to the student who wrote them. With an uploaded video or a direct video link, “Bookmark this moment” saves the current time with the note, and a play button showing that time jumps back to it.
Secure video and lesson files
What this is for: uploading videos and files that only enrolled students can watch or download.
Uploading a protected video
- In the Course Builder, edit a Video lesson.
- Set “Video source” to “Uploaded video (protected)”.
- Under Attachments, click “Add file” and choose an MP4 (or M4V) or WebM file. The size limit is your server's upload limit (PHP
upload_max_filesizeandpost_max_size). - Click “Save”.
The video is stored in protected storage, never in the Media Library. It is streamed only to logged-in users with access to the lesson, respecting drip and prerequisites, and supports seeking. For students it is stream-only: the file is sent only as the stream the lesson player plays. Opening its address directly, or asking for it as a download, gets “403 Forbidden”. The course's editors can still download their own file. The player:
- has no download or picture-in-picture control and blocks the context menu;
- shows a moving watermark with the student's name and email address (developers can change or remove it with
edvera_video_watermark); - completes the lesson after 90% of the video has been watched, when the lesson uses “Watch the full video” (see Completion).
These measures discourage sharing; they are not DRM. A determined student can still record the screen or capture the stream with special tools.
Lesson attachments
Files attached to File lessons are listed under “Attachments” with their size and a download link. Video lessons list their other files there too, such as handouts or slides; the lesson's protected video itself is never listed. Every download goes through Edvera, which checks login, access, drip and prerequisites before sending the file. With the “Download the file” rule, the first download completes the lesson.
Certificates
What this is for: giving students a PDF certificate when they finish a course, with your logo, signature and an online check.
Edvera issues PDF certificates with a unique ID and a QR code that links to a public verification page.
Certificate settings
Courses → Settings → General, section “Certificates”:
| Field | Default | Notes |
|---|---|---|
| Issuer name | Site title | Printed at the top of the certificate. |
| Logo | — | Image from the Media Library. |
| Signature image | — | A transparent PNG works best. |
| Signer name | — | |
| Signer title | — | For example “Director of Studies”. |
| Accent colour | #1d6f8a | Used by the built-in design and by any design that uses {{accent}}. |
| Paper size | A4 landscape | Or “US Letter landscape”. The built-in design adapts to the paper size. |
| Default design | Built-in design | Used by courses that do not choose a design. |
| Certificate ID prefix | CERT | Up to 8 letters or digits. IDs look like ACME-7K2Q-9MXD. |
| Verification page address | verify-certificate | The page lives at /verify-certificate/ (with Plain permalinks at ?edvera_cert_verify=1; the help text shows the address certificates link to). An address already used by a page, another content type, a WordPress address or another Edvera screen is refused with a message, and the current address stays. |
Each course chooses whether it issues a certificate, the condition and its design in the Course Builder's certificate box.
Certificate designs
Courses → Certificate designs holds HTML designs. A first design, “Classic”, is created for you. Click “Add design” to make another:
- Write HTML for a landscape page in the paper size chosen in the settings (A4 is 297 × 210 mm, US Letter 279.4 × 215.9 mm), positioning elements absolutely in millimetres.
{{page_width}}and{{page_height}}give the size of the chosen paper, so one design can fit both. A new design starts with the built-in HTML. - As long as a design still holds the built-in HTML unchanged (like “Classic”), it follows the Paper size setting by itself. Once you change it, its measurements are yours.
- “Insert an image” adds an image from the Media Library.
- When the server has Imagick with Ghostscript, saving creates a preview image, shown in the list and in the Course Builder.
Designs are filtered like post content when saved: scripts and unsafe markup are removed. Placeholders are kept everywhere, inline styles included, so border-color:{{accent}} keeps working. Layout styles such as position, top, left, width, height, z-index, transform and font-family are allowed.
Placeholders
| Placeholder | Replaced with |
|---|---|
{{full_name}} | The student's name as saved on the certificate |
{{course_title}} | Course (or bundle) title |
{{issue_date}} | Issue date in the site date format (Persian calendar on Persian certificates) |
{{cert_code}} | Certificate ID |
{{verify_url}} | Verification address of this certificate |
{{qr}} | QR code image of the verification address (27 mm) |
{{site_name}} | Issuer name |
{{logo}} | Logo image (up to 20 × 80 mm) |
{{signature}} | Signature image (up to 16 × 55 mm) |
{{signer_name}}, {{signer_title}} | Signer settings |
{{accent}} | Accent colour (hex) |
{{dir}}, {{lang}} | Text direction (rtl or ltr) and language code |
{{page_width}}, {{page_height}} | Width and height of the chosen paper in landscape, for example 297mm and 210mm |
{{t_title}}, {{t_intro}}, {{t_completed}}, {{t_date}}, {{t_code}}, {{t_verify}} | Fixed wording in the certificate's language: “Certificate of Completion”, “This certifies that”, “has successfully completed the course”, “Date”, “Certificate ID”, “Verify online” |
When a certificate is issued
- Edvera checks the condition whenever a student completes a lesson for the first time, submits a quiz or has an essay graded.
- “Complete all lessons”: every lesson completed and every graded quiz passed.
- “Average quiz score”: the average of the best scores of all graded quizzes (quizzes not taken count as 0) reaches the minimum. Self-tests are ignored.
- The student needs a real name. Edvera uses the first and last name, or the display name if it is not an email address or phone number. Without one, the dashboard and the last lesson ask: “Your certificate is ready to be issued. Enter your full name exactly as it should appear on the certificate.”
- In the management panel, instructors can issue a certificate by hand to any enrolled student, regardless of the condition.
- No email is sent when a certificate is issued; students find it on their dashboard.
Accounts created by bulk enrolment or guest checkout may have no first and last name, and the display name may be the username. Ask students to complete their profile, or fill in their names under Users, before they finish a course.
Issued certificates and revoking
Courses → Certificates lists issued certificates, with search by ID, name or course. Columns: Certificate ID, Name, Course, Issued, Status. Actions: “Verify”, “PDF”, “Revoke”.
A revoked certificate no longer verifies, its PDF stops working and it disappears from the student's dashboard. If the student still meets the condition, Edvera issues a new certificate, with a new ID, the next time they complete a lesson or submit a quiz.
Refunding an order or revoking a student's access does not revoke a certificate already issued: the student did complete the course. Revoke it here if your policy says otherwise.
Verification page
Anyone can check a certificate at /verify-certificate/ (or the address you set). The QR code links straight to /verify-certificate/<ID>/; with Plain permalinks to ?edvera_cert_verify=1&edvera_cert_code=<ID>. A valid certificate shows the name, course, issue date and ID with “Download the certificate (PDF)”. An unknown or revoked ID shows “No valid certificate found”. Each visitor can look up 30 certificates per minute. The [edvera_cert_verify] shortcode places the lookup form on any page.
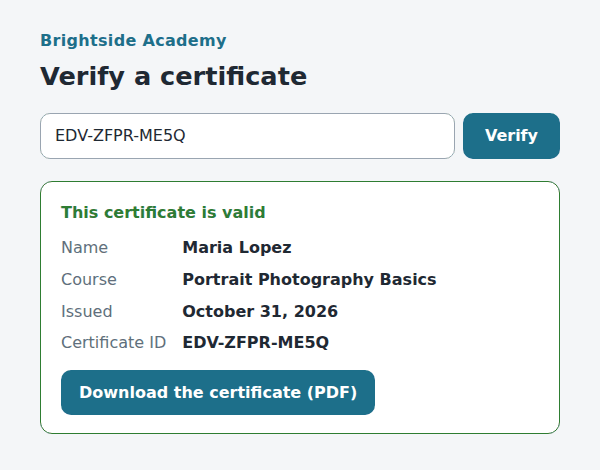
PDF and languages
PDFs are created on request with the bundled mPDF library. The certificate's language is the site language at the moment it was issued, and the PDF is worded in that language (fixed wording, date and digits, when a translation for it is installed), whoever opens it. Persian, Arabic, Hebrew, Urdu, Pashto, Kurdish and Yiddish certificates are right-to-left. Dates follow the site's date format (Settings → General) with month names in the certificate's language; only Persian certificates use the Persian calendar and Persian digits, while Arabic certificates keep Western digits. Anyone with the certificate ID can open its PDF.
Fonts are bundled (the one for Chinese, Japanese and Korean in an optional add-on), so names print correctly in the scripts WordPress sites commonly use:
| Font | Used for |
|---|---|
| DejaVu Sans | Latin, Cyrillic and Greek (the default) |
| Vazirmatn | Persian, Arabic and other Arabic-script languages |
| FreeSerif | Devanagari and the other Indic scripts |
| Garuda | Thai |
| Taamey David CLM | Hebrew |
| WenQuanYi Zen Hei | Chinese, Japanese and Korean — only with the optional CJK certificate fonts add-on. Without it, these names use the PDF viewer's own Asian fonts instead of being embedded. |
The fonts' licences are listed on the credits page.
For developers Developers can add fonts with the edvera_cert_font_dirs, edvera_cert_fontdata and edvera_cert_font_map filters. The CJK certificate fonts add-on uses the first two: it adds its fonts/ folder and registers WenQuanYi Zen Hei as the font family wqyzenhei, which Edvera then uses for Chinese, Japanese and Korean text.
If the library is missing from your installation, Courses → Certificates shows: “The PDF library is missing from this installation, so certificates can be verified but not downloaded as PDF. Reinstall the plugin from the original package.” Without the mbstring PHP extension it shows: “The mbstring PHP extension is missing on this server, so certificates can be verified but not downloaded as PDF. Ask your host to enable it; Tools → Site Health lists what is missing.” What visitors see when a PDF cannot be created: When a certificate PDF cannot be created.
Student dashboard
What this is for: the page where students find their courses, progress, files, certificates and orders.
The dashboard page (“My courses”, created on activation) holds the [edvera_dashboard] shortcode; the Student dashboard block works too. Select the page in “Student dashboard page” under Courses → Settings → General; emails and receipts link to it. Logged-out visitors see “Log in to see your dashboard.”
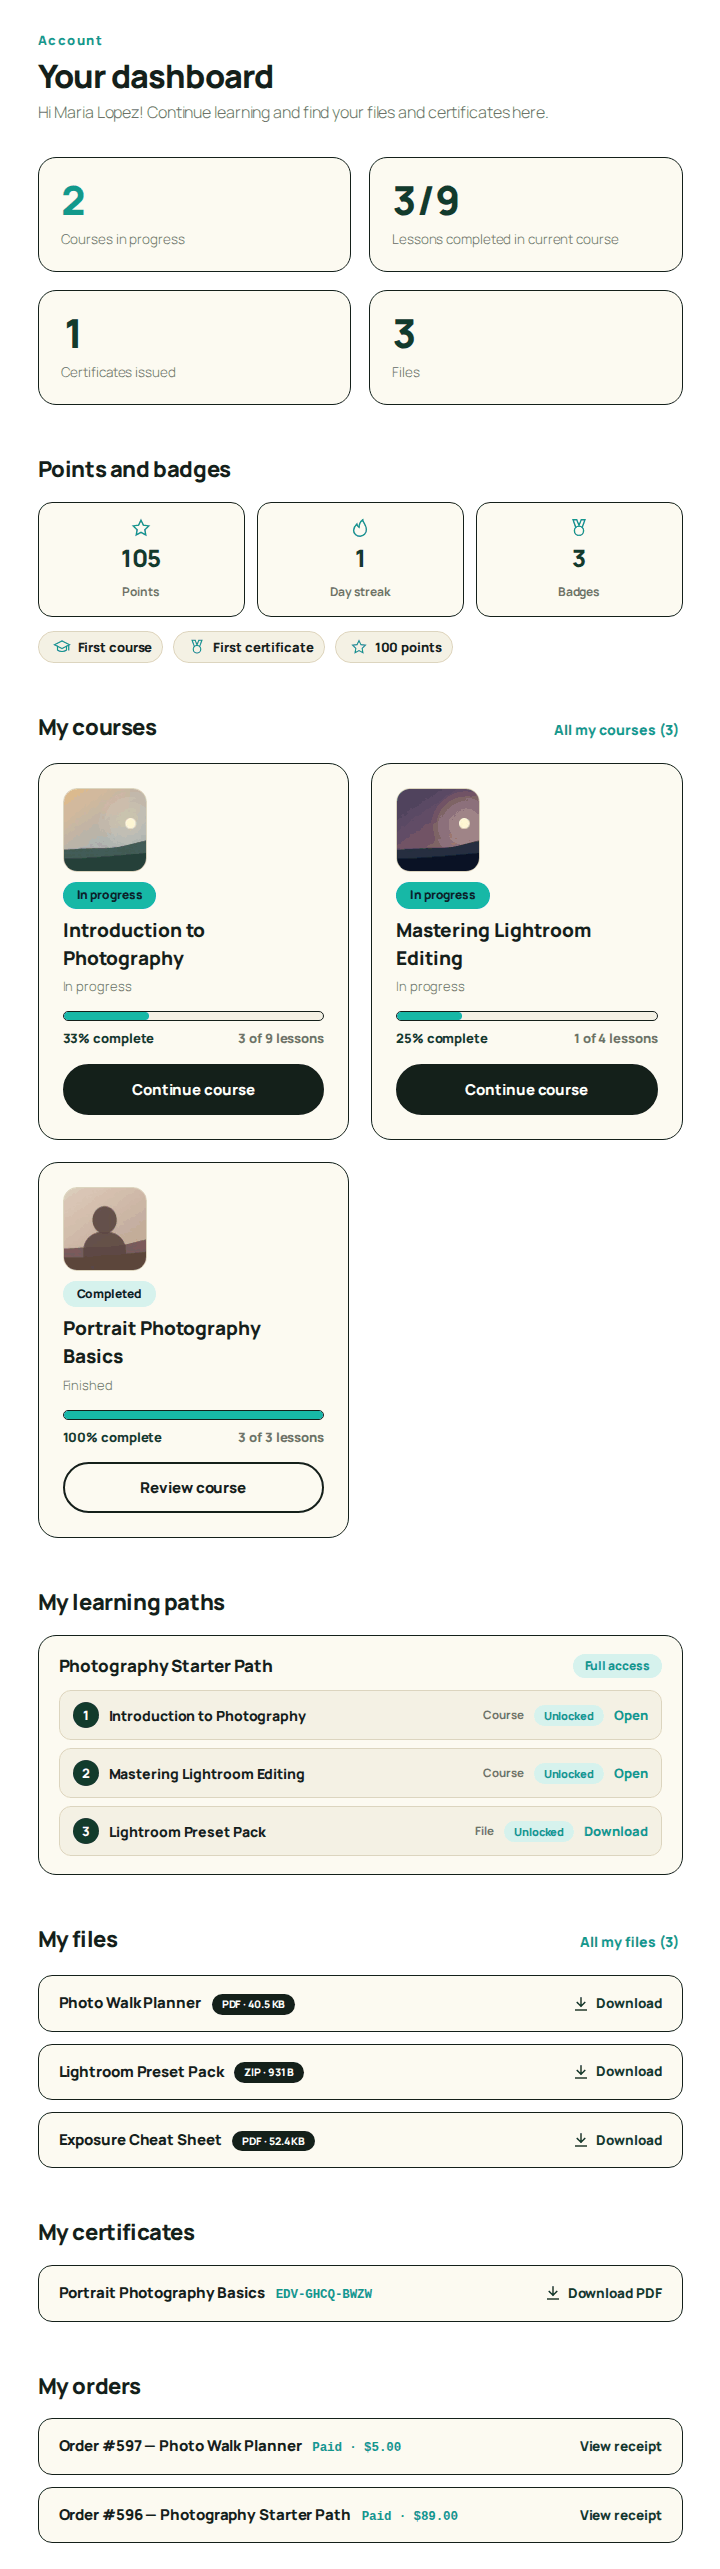
Sections, in order (empty sections are hidden or show a short hint):
- “Your dashboard” greeting with the links Account details and Log out, and counters: courses in progress, lessons completed in the current course, certificates issued, files.
- “Points and badges”.
- “My classes (cohorts)” — for cohort members.
- “My courses” — each course with its progress and “Start course”, “Continue course” or “Review course”.
- “My learning paths” — bundles and the state of each item.
- “My files” — downloads the student owns, with “Download”.
- “My certificates” — with “Download PDF”, or a form to enter the name for a certificate that is waiting to be issued.
- “My orders” — the last 20 orders, without cancelled ones, with “View receipt”.
Account details
Account details opens on the dashboard page itself (?edvera-view=account). There students change their own:
- first and last name (the name other students see follows it, unless the account already shows a different name);
- email address — only after entering their current password;
- billing address: company, street, apartment, city, state or province, postcode, country and phone. When any field is filled in, street, city and country are required. Each new order keeps a copy of the address, and its receipt and the order screen in Courses → Orders show it, so changing the address later does not change old receipts;
- password — with the current password, at least 8 characters, typed twice. The student stays signed in; their other sessions end.
The page also has Log out. Logged-out visitors see “Log in to see your account details.”
For developers edvera_account_url() returns the address of the screen (filter edvera_account_url). The edvera_address_fields filter changes the address fields, and edvera_account_locked_fields shows parts of an account read-only (name, email, password, address; the public demo locks name, email and password of its shared accounts). The address is stored in the user meta edvera_address; edvera_account_saved fires after a save.
For developers Developers can hide, add or reorder the courses, files, certificates and orders listed here with the edvera_dashboard_courses, edvera_dashboard_files, edvera_dashboard_certificates and edvera_dashboard_orders filters; the counters follow them (see Filters).
Managing students
What this is for: enrolling students one by one or in bulk, following their progress and grading their work.
Instructors and course managers manage students in a front-end panel at /manage/ (a course picker) and /manage/<course id>/ (one course). Open it from the Course Builder (“Students” in the top bar, “Students and management” on a course) or from Courses → Students in wp-admin.
The panel needs no page. At its own address it opens as a full page of its own, with a top bar that links to “All courses”, “Course Builder” and “Back to site”. To show it inside your theme instead, publish a page with the slug manage that contains the Course management panel block or the [edvera_manage] shortcode; that page then hosts the panel at the same addresses.
For developers The edvera_manage_slug filter moves the panel to another address.
Who can use it: course managers, editors and administrators manage every course; instructors manage the courses they can edit (their own). Visitors who are not logged in are sent to the login page and back.
The picker lists the courses you may manage and a “Course comparison” table. A course screen has these tabs:
| Tab | What you can do |
|---|---|
| Students and enrollment | Enrol a user (“Name, email or username”, then “Enroll manually”); see each student's progress, enrolment date and certificate; issue a certificate by hand; “Revoke” access. Select students and click “Issue certificates in bulk”. |
| Quiz grading | Grade essay answers. |
| Assignments | Grade submissions, see Assignments. |
| Questions | Unanswered lesson questions. |
| Cohort | Scheduled groups, see Cohorts. |
| Analytics | Students, average progress, fully completed, and a lesson-by-lesson completion funnel that flags the biggest drop-off. |
| Bulk enrollment | Enrol a list of people at once, see below. |
Instructors must type an exact email address or username to enrol someone. Course managers and administrators also get name suggestions as they type.
Bulk enrolment
- Paste email addresses (one per line, or separated by commas, semicolons or tabs), or click “Upload CSV”. Every email address found in the file is used.
- Course managers and administrators can also tick bundles and downloads under “Also add to other items (optional):”.
- Click “Start bulk enrollment”. Edvera works in batches of 25 and then reports the result, for example “Done: 18 students enrolled · 3 new accounts · 1 invalid row”.
- Course managers and administrators: addresses without an account get a new account with your site's default role, and WordPress sends them its standard “set your password” email.
- Instructors enrol people who already have an account, in their own courses. Addresses without an account are not enrolled: the result counts them (“… addresses have no account (not enrolled)”) and lists them, so you can pass them to a site manager.
How access works
- A student can get access to the same course in several ways: purchase, bundle, manual, bulk, cohort, free enrolment or WooCommerce. Edvera records each one. A refund removes only the access its own order gave; the student keeps the course if another grant remains.
- “Revoke” in the panel removes all access to the course.
- Expired enrolments lose access automatically. Enrolling the student again starts a new access period; drip by days still counts from their first enrolment.
- You can also enrol users from the “Course students” box in the course editor, which shows how each student got access.
Cohorts
What this is for: running a course for a named group, such as a class that starts in the autumn, with a session schedule.
A cohort is a named group run of a course, for example “Fall 2026”, with a class schedule. Manage cohorts in /manage/<course id>/ → “Cohort”:
- Type a name in “New cohort name (e.g. Fall 2026)” and click “Create cohort”.
- Set “Start” and “End” dates, and add sessions under “Sessions (class schedule)” with “Add session”: a title, a date and time, and a note.
- Add members by email or username. Adding a member also enrols them in the course.
- Click “Save”.
Members see their sessions under “My classes (cohorts)” on the dashboard. Start and end dates are informational; they do not change access or drip. Removing a member from a cohort does not unenrol them.
Reminders
What this is for: automatic emails that nudge students who have stopped working on a course.
Edvera can email students who have not finished a course. Once a day it checks every published course and sends:
- Inactivity: “It’s been a few days since you visited the course …” — after a set number of days without opening the player or completing a lesson.
- Quiz waiting: “The quiz for the course … is still waiting for you.” — when the student has started the course but has not yet passed its graded quiz. Self-tests do not count.
The subject is “Course reminder — site name”. A student gets at most one reminder per course per day, and no more often than the minimum gap you set. Students who have finished the course get none.
Reminders are off by default. Administrators set them up under Courses → Settings → Emails, section “Course reminders”:
| Field | Default |
|---|---|
| Send course reminders | Off |
| “You haven’t visited in a while” reminder | On |
| “Your quiz is waiting” reminder | On |
| After how many days of inactivity | 3 days (1 to 30) |
| Minimum gap between two reminders | 5 days (1 to 30) |
Reminders are sent by email only.
For developers To send them through another channel, such as SMS, a developer hooks into the edvera_send_reminder action (or the generic edvera_notify), which fires for every reminder.
Points, badges and leaderboard
What this is for: points and badges that reward progress, and a leaderboard to show them.
| Event | Points |
|---|---|
| A lesson completed for the first time | 5 |
| A course completed | 50 |
| A certificate issued | 20 |
Points are paid once per lesson, course and certificate: completing a lesson again after its progress was reset, or a certificate issued again after a revoke, earns nothing new.
Badges: “First course”, “Three courses completed”, “First certificate”, “7-day streak”, “100 points” and “500 points”. The day streak counts consecutive days with a completed lesson. Points, streak and badges appear on the student dashboard. The point values are fixed, and the feature has no on/off setting.
The Leaderboard block and the [edvera_leaderboard] shortcode show the students with the most points: 10 by default, or 3 to 50 with the block's “Number of students” setting or [edvera_leaderboard limit="20"]. Students without points are not listed. The top three get a medal icon in gold, silver and bronze next to their rank. Students without a real name (a first and last name, or a display name that is not an email address or phone number) are shown as “Student”.
Reports
What this is for: figures per course (enrolments, completions, quiz passes, certificates) and quiz answers as a spreadsheet.
Courses → Reports (administrators, editors and course managers):
- Course table for published courses: “Active enrollments”, “Completed”, “Quiz passes” and “Certificates issued”. “Active enrollments” counts students with current access only; “Completed”, like the analytics below, also counts students whose access period has ended.
- Quizzes — answers and scores: a CSV export per quiz, see Exporting results.
Per-course analytics (completion funnel and drop-off) are in the management panel's “Analytics” tab.
Roles and capabilities
What this is for: who can do what: giving teachers and assistants access without making them administrators.
| Role | Can | Cannot |
|---|---|---|
| Administrator | Everything, including settings, orders, coupons and Get started. | — |
| Editor | Build, publish and manage all courses; students, grading, reports, certificates, bundles and downloads. | Orders, coupons, settings. |
Course manager (edvera_manager) | Build, publish and manage all courses; enrol (including bulk enrolment with new accounts, bundles and downloads), grade and issue certificates; reports, certificate designs, bundles and downloads. | Orders, coupons, settings (reminders included). |
Instructor (edvera_instructor) | Build and publish their own courses in the Course Builder; manage, enrol (also in bulk, for people who already have an account), grade and issue certificates for their own courses at /manage/<id>/; answer their students' questions; upload files. | Other instructors' courses and their students' work, creating accounts, reports, certificate designs, orders, settings. |
Assign roles in Users: edit the user and choose the role.
Once an administrator has turned on the AI & MCP server, everyone who builds courses can connect an AI assistant to their own account under Courses → AI & MCP. The assistant gets the same limits as the role: an instructor's assistant works only with that instructor's courses and students, and only administrators can give an assistant the Commerce permission.
For developers Edvera's own capabilities:
| Capability | Meaning | Also granted by |
|---|---|---|
edvera_build | Build and edit courses (Course Builder) | edit_edvera_courses |
edvera_publish | Publish courses. A role that has it is allowed publish_edvera_courses as well. | publish_edvera_courses |
edvera_manage | Manage users and enrollments of every course | edit_others_edvera_courses |
edvera_grade | Open the grading screens. Which courses a user may grade (quizzes, assignments, questions, students' files) is decided per course: the courses they can edit, or every course with edvera_manage. Developers can widen this with the edvera_can_grade_course filter, for example for teaching assistants. | edit_edvera_courses |
edvera_manage_orders | Manage orders and payments (Orders, Coupons) | manage_options |
For developers Courses, bundles and downloads also use the post-type capabilities edit_edvera_courses, edit_others_edvera_courses, publish_edvera_courses, delete_edvera_courses and their published, private and others variants. Developers can add roles with edvera_add_role(). Settings, including reminder settings, need manage_options (administrators).
Selling: checkout and orders
What this is for: how buying works: currency, the checkout page, the emails buyers get and the Orders screen where you confirm payments and refunds.
Edvera has its own checkout, so you can sell courses, bundles and downloads without WooCommerce. Buyers pay on the payment provider's own page; card details never reach your site.
Currency
Courses → Settings → Payments:
| Field | Default | Notes |
|---|---|---|
| Currency | USD | About 50 currencies. Zero-decimal currencies (JPY, KRW, VND, CLP, IRR, IRT) and three-decimal ones (KWD, BHD, OMR) are handled. |
| Currency position | Left ($99) | Or “Right (99$)”, “Left with space ($ 99)” or “Right with space (99 $)”. |
| Thousand separator | Comma (1,234) | A list: “Comma (1,234)”, “Period (1.234)”, “Space (1 234)”, “Apostrophe (1'234)”, “Arabic thousands separator (1٬234)” or “None (1234)”. A space never lets a price break across two lines. |
| Decimal separator | Period (9.99) | A list: “Period (9.99)”, “Comma (9,99)” or “Arabic decimal separator (9٫99)”. Used when the currency has decimals, and when you type prices. |
Choose the currency before you set prices. Prices are stored as numbers and are not converted when you switch currency, so check them afterwards. Existing orders keep their own currency.
Not every payment method supports every currency:
- Stripe: every currency except IRR and IRT.
- PayPal: AUD, BRL, CAD, CNY, CZK, DKK, EUR, HKD, HUF, ILS, JPY, MYR, MXN, TWD, NZD, NOK, PHP, PLN, GBP, SGD, SEK, CHF, THB and USD.
- Zarinpal: IRR and IRT only.
- Bank transfer: any currency.
A method that does not support the store currency is not offered at checkout. The Payments tab warns you at the top when a method is switched on but cannot be offered, because it cannot charge the store currency or its credentials are missing.
Checkout
The checkout page holds the checkout block (created on activation) or the [edvera_checkout] shortcode. Select it in “Checkout page” under Courses → Settings → General.
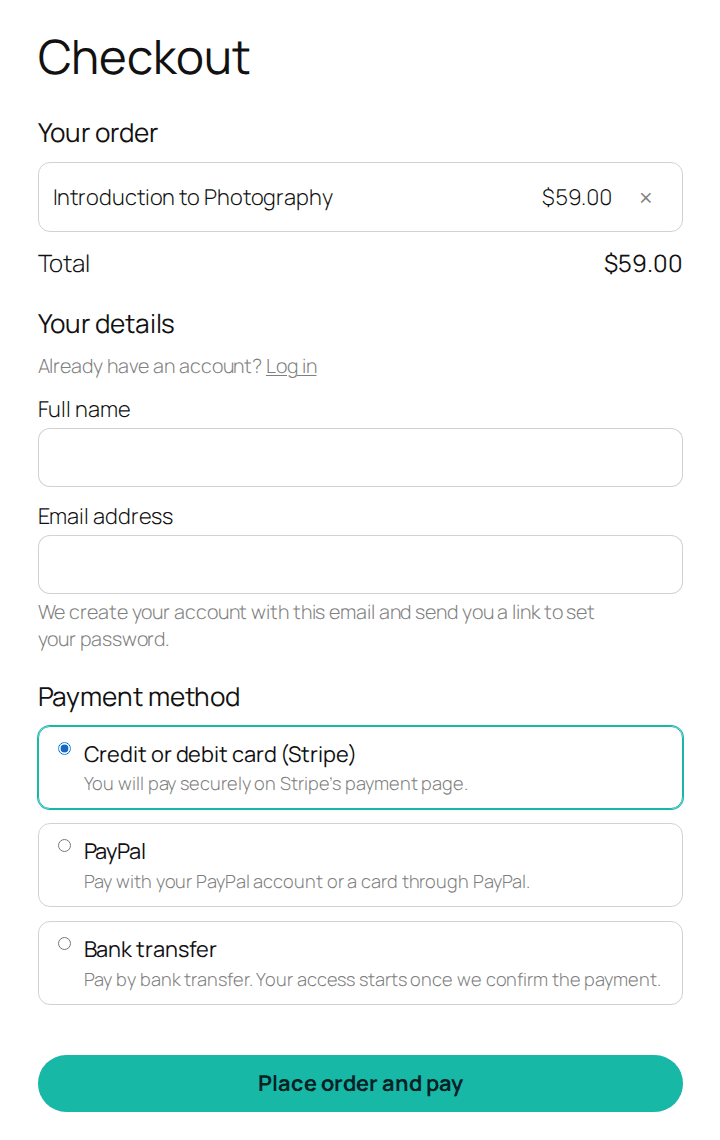
The cart
“Buy now” adds the item to a cart and opens the checkout. The cart holds up to 20 items for 30 days; the close icon next to an item removes it. Items that can no longer be bought (for example closed, or already owned) are removed with a message.
The form
- “Your order” and “Total”.
- “Coupon code” and “Apply” — shown only while at least one coupon can be used: published, with a valid amount, not expired and not used up.
- “Your details” — logged-in buyers see “Signed in as …”. Guests enter “Full name” and “Email address”, or follow “Already have an account? Log in”.
- “Payment method” — the available methods, when the total is above zero.
- “I have read and accept the …” — only when a “Terms and conditions page” is selected in Settings.
- “Place order and pay”, or “Complete order” when the total is 0 (free items or a 100% coupon; the payment methods are then hidden).
Guest checkout and accounts
- Guests do not need an account. When their order is paid, Edvera creates one with that email address and your site's default role, and WordPress sends its standard “set your password” email.
- A guest who has just paid is logged in on the receipt page, so they can start straight away. After a free order they are not logged in; they sign in with the password link.
- If the email address already belongs to an account, the buyer is asked to log in first: “An account with this email already exists. Please log in first, then complete your order.”
Free items
Logged-in users enrol in a free course with one click on “Enroll for free” and go straight to the player. Guests go through the checkout (name and email), which creates their account; the receipt page tells them “We emailed you a link to set your password. Use it to sign in and start learning.” Orders whose total is zero after a coupon complete without a payment method: as soon as a coupon brings the total to 0, the “Payment method” part disappears and the button reads “Complete order”. Clearing the coupon field and clicking “Apply” again brings them back. Free orders are listed with the payment method “Free order”.
After payment
The buyer returns to the receipt on the checkout page:
- Paid: “Thank you! Your payment was received and your access is ready.”, with “Start learning” for each course and a link to the dashboard.
- Not yet confirmed by the provider: the page checks again every few seconds for about two minutes.
- Bank transfer: “Your order is placed. Access starts once we confirm your payment.”, your payment instructions and the payment deadline, for example “Please pay within 14 days. Unpaid orders are cancelled after that.”
- Cancelled at the provider: back to the checkout with “The payment was cancelled. You can try again.”
Access is granted only after the payment is confirmed on the server. Unpaid and failed orders are cancelled automatically after two days. Bank-transfer orders awaiting confirmation are cancelled after the number of days set in “Cancel unpaid orders after (days)” (default 14; 0 = never), see Bank transfer.
If a paid order cannot create the buyer's account (rare; for example when another plugin blocks registration), the buyer sees “Your payment was received, but we could not set up your account automatically. We have been notified and will contact you shortly.” and the site admin gets an “Action needed” email with a link to the order. Create or find the account and give access by hand.
Abuse protection
The checkout has a hidden spam trap and rate limits: 30 attempts per 10 minutes for a logged-in user, 12 per 10 minutes per guest IP address, and 5 per hour per guest email address.
For developers The edvera_checkout_rate_limit filter changes these limits.
Emails
Edvera sends plain-text emails through WordPress (wp_mail). Set the sender in Courses → Settings → Emails: “From” name (default: site title) and “From” address (default: admin email).
| To | When | |
|---|---|---|
| Your receipt | Buyer | An order with a total above zero is paid. A free order (a free item, or a coupon that covers the total) gets it only when the order created the buyer's account, so a new student has the links. Lists items and total, and links to the dashboard and the receipt. |
| New paid order | Site admin email | A paid order with a total above zero. Turn off with “Email the site admin about new paid orders”. |
| How to pay for order | Buyer | A bank-transfer order is placed. Contains your payment instructions and the payment deadline. Always sent. |
| New order awaiting payment | Site admin email | A bank-transfer order is placed. Turn off with “Email the site admin about new bank-transfer orders awaiting payment”. |
| Action needed | Site admin email | A paid order could not create the buyer's account, so the buyer has no access yet. Always sent. |
| Course reminder | Student | Only when reminders are turned on, see Reminders. |
| WordPress “set your password” | New account | Accounts created by checkout or bulk enrolment. |
The site admin email is the address in Settings → General → Administration Email Address. No emails are sent for refunds, cancellations, failed payments, enrolments or certificates.
Language of the emails. Each email is written in its reader's language, whoever triggers it:
- Emails to the buyer (the receipt and the bank-transfer payment instructions) use the language chosen in the buyer's user profile, otherwise the site language. Guests without an account get the site language.
- Emails to the site admin (new paid order, new order awaiting payment, action needed) use the site language (Settings → General → Site Language) — not the language of the admin who clicked “Mark paid”.
- Course reminders use the student's profile language, otherwise the site language, whatever request runs the daily task.
When a profile language is no longer installed on the site, the site language is used.
For developers The edvera_email filter changes or stops any Edvera email, and edvera_send_order_receipt decides who gets a receipt.
Orders screen
Courses → Orders (administrators) lists orders, 30 per page, newest first, with the columns Order, Date, Status, Buyer, Items, Total and Payment method (free orders show “Free order”). Orders placed while their payment method was in test or sandbox mode show Test mode under their status. Filter by status, and search by email, order number or transaction ID. Hover an order number for View and, for orders that may be deleted, Delete; see Deleting orders.
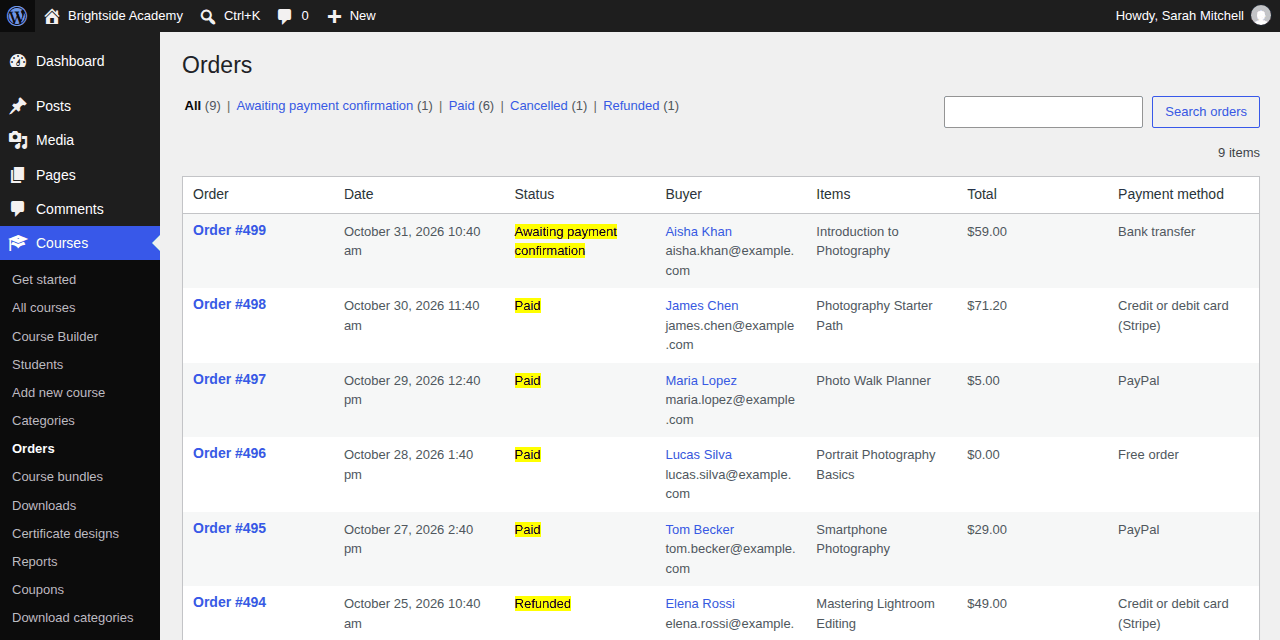
| Status | Meaning |
|---|---|
| Pending payment | Created; the buyer is paying or left. |
| Awaiting payment confirmation | Bank transfer placed; you confirm it. |
| Paid | Access granted. |
| Failed | The provider reported a failure. |
| Cancelled | Cancelled by the buyer or by you, or automatically: after two days unpaid, or, for bank transfers, after the days set for that method. |
| Refunded | The access this order gave was withdrawn. |
Click an order to see the buyer, dates, payment method (followed by “— Test mode” for a test order), transaction ID, coupon, items and history, and the available actions:
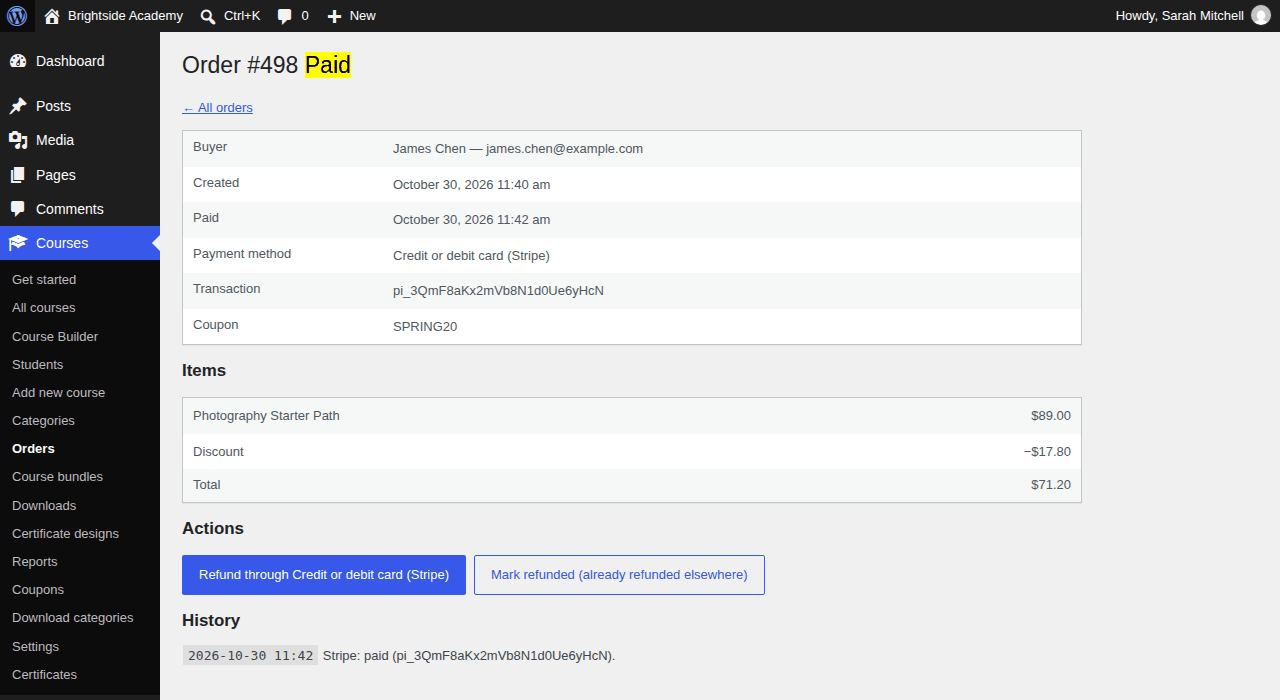
| Action | Shown for | Effect |
|---|---|---|
| Mark paid and grant access | Pending, awaiting confirmation, failed | Marks the order paid and grants access at once. Use it for bank transfers. |
| Cancel order | Pending, awaiting confirmation, failed | Cancels the unpaid order. |
| Refund through method | Paid Stripe and PayPal orders | Refunds the full amount through the provider and removes the access this order gave. |
| Mark refunded (already refunded elsewhere) | Paid orders | Removes the access this order gave. No money is sent. |
| Delete order | Pending, awaiting confirmation, failed and cancelled orders, and every test-mode order (not a live pending order in its first hour) | Deletes the order permanently, after a confirmation. See Deleting orders. For an order that cannot be deleted, the reason is shown below the actions. |
Edvera refunds whole orders only. A partial refund made in the Stripe or PayPal dashboard leaves access unchanged; decide yourself whether to mark the order refunded. A cancelled order cannot be marked paid any more; if a buyer pays after their order was cancelled, give access by hand (or ask them to order again).
The order history is written in your site's language, for example “Marked paid by admin.”, “Stripe: paid (pi_…).” or “Cancelled automatically: not paid within 14 days.”
Deleting orders
Orders that never took real money can be deleted; real payments stay on record for your accounts, refunds and disputes.
| Can be deleted | Cannot be deleted |
|---|---|
|
|
Three ways to delete:
- One order from the list: hover the order number and click Delete.
- Several at once: tick the orders (only orders that may be deleted have a checkbox), choose Delete under Bulk actions and click Apply.
- On the order screen: the Delete order button.
Each way asks first, for example “Delete this order permanently? This cannot be undone.”; for an order awaiting a bank transfer it adds that you lose the record of a payment the buyer may already have sent. Afterwards the list reports “n orders deleted.” and, when some of the selected orders had to stay, why. A deleted order is gone with its items and history.
Deleting a paid test order works like a refund first: it takes back exactly what this order gave — its course access, its bundles and its downloads — while access the buyer also has through another order, a bundle or an admin stays. Its coupon use is forgotten, so it no longer counts towards the coupon's limits. It does not delete the student's learning progress, the account created for a guest buyer (delete it under Users if you want) or certificates already issued (revoke them under Courses → Certificates).
If the order changes while it is being deleted, for example because a payment confirmation arrives at that moment, the order is kept and Edvera says “The order changed while it was being deleted. Open it again and check its status.”
Payment methods
What this is for: connecting the ways buyers pay (Stripe, PayPal, bank transfer or Zarinpal), step by step.
Which one? Bank transfer needs no account and is the easiest to test; Stripe takes cards, Apple Pay and Google Pay; PayPal takes PayPal accounts and cards; Zarinpal is for Iranian stores. You can turn on several; buyers choose at checkout.
Configure payment methods in Courses → Settings → Payments. Every method has “Enable” and “Title at checkout”. A method appears at checkout when it is enabled, its credentials are filled in, and it supports the store currency. When a method is switched on but one of these is missing, a warning at the top of the tab says so, for example “Zarinpal (Iranian bank cards) is switched on but cannot charge in USD, so buyers do not see it at checkout. Choose a currency it supports or use another payment method.”
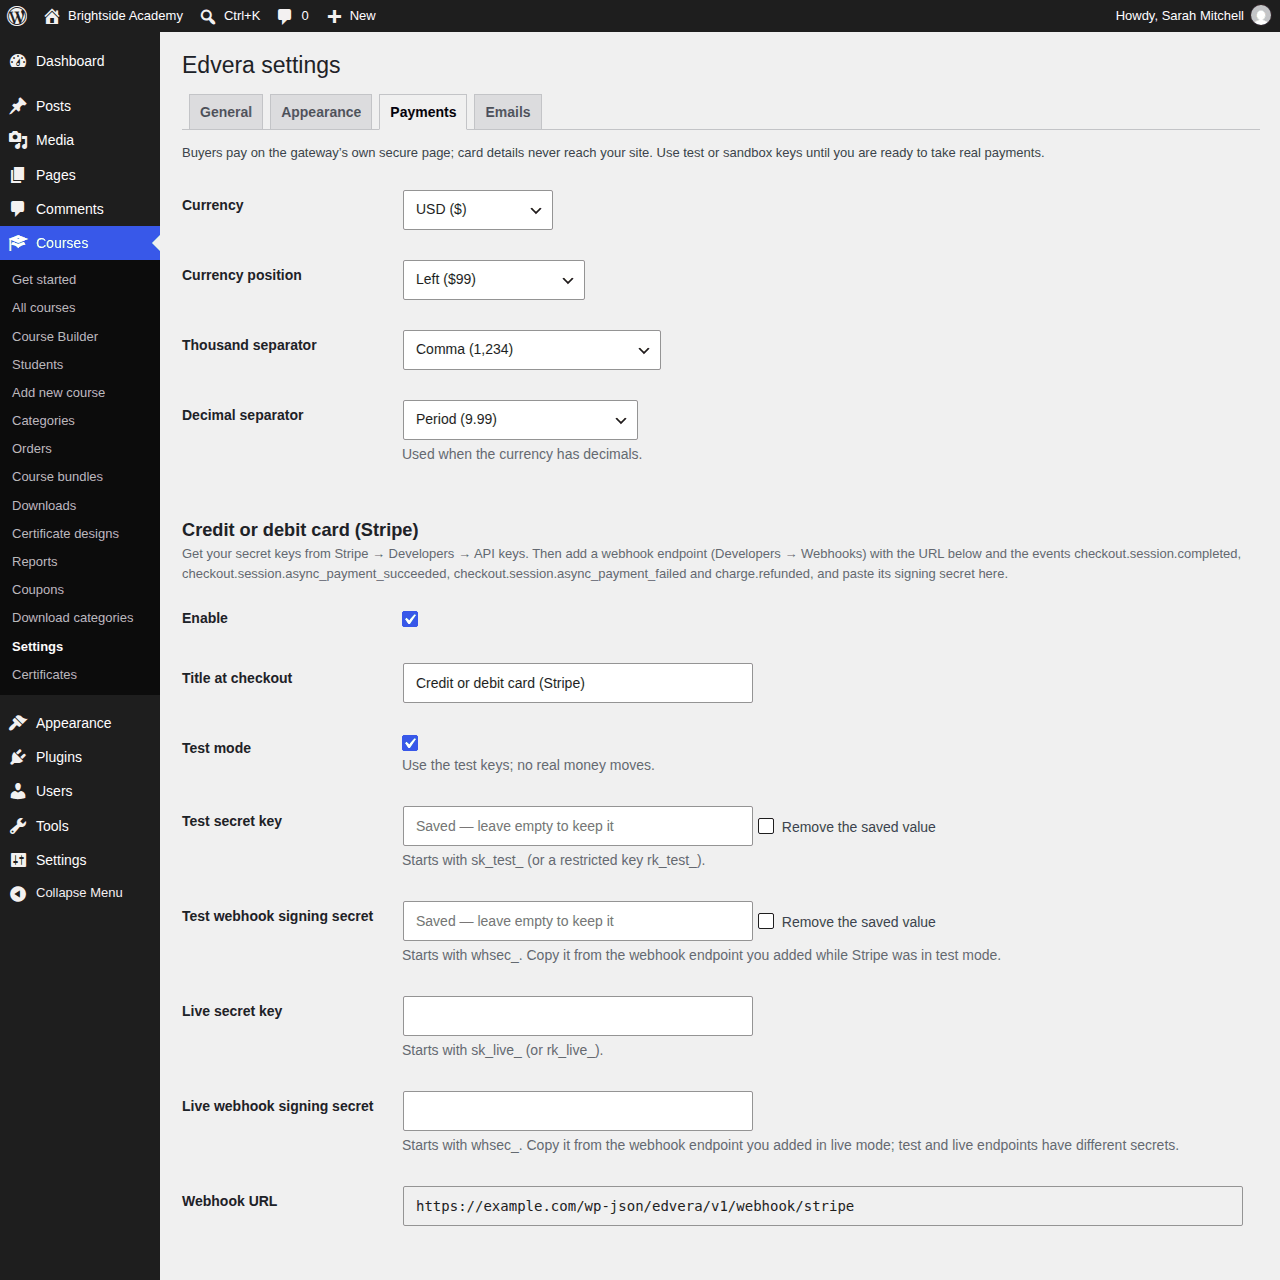
Saved secret keys are never shown again; the field says “Saved — leave empty to keep it”. Tick “Remove the saved value” to clear one.
Checking your keys
Edvera checks Stripe and PayPal credentials in two ways, so that a key pasted into the wrong field shows up in the settings and not at checkout.
1. When you save. Every key you type is checked for the right form. A value that cannot be what the field asks for is not saved: the message at the top of the screen reads “Field was not saved: …”, says what is wrong and which key to paste instead, and the value saved before stays in place.
- Stripe: Test secret key must start with
sk_test_(orrk_test_for a restricted key), Live secret key withsk_live_(orrk_live_), and the webhook signing secrets withwhsec_, without spaces. A publishable key (pk_test_…orpk_live_…) is refused in every field, because Edvera needs the secret key. A key from the other mode is refused too: a live key in Test secret key, a test key in Live secret key. So is a signing secret in a secret key field, and a secret key in a signing secret field. - PayPal: Client ID and Secret must each be a long code of letters, digits,
-and_without spaces. A Stripe key pasted there is refused, and so is a Secret that is the same as the Client ID. The Webhook ID is not checked.
A key field left empty keeps the saved key.
2. Test connection. The Stripe and PayPal sections have a Connection row with a Test connection button. It asks the provider whether the credentials work; nothing is charged, changed or saved.
- Stripe: a read-only request for your account balance (
GET /v1/balance) with the secret key of the mode ticked in the form: the test key while Test mode is ticked, the live key while it is not. The answer is, for example, “Connected to Stripe in test mode: the test secret key works.” A restricted key that may not read the balance gets “Connected to Stripe: this restricted key works but may not read the balance. Make sure it may create Checkout Sessions and refunds.” - PayPal: a request for an access token (OAuth) with the Client ID and Secret, to PayPal's sandbox or live system according to Sandbox mode in the form. The answer is, for example, “Connected to PayPal in sandbox mode: the client ID and secret work.” The token is not kept.
The test uses the values in the form as they are, also keys you have typed but not saved yet and an unsaved change of Test mode or Sandbox mode; an empty key field uses the saved key. When the provider refuses, its own error is shown, for example “Stripe refused the key (HTTP 401): …” or “PayPal refused the credentials (HTTP 401): …. Check that they belong to the mode ticked above (sandbox or live).” When your server cannot reach the provider at all, for example because the host blocks outgoing connections, the result is “Could not reach Stripe: …” (or PayPal) with the reason; ask your host to allow outgoing HTTPS connections from your site (see Requirements).
Only administrators can run the test. Saved secrets are never sent to your browser or shown; keys you type go from the form to your site and on to the provider, once, and the test neither stores nor logs them. Bank transfer and Zarinpal have no test button.
Stripe
Buyers pay on Stripe Checkout, Stripe's own payment page: cards, Apple Pay, Google Pay and the local methods you enable in Stripe. Card details never reach your site. Edvera needs only your secret key and the webhook's signing secret; the publishable key is not used.
You need: a Stripe account and about ten minutes. Start in test mode: test payments use test cards and no real money moves.
| Field in Edvera | Where you find it in Stripe | What it looks like |
|---|---|---|
| Test secret key | In test mode: Developers → API keys, Secret key | Starts with sk_test_, followed by a long run of letters and digits. A restricted key starts with rk_test_. |
| Test webhook signing secret | In test mode: Developers → Webhooks, your endpoint, Signing secret | Starts with whsec_. |
| Live secret key | In live mode: Developers → API keys, Secret key | Starts with sk_live_ (restricted: rk_live_). |
| Live webhook signing secret | In live mode: your live endpoint, Signing secret | Starts with whsec_; different from the test one. |
| Not used | The Publishable key | Starts with pk_test_ or pk_live_. Do not paste it into Edvera. |
In the Stripe Dashboard, switch to test mode, open Developers → API keys, reveal the Secret key and copy it (
sk_test_…). A restricted key (rk_test_…) also works if it may create and read Checkout Sessions and create Refunds.In WordPress, open Courses → Settings → Payments, section Credit or debit card (Stripe). Tick Enable, keep Test mode ticked, paste the key into Test secret key and click Save Changes. Then click Test connection: it should say “Connected to Stripe in test mode: the test secret key works.” A key with the wrong form (a publishable key, a live key) is not saved, and the message says which key to paste; see Checking your keys.
Copy the Webhook URL shown at the bottom of the Stripe section. It looks like
https://example.com/wp-json/edvera/v1/webhook/stripe(with Plain permalinkshttps://example.com/?rest_route=/edvera/v1/webhook/stripe). Always copy it from the field rather than typing it.In Stripe, still in test mode, open Developers → Webhooks and add an endpoint with that URL and exactly these four events:
checkout.session.completedcheckout.session.async_payment_succeededcheckout.session.async_payment_failedcharge.refunded
Open the new endpoint, reveal its Signing secret (
whsec_…), paste it into Test webhook signing secret in Edvera and click Save Changes.Test: buy a course with Stripe's test card
4242 4242 4242 4242, any future expiry date and any CVC. In Courses → Orders the order should be Paid. If it stays “Pending payment”, see this troubleshooting entry.Go live: switch Stripe to live mode and repeat steps 1, 4 and 5 there: copy the live secret key into Live secret key, add a live endpoint with the same URL and events, and paste its signing secret into Live webhook signing secret. Then untick Test mode, click Test connection (“Connected to Stripe in live mode: the live secret key works.”) and click Save Changes.
Edvera refuses keys of the wrong form when you save them, and Test connection confirms the secret key with Stripe (see Checking your keys). The webhook signing secret cannot be tested that way: a wrong one shows in Stripe's webhook log as 400 bad_signature. If a secret key stops working later (for example because it was rolled in Stripe), buyers see “The card payment could not be started. Please try again or choose another payment method.” and the order's history says “Stripe: the payment page could not be created (…)” with Stripe's reason. Run the test purchase in step 6 after every change.
How it works: Edvera confirms the payment with Stripe when the buyer returns, so card payments complete even before the webhook arrives. The webhook covers buyers who close the browser before returning, delayed payment methods, and full refunds made in the Stripe dashboard. Each mode uses its own signing secret; events from the other mode are ignored.
PayPal
Buyers approve the payment on PayPal, with their PayPal account or a card, and Edvera then collects (captures) it.
You need: a PayPal business account, access to the PayPal Developer dashboard (developer.paypal.com, same login) and about ten minutes. Start in sandbox mode: sandbox payments use test accounts and no real money moves.
| Field in Edvera | Where you find it in PayPal | What it looks like |
|---|---|---|
| Client ID | Developer dashboard: Apps & Credentials, Sandbox (or Live), your app | A long string of letters and digits. |
| Secret | The same app's page | Another long string of letters and digits. Keep it private. |
| Webhook ID (optional, recommended) | The same app's webhook list, beside the webhook you added | A code of letters and digits. |
In the PayPal Developer dashboard, open Apps & Credentials, choose Sandbox, create an app (or open an existing one) and copy its Client ID and Secret.
In WordPress, open Courses → Settings → Payments, section PayPal. Tick Enable, keep Sandbox mode ticked, paste Client ID and Secret and click Save Changes. Client ID and Secret must come from the same app and the same mode. Then click Test connection: it should say “Connected to PayPal in sandbox mode: the client ID and secret work.”
Recommended: in the PayPal app, add a webhook with the Webhook URL shown in Edvera (
…/wp-json/edvera/v1/webhook/paypal) and these three events:CHECKOUT.ORDER.APPROVEDPAYMENT.CAPTURE.COMPLETEDPAYMENT.CAPTURE.REFUNDED
Copy the webhook's ID into Webhook ID (optional) and save. The first two events confirm a payment even when the buyer closes the page before returning to your site; the third makes full refunds made in PayPal remove access too. Without a webhook ID Edvera rejects PayPal's webhook calls, but payments still complete when the buyer returns.
Test: buy a course and pay with a PayPal sandbox buyer account (the Developer dashboard lists your sandbox test accounts). The order should become Paid.
Go live: switch the Developer dashboard to Live, create a live app, paste its Client ID and Secret, add the same webhook to the live app and paste its ID, then untick Sandbox mode, click Test connection and click Save Changes.
Edvera refuses values of the wrong form when you save them, and Test connection asks PayPal whether the Client ID and Secret work in the mode ticked (see Checking your keys). For credentials that are wrong, or come from the other mode, the test shows PayPal's refusal (“PayPal refused the credentials (HTTP …): …”); at checkout, buyers who choose PayPal would see “PayPal rejected the credentials.” Run the test purchase in step 4 after every change.
PayPal charges HUF, JPY and TWD in whole amounts only; a HUF or TWD total with decimals cannot be paid with PayPal. Webhook calls are verified with PayPal; without a webhook ID they are rejected.
Bank transfer
The buyer sees your bank details after checkout and pays you directly; you confirm the payment by hand, and access starts at that moment. No payment account or keys are needed, which also makes bank transfer the easiest way to test a sale.
In Courses → Settings → Payments, section Bank transfer, tick Enable.
Fill in Payment instructions: your account details, the reference buyers should use (for example the order number) and how they tell you they have paid. They are shown after checkout and in the order email.
Set Cancel unpaid orders after (days): default 14; 0 = never. Click Save Changes.
A buyer places an order. It waits in Courses → Orders as “Awaiting payment confirmation”. The buyer sees the deadline on the receipt and in the instructions email, for example “Please pay within 14 days. Unpaid orders are cancelled after that.”
When the money arrives, open the order and click Mark paid and grant access. A guest buyer's account is created at this moment.
Orders still unpaid after the set number of days are cancelled by the daily task, with the note “Cancelled automatically: not paid within n days.” With 0 they wait until you cancel them yourself. The site admin is emailed about each new bank-transfer order unless you turn off “Email the site admin about new bank-transfer orders awaiting payment” (Courses → Settings → Emails).
Zarinpal
For Iranian stores. Set the currency to IRR or IRT, tick “Enable”, paste your 36-character “Merchant ID” and save. “Sandbox mode” is on by default: payments go to Zarinpal's sandbox and no real money moves. Untick it to take real payments. Prices in toman (IRT) are sent to Zarinpal in rials. Zarinpal has no webhook and no refunds through Edvera: refund the buyer in Zarinpal, then use “Mark refunded”.
Zarinpal is offered only when the site language is Persian (Settings → General → Site Language), or once it is already enabled, so a site that changes its language keeps its Zarinpal orders working. On other sites it does not appear in the Payments settings or at checkout.
For developers The edvera_zarinpal_offered filter decides whether Zarinpal is offered, in the settings and at checkout. It receives the decision (true or false) and the site locale.
Coupons
What this is for: discount codes that buyers type at checkout.
Courses → Coupons (administrators). The title is the code: type one, for example SUMMER20, or click “Generate a code”. Buyers can type it in any letter case. Publish the coupon to activate it; switch it to Draft to deactivate it. The checkout shows the coupon field only while at least one published coupon can be used (valid amount, not expired, not used up).
| Field | Notes |
|---|---|
| Discount type | “Percentage discount” or “Fixed amount discount”. |
| Amount | Percentage from 1 to 100, or an amount in the store currency. The discount never exceeds the price of the items it applies to. |
| Expiry date | Works until the end of that day in the site time zone. Empty = no expiry. |
| Usage limit | Paid orders that may use the coupon in total. Empty or 0 = unlimited. |
| Limit per customer | Uses per account or email address. Empty or 0 = unlimited. |
| Minimum order | Cart subtotal before the discount. Empty = no minimum. |
| Applies to | Tick courses, bundles and downloads to restrict the coupon to them. The discount then applies only to those items, and the coupon is refused when none of them is in the cart. Leave everything unticked for all items. |
A use is recorded when an order is paid. Refunded uses are flagged but still count toward the limits. The Usage box shows the latest uses. A coupon with an invalid field or a code already in use is saved as inactive, with a message explaining what to fix.
Buyers see clear messages, for example “This coupon has expired.”, “This coupon has reached its usage limit.”, “This coupon needs a minimum order of …” and “This coupon doesn’t apply to the items in your cart.”
Bundles
What this is for: selling several courses and downloads together as one item, often for less.
A bundle sells several courses and downloads as one item. Manage bundles under Courses → Course bundles. Bundle pages live at /bundle/<slug>/ (change the base with “Bundle URL base” in Courses → Settings → General).
Creating a bundle
Bundles open in the classic editor. Write a title and description, then fill in the Bundle contents and price box:
- Courses and downloads — choose items with “— Choose a course or download —” and “Add to bundle”, and order them with the arrows (up to 100 items). Unpublished items are flagged: students do not get them until they are published.
- How items unlock — “Everything at once”, or “One after another”: each item unlocks when the one before it is done (a course at 100% progress, a download as soon as the student has it).
- Pricing — Price and Sale price, as for courses. A summary compares the bundle price with buying the items separately.
- “Issue a certificate for the whole bundle when a student has finished every item” — the certificate appears under “My certificates”.
The Bundle status box offers “On sale”, “Sales closed” and “Archived”, with the same meaning as for downloads. The Bundle owners box lists owners and lets you grant a bundle by hand (“Give this bundle to a student (email or username)”) or revoke it.
How bundle access works
- Courses and downloads added to a bundle later reach past buyers automatically.
- Removing an item from a bundle does not take it away from students who already have it.
- A refund or revoke removes only what the bundle gave; courses the student got another way stay.
- In the Trash, a bundle disappears from its owners' dashboards and its locked items stop unlocking; what it already unlocked stays. Deleting a bundle permanently keeps orders and the access it already gave.
The bundle page shows the items, the saving and the buy button; owners also see their progress. Students find their bundles under “My learning paths” on the dashboard.
Downloads
What this is for: selling or giving away files on their own, such as e-books, templates or worksheets.
Downloads are files you sell or give away on their own: e-books, templates, worksheets. Manage them under Courses → Downloads and Courses → Download categories.
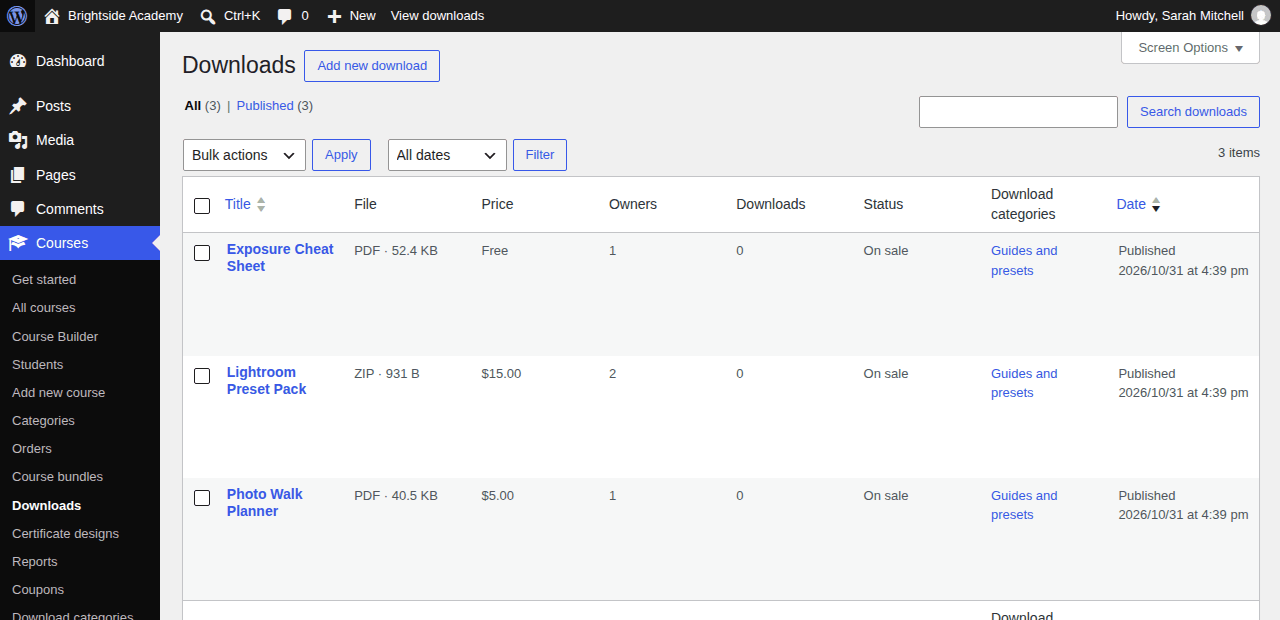
Creating a download
- Open Courses → Downloads → Add new download. Write a title and a description; add an excerpt and a featured image for the catalogue.
- In the File to download box, click “Upload a file”. The file goes straight into protected storage.
- In the Download settings box, set the status and the price (“Empty or 0 = free”).
- Optionally assign download categories, then publish.
Allowed types: documents (pdf, doc, docx, xls, xlsx, ppt, pptx, odt, ods, odp, rtf, epub, txt, csv), archives (zip, rar, 7z, gz, tar), audio (mp3, m4a, wav, ogg, flac, aac), video (mp4, m4v, mov, webm, avi, mkv) and images (jpg, jpeg, png, gif, webp). Scripts, HTML and SVG are always refused, and the file's content must match its extension. The size limit is your server's upload limit.
“Replace the file” swaps the file, and owners get the new one. A download without a file cannot be bought.
How buyers get the file
- Paid: the buy button adds it to the cart. After payment the receipt links straight to the file, and it appears under “My files” on the dashboard.
- Free: logged-in visitors click “Get it free” and the download starts. Guests go through the checkout, which creates their account.
- Each download link is personal and signed: it works only for the account it was made for and expires after one day. An expired link shows a fresh “Download the file” link.
- Editors see “Download the file (editor access)” on the download's page.
The download page shows “File type”, “Size” and the right action for the visitor. The catalogue is at /downloads/, single downloads at /download/<slug>/ (change the base with “Download URL base” in Courses → Settings → General; an address already in use by a page, another content type or another screen is refused), and categories at /download-category/<slug>/.
Download lifecycle
The status works like a course's, with row and bulk actions in the list:
- On sale — the default.
- Sales closed — still visible, but nobody new can buy it or take it for free.
- Archived — hidden from everyone except its owners, who keep their access.
- Trash — owners cannot download it until you restore it. Edvera warns you first when it has owners.
- Deleted permanently — the stored file and the access records are deleted. Orders are kept.
The list shows File, Price, Owners, Downloads and Status. Each download is counted once, however many pieces a download manager requests.
WooCommerce (optional)
What this is for: selling Edvera courses through WooCommerce instead of Edvera's own checkout. Only needed if you already use WooCommerce.
Use this only if you want WooCommerce's payment methods.
- Install and activate WooCommerce.
- In Courses → Settings → Payments, tick “Sell through WooCommerce”. The WooCommerce section appears only while WooCommerce is active.
- Create a simple WooCommerce product (or a variation) for each item you sell.
- In the course's Course settings box, or the bundle or download settings, choose that product in “WooCommerce product”. “— Sell with Edvera checkout —” keeps Edvera's own checkout for that item.
- The buy button then adds the product to the WooCommerce cart. WooCommerce charges the product's price, so keep the two prices the same.
- Access is granted when the WooCommerce order is paid or set to Completed. For offline methods such as bank transfer, cheque or cash on delivery, set the order to Completed after payment.
- Guest customers get an account with their billing email.
- Setting the WooCommerce order to Refunded or Cancelled removes the access it gave. Partial refunds change nothing.
- A free Edvera course with a linked product still shows “Enroll for free” and enrols logged-in users directly.
Use Edvera in your own site
What this is for: showing your courses anywhere on your site — the homepage, landing pages, sidebars, an instructor's page — in any block or classic theme, and in page builders that accept shortcodes.
Every piece in this section exists twice, with the same options: as a block for WordPress's block editor (search for “Edvera” in the block inserter) and as a shortcode, a short text in square brackets such as [edvera_courses limit="6"] that you paste where the piece should appear. You do not have to write shortcodes yourself: Courses → Shortcodes has ready-made recipes to copy and a shortcode builder that writes the shortcode while you pick options, with a live preview.
The pieces use the accent colour, corner style and font of Courses → Settings → Appearance and keep your theme's text colour.
Adding a shortcode or block
- In the block editor (pages, posts, and templates under Appearance → Editor)
-
- Click the + button at the top left, which opens the block inserter, or the + that appears in an empty line.
- Type
Edverain the search field and click the block you want, for example Course catalogue or Course card. - Set its options in the settings sidebar on the right (if it is closed, click the Settings button at the top right). The editor shows a live preview of what visitors will see.
To use a shortcode instead, for example one copied from a recipe, add a Shortcode block (search for “shortcode” in the inserter) and paste the shortcode into it.
- In the classic editor
- Click where the piece should appear and paste the shortcode, on the Visual or the Text tab. It shows as text in the editor and becomes the piece on the published page.
- In sidebars and footers
- Under Appearance → Widgets, add the Edvera block or a Shortcode block to a widget area (on the classic widgets screen, paste the shortcode into a Text widget). With a block theme, edit the template part (for example the footer) under Appearance → Editor instead.
- In a page builder
- Most page builders have a widget or module for shortcodes. In Elementor, search the widget panel for Shortcode, drag the Shortcode widget onto the page and paste the shortcode into it. In other builders, look for a Shortcode element, or a text element that accepts shortcodes. If the builder's editor does not show the result, check the published page.
The Shortcodes screen
Courses → Shortcodes is open to everyone who builds courses. You also reach it with Show courses on your site below the Get started checklist, and with Shortcodes in the top bar of the Course Builder (for administrators, editors and course managers). The links at the top jump to its three parts:
- Recipes — ready-made shortcodes for common places (see Recipes), filled in with a real course, category and instructor of your site when there are any. Each recipe has Copy, which copies the shortcode, the name of the matching block, and Open in the builder, which loads the recipe into the shortcode builder so you can change it (not offered for the recipe made of two shortcodes).
- Shortcode builder — choose a piece in Shortcode and set its options: lists of your courses, categories, pages and instructors appear where they fit. Your shortcode shows the finished text (only the options you changed) with a Copy button, and names the block with the same options. The Preview below shows the result as your site renders it, with Edvera's styles; Preview width switches between Wide and Phone (390 px), and Refresh preview renders it again. The preview shows what you see while logged in: My courses lists your own courses, for example. It renders Edvera's own shortcodes only.
- All shortcodes — every Edvera shortcode with what it does, its block, and a table of its attributes: allowed values, default and what each one does.
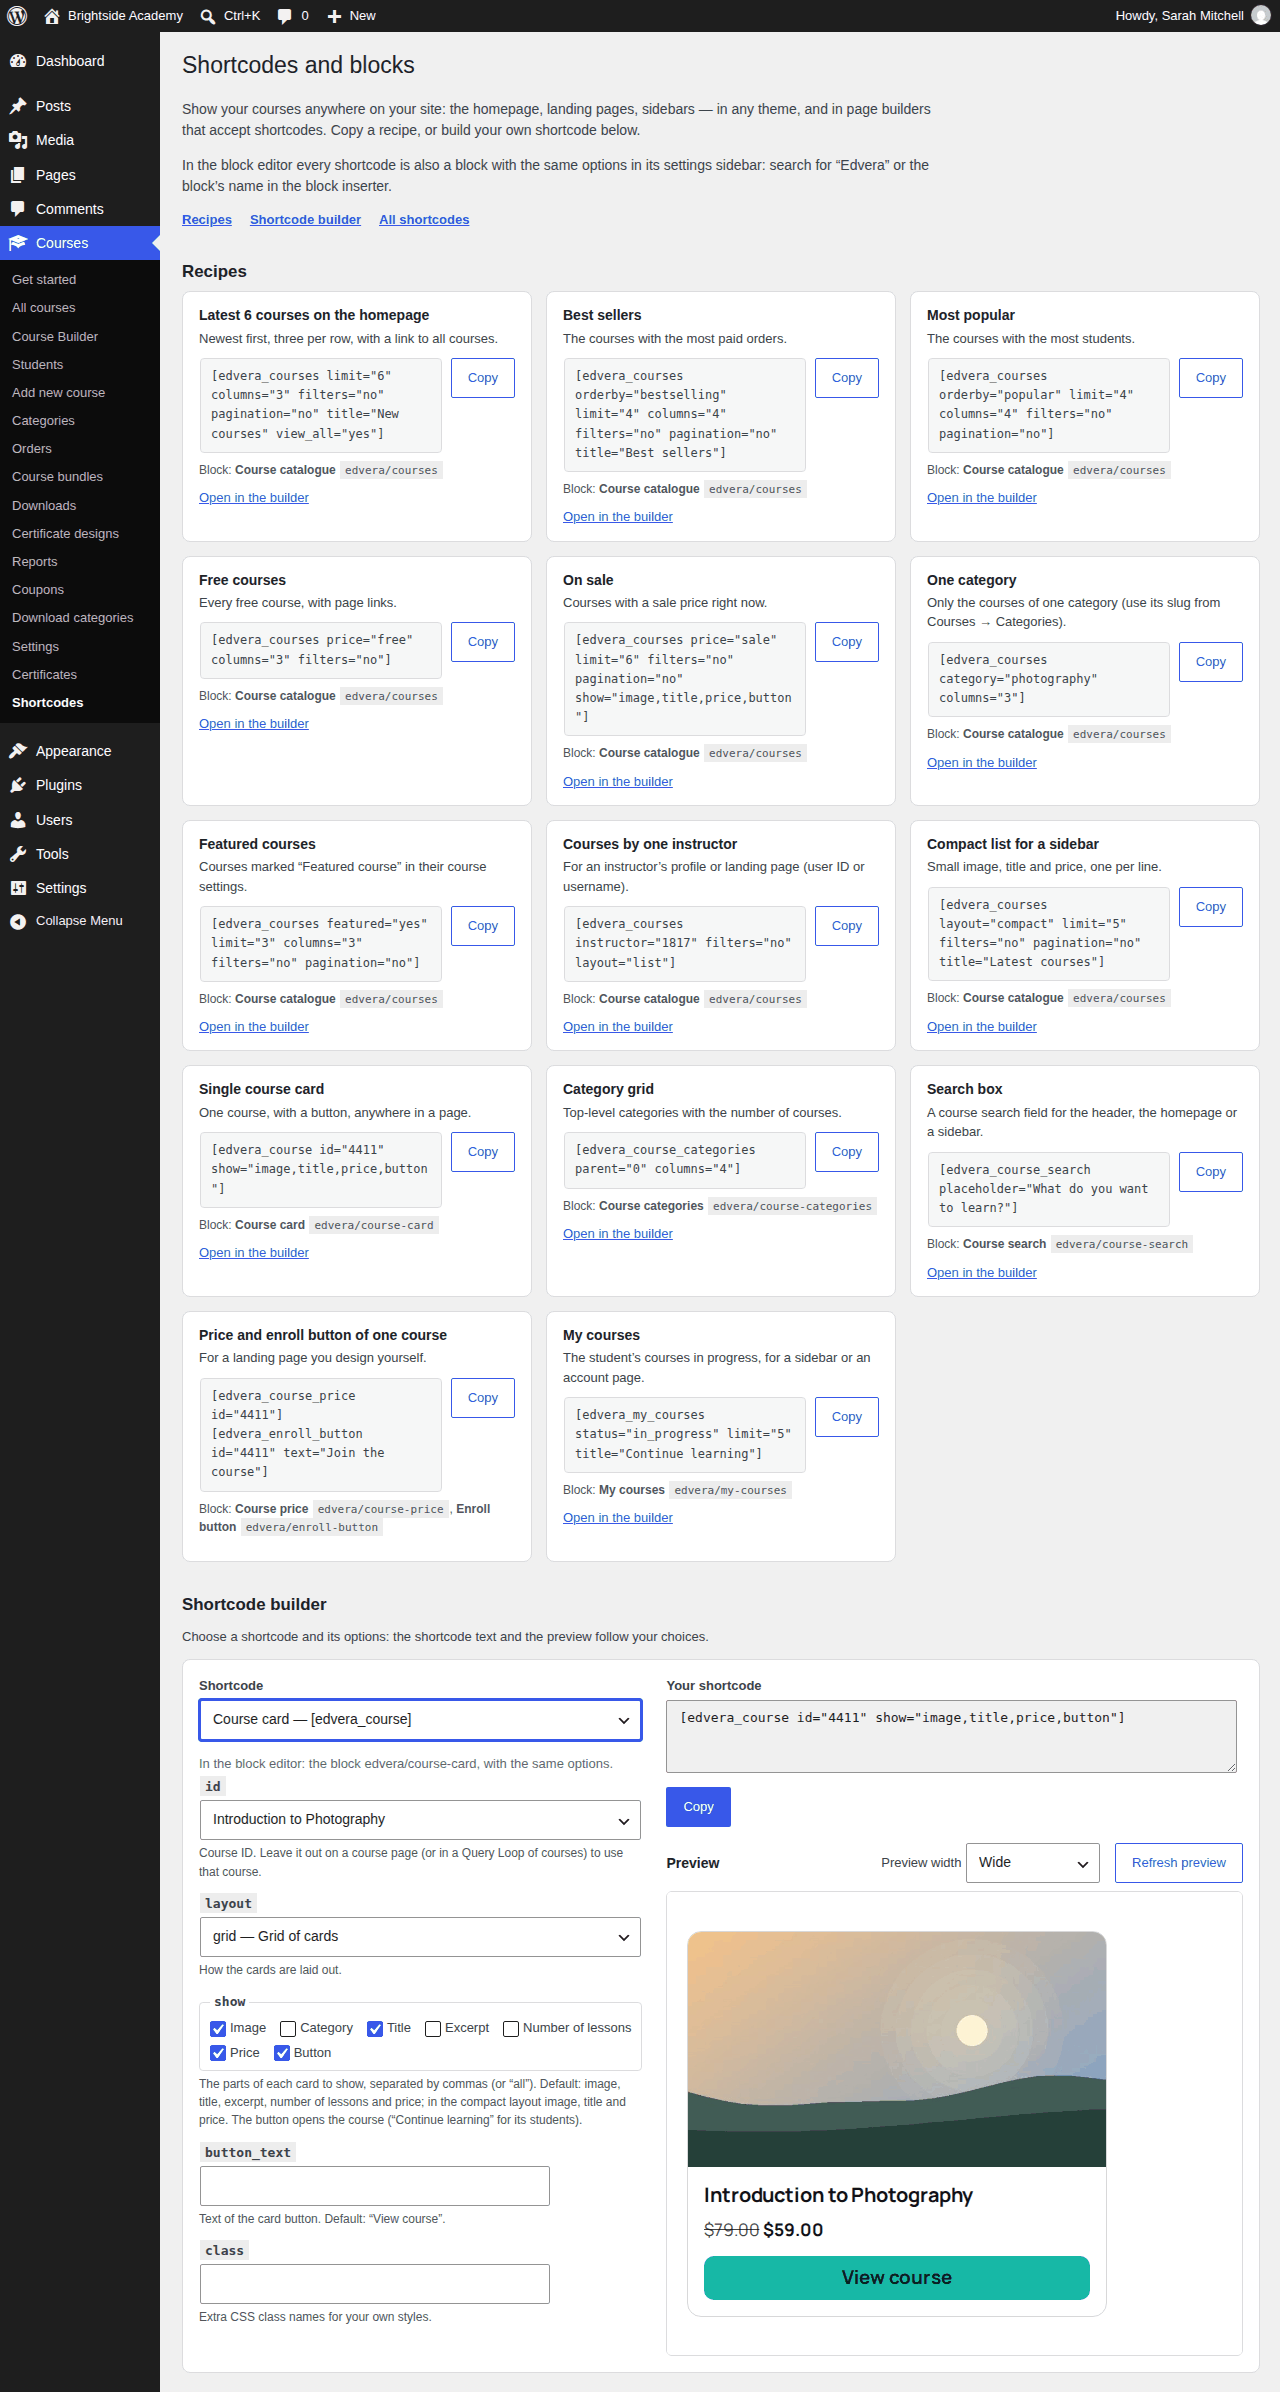
Recipes
Copy a line into a page, or open it in the shortcode builder to change it. Replace the example values (123, your-category, jane) with your own; the Shortcodes screen fills in real ones from your site.
| You want | Shortcode | Block |
|---|---|---|
| The latest 6 courses on the homepage, three per row, with a link to all courses | [edvera_courses limit="6" columns="3" filters="no" pagination="no" title="New courses" view_all="yes"] | Course catalogue |
| Best sellers (most paid orders) | [edvera_courses orderby="bestselling" limit="4" columns="4" filters="no" pagination="no" title="Best sellers"] | Course catalogue |
| Most popular (most students) | [edvera_courses orderby="popular" limit="4" columns="4" filters="no" pagination="no"] | Course catalogue |
| Every free course, with page links | [edvera_courses price="free" columns="3" filters="no"] | Course catalogue |
| Courses on sale right now | [edvera_courses price="sale" limit="6" filters="no" pagination="no" show="image,title,price,button"] | Course catalogue |
| The courses of one category | [edvera_courses category="your-category" columns="3"] | Course catalogue |
| Featured courses | [edvera_courses featured="yes" limit="3" columns="3" filters="no" pagination="no"] | Course catalogue |
| The courses of one instructor, for their profile or landing page | [edvera_courses instructor="jane" filters="no" layout="list"] | Course catalogue |
| A compact list for a sidebar: small image, title and price | [edvera_courses layout="compact" limit="5" filters="no" pagination="no" title="Latest courses"] | Course catalogue |
| One course as a card, with a button, anywhere in a page | [edvera_course id="123" show="image,title,price,button"] | Course card |
| Top-level categories with the number of courses | [edvera_course_categories parent="0" columns="4"] | Course categories |
| A course search box for the header, homepage or a sidebar | [edvera_course_search placeholder="What do you want to learn?"] | Course search |
| The price and the enroll button of one course, for a landing page you design yourself | [edvera_course_price id="123"] [edvera_enroll_button id="123" text="Join the course"] | Course price and Enroll button |
| The student's courses in progress, for a sidebar or an account page | [edvera_my_courses status="in_progress" limit="5" title="Continue learning"] | My courses |
Where to find the values:
- Course ID: in Courses → All courses, hover the course title (or open it): the address shown contains
post=123, and123is the ID. The Course Builder shows it in its address too,/studio/123/. In the shortcode builder and in the blocks you simply pick the course from a list. On a course page you can leave the ID out: the piece then uses that course. - Category slug: Courses → Categories, column Slug, for example
web-design. Several slugs are separated by commas. - Instructor: the user name of the course author (Users, column Username), or their user ID (hover the user:
user_id=2). Several are separated by commas. - Page ID (for the search box): hover the page in Pages, as for courses.
Course catalogue options
The Course catalogue block (edvera/courses) and the [edvera_courses] shortcode take the same options. Without any, the catalogue lists every course, 12 per page, with the category filter, search and page links. In the block, the options are grouped in the panels Courses to show, Sort order and Layout.
| Shortcode attribute | Block setting (attribute) | Values (default) | What it does |
|---|---|---|---|
limit (or per_page) | Courses per page (perPage) | 1 to 48 (12) | How many courses to show, per page when there are page links. per_page is the older name; when both are given, per_page wins. |
category | Only these categories (category) | Category slugs, separated by commas (all) | Only courses in these categories, their sub-categories included. Hides the category filter. |
exclude_category | Leave out these categories (excludeCategory) | Category slugs (none) | Leaves out the courses in these categories. |
featured | Featured courses only (featured) | yes or no (no) | Only courses with “Featured course” ticked in their Course settings. 1, true and on also mean yes. |
price | Price (price) | free, paid or sale (any price) | Only free courses (current price 0), only paid courses, or only courses on sale now (a sale price lower than the regular price). |
instructor | Instructor (instructor) | User IDs or user names, separated by commas (every instructor) | Only courses whose author is one of them. When none of the names exists, the catalogue shows “No courses found.” instead of every course. |
level | Level (level) | beginner, intermediate, advanced, all; several separated by commas (any level) | Only courses of these levels. all means courses whose level is set to “All levels”. |
ids | Only these courses (ids) | Course IDs, separated by commas (all) | Only these courses, in the order typed unless orderby is set. When none of the IDs can be used, the catalogue shows “No courses found.” |
exclude | Leave out these courses (exclude) | Course IDs (none) | Leaves out these courses. |
orderby | Order by (orderby) | date, updated, title, price, popular, bestselling, menu_order, rand (newest first, or the order of ids) | Date published, last updated, title, price (the current price, so a sale price counts; free courses are cheapest), most students, best selling, custom order (menu order) or random. See how students and sales are counted. |
order | Direction (order) | asc or desc (the natural direction) | Natural directions: newest first for dates, A–Z for titles, cheapest first for prices, lowest number first for menu order, most first for students and sales. |
layout | Layout (layout) | grid, list or compact (grid) | A grid of cards, a list with the image beside the text, or a compact list for sidebars. |
columns | Columns (columns) | 0 to 4 (0) | Cards per row on wide screens; narrow screens show fewer. 0 fits as many as there is room for. |
show | Show on each card (show) | image, category, title, excerpt, meta, price, button, separated by commas, or all | The parts of each card; meta is the number of lessons. Default: image, title, excerpt, number of lessons and price; in the compact layout image, title and price. The button opens the course page (“View course”); students of the course get “Continue learning”, which opens the lesson player. |
button_text | Button text (buttonText) | Text (“View course”) | The text of the card button, for visitors who are not enrolled. |
title | Heading (title) | Text (none) | A heading above the courses. |
view_all | Show a “View all courses” link (viewAll) | yes, or an address (none) | A link beside the heading: yes links to the list of all courses (the course archive); an address such as /all-courses/ links there. |
view_all_text | Link text (viewAllText) | Text (“View all courses”) | The text of that link. |
empty_text | Text when no course matches (emptyText) | Text (“No courses found.”) | Shown when no course matches. |
filters | Show the category filter and search (filters) | yes or no (yes) | The “All categories” list, the search field and the “Filter” button above the cards. Not shown when category is set. |
pagination | Show page links (pagination) | yes or no (yes) | “Previous” and “Next” links when there are more courses than limit. |
class | Additional CSS class(es), in the block's Advanced panel (className) | Class names | Extra CSS classes for your own styles. |
All options combine with each other. Archived courses never appear in a catalogue, whatever the options; closed courses stay listed, and drafts are never shown.
Fixed lists for the homepage. A catalogue with the filter or page links follows the visitor's choices in the page address (category, search words, page number), and so does every other such catalogue on the same page. With filters="no" pagination="no" (the block: both switches off) a list always shows the same courses, whatever the address says. Use this for homepage and landing-page sections, as the recipes do.
How “Most students” and “Best selling” are counted
- Most students (
popular) counts the students with an active enrolment whose access has not ended — the same number as the course's student count. - Best selling (
bestselling) counts paid orders that include the course at a price above zero. Free enrolments, free orders, refunded orders and orders placed in a payment method's test or sandbox mode are not sales. With the WooCommerce bridge, active enrolments granted by a WooCommerce order count as sales too. - Courses with the same count follow newest first; in the default direction, courses with none come last.
- The counts are cached for speed and recounted after every enrolment, unenrolment, paid order and refund (and when a user is deleted or a person's data is erased); in any case at least every 12 hours for students, because access periods end, and every 24 hours for sales.
More pieces
Each piece below is a block (in the inserter under the name shown) and a shortcode. Where a piece is about one course, leaving the course out uses the course being shown: on a course page, or for each course in a Query Loop of courses. A piece about a course shows nothing for an unpublished course, and an archived course only to its students and editors. In the block editor, an empty piece explains what is missing; visitors see nothing.
| Block | Shortcode | Options (default) | Shows |
|---|---|---|---|
Course cardedvera/course-card | [edvera_course] | id (block: “Course” courseId; the course being shown); layout grid, list or compact (grid); show and button_text (buttonText) as in the catalogue; class. | One course as a catalogue card. |
Course categoriesedvera/course-categories | [edvera_course_categories] | parent (block: “Categories”): empty = every category, 0 = only top-level categories, a category ID or slug = its sub-categories; hide_empty (hideEmpty, yes); show_count (showCount, yes); layout grid or list (grid); columns 0–4 (0); orderby name or count (name); order asc or desc (A–Z by name, most courses first by count); limit (0 = all); title; class. | Your course categories as tiles or a list, each linking to its category page, with “n courses”. A category counts the courses of its sub-categories too; archived and unpublished courses are not counted. |
Course searchedvera/course-search | [edvera_course_search] | placeholder (“Search courses”); button_text (buttonText, “Search”); page (block: “Show the results on”; the course archive); class. | A search box. Results open on the course archive (your theme's search results, limited to courses), or on the page you chose, which should hold a Course catalogue: that catalogue filters by the search words when it shows its filter or page links (a fixed list ignores searches). |
Course priceedvera/course-price | [edvera_course_price] | id (block: courseId; the course being shown). | The price as text: “Free”, or the price — while the course is on sale, the sale price with the regular price struck through. Fits into a sentence or a button of your page builder. |
Enroll buttonedvera/enroll-button | [edvera_enroll_button] | id (block: courseId; the course being shown); text (“Buy now” or “Enroll for free”). | Only the button. Students who already have the course see “Continue learning”, which opens the lesson player. When nobody can enrol now, the reason is shown instead, for example “Enrollment in this course is closed.” Logged-in visitors enrol in a free course with one click; paid courses, and free ones for visitors who are not logged in, go through the checkout. |
My coursesedvera/my-courses | [edvera_my_courses] | status all, in_progress or completed (all); limit (0 = all, at most 50); show_progress (showProgress, yes); title; empty_text (emptyText); class. | The logged-in student's courses, newest enrolment first, each with its status (“In progress” or “Completed”) and progress bar, linking to the lesson player. Visitors who are not logged in see “Log in to see your courses.” with a Log in link. |
Edvera buy buttonedvera/buy-button | [edvera_buy item=""], also [edvera_buy_button id=""] | item (or id for [edvera_buy_button]): a course, bundle or download ID (the one being shown). | The price and the buy or enroll button of a course, bundle or download. |
All of Edvera's blocks and shortcodes, those for the checkout, the dashboard, bundles and downloads included, are listed in Blocks and shortcodes.
For developers
You do not need this part to place courses on your pages; it is for developers who change the lists with code.
edvera_catalogue_query($query_args, $atts) receives every attribute of the catalogue, from the block and the shortcode alike: the known ones validated (block names, soperPagerather thanlimit), unknown ones as given. So an attribute of your own, such as[edvera_courses language="de"], can steer the query (example below).edvera_course_rank_counts($counts, $type) changes the counts that “Most students” (popular) and “Best selling” (bestselling) sort by:[ course ID => count ]. The filtered result is what gets cached.edvera_shortcodes_registry($list) adds your own shortcodes to Courses → Shortcodes (reference, builder and preview):tag => [ 'title', 'desc', 'block', 'atts' => [ name => [ 'type', 'default', 'desc', 'values' ] ] ].[edvera_my_courses]lists the same enrolments as the dashboard, throughedvera_dashboard_courses; the enroll button goes where the buy button goes, throughedvera_buy_button_url.- CSS hooks:
.edv-cat--grid,.edv-cat--listand.edv-cat--compacton catalogues and cards,.edv-cols-1….edv-cols-4on the list whencolumnsis set, and.edv-ccat(categories),.edv-csearch(search),.edv-cprice(price) and.edv-mine(my courses); more in Styling and icons.
// [edvera_courses language="de"]: only courses whose custom field "language" is "de".
add_filter( 'edvera_catalogue_query', function ( $args, $atts ) {
	if ( ! empty( $atts['language'] ) ) {
		// Keep Edvera's own conditions (archived courses stay hidden) and add yours.
		$args['meta_query'] = array(
			'relation' => 'AND',
			$args['meta_query'] ?? array(),
			array( 'key' => 'language', 'value' => sanitize_key( $atts['language'] ) ),
		);
	}
	return $args;
}, 10, 2 );Blocks and shortcodes
What this is for: the reference list of Edvera's blocks and shortcodes (catalogue, buy button, dashboard and more), with every setting and attribute.
Step-by-step help for placing them, recipes and the Shortcodes screen with its builder are in Use Edvera in your own site.
Every front-end part is available as a block and as a shortcode. The blocks are in the block inserter (search for “Edvera”, or open the Widgets category) and work in pages, posts and block-theme templates. They are rendered by the server: the editor shows a live preview of what visitors will see, and the block's settings are in the sidebar. Shortcodes work anywhere a Shortcode block or classic content does.
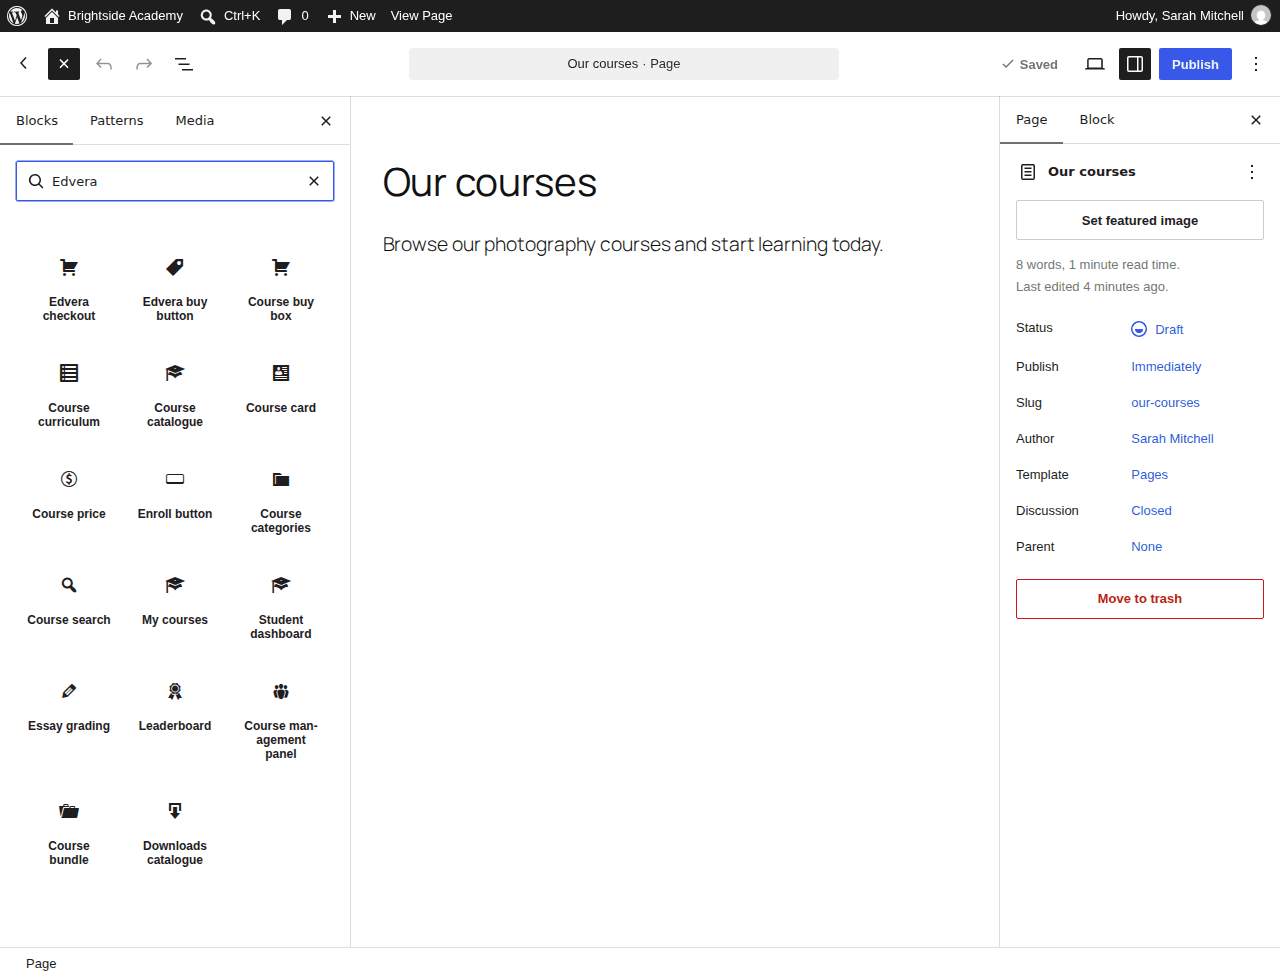
The Edvera checkout block shows a placeholder in the editor, because the cart belongs to each visitor; the Checkout page that Edvera creates contains this block.
| Block (inserter name) | Shortcode | Settings and attributes (default) | Shows |
|---|---|---|---|
Course catalogueedvera/courses | [edvera_courses] | Block, in the panels “Courses to show”, “Sort order” and “Layout”: perPage (12, 1 to 48), category and excludeCategory (category slugs), featured (off), price (free, paid, sale), instructor, level, ids and exclude (course IDs), orderby (empty = newest first, or the order of ids; date, updated, title, price, popular, bestselling, menu_order or rand), order (asc or desc; not shown for Random), layout (grid, list, compact), columns (0 to 4), show, buttonText, title, viewAll, viewAllText, emptyText, filters (on) and pagination (on).Shortcode: the same options in snake_case — limit (or per_page), category, exclude_category, featured, price, instructor, level, ids, exclude, orderby, order, layout, columns, show, button_text, title, view_all, view_all_text, empty_text, filters, pagination and class. Yes/no options take yes or no (also 1, true, on and 0, false, off). Every option is explained in Course catalogue options. Example: [edvera_courses featured="yes" orderby="price" order="asc"]. | Course catalogue, see Course catalogue |
Course cardedvera/course-card | [edvera_course] | Block: “Course” courseId (0 = the course being shown, also in a Query Loop), layout (grid), show, buttonText.Shortcode: id, layout, show, button_text, class. | One course as a catalogue card, see More pieces |
Course categoriesedvera/course-categories | [edvera_course_categories] | Block: “Categories” parent, hideEmpty (on), showCount (on), layout (grid), columns (0), orderby (name), order, limit (0 = all), title.Shortcode: parent, hide_empty, show_count, layout, columns, orderby, order, limit, title, class. | Course categories with the number of courses |
Course searchedvera/course-search | [edvera_course_search] | Block: placeholder, buttonText, “Show the results on” page (0 = the course archive).Shortcode: placeholder, button_text, page, class. | A course search box |
Course priceedvera/course-price | [edvera_course_price] | Block: “Course” courseId (0 = the course being shown); shortcode: id. | The course price, “Free”, or the sale price with the regular price struck through |
Enroll buttonedvera/enroll-button | [edvera_enroll_button] | Block: “Course” courseId, “Button text” text; shortcode: id, text. | Only the buy or enroll button (“Continue learning” for students of the course) |
My coursesedvera/my-courses | [edvera_my_courses] | Block: “Courses” status (all), limit (0 = all), showProgress (on), title, emptyText.Shortcode: status, limit, show_progress, title, empty_text, class. | The student's courses with their progress |
Course buy boxedvera/course-buy | [edvera_course_buy] | Block: “Course” courseId (0 = the course the block is on, for example in the course template).Shortcode: id (current post). | Price, buy or continue button, progress and course details |
Course curriculumedvera/course-curriculum | [edvera_course_curriculum] | Block: “Course” courseId (0 = the current course).Shortcode: id (current post). | Chapters and lessons |
Edvera buy buttonedvera/buy-button | [edvera_buy], also [edvera_buy_button] | Block: “Item ID” itemId; shortcode: item ([edvera_buy_button]: id). Any course, bundle or download ID (default: the current post). | Price and buy button |
Edvera checkoutedvera/checkout | [edvera_checkout] | — (one per page; placeholder in the editor) | Cart, checkout and receipt |
Student dashboardedvera/dashboard | [edvera_dashboard] | — (the editor previews your own dashboard) | Student dashboard |
Course management paneledvera/manage | [edvera_manage] | Block: “Course” course; shortcode: course (0 = the course picker, or the course in the address) | Management panel, see Managing students |
Essay gradingedvera/grading | [edvera_grading] | Block: “Course” course; shortcode: course (0 = every course the user may grade) | Essay answers awaiting grading |
Leaderboardedvera/leaderboard | [edvera_leaderboard] | Block: “Number of students” limit; shortcode: limit (10, 3 to 50) | Students with the most points |
Course bundleedvera/bundle | [edvera_bundle] | Block: “Bundle” bundleId; shortcode: id (the current bundle) | Bundle card with items and buy button |
Downloads catalogueedvera/downloads | [edvera_downloads] | Block: “Category slug (optional)” category, “Items per page” perPage (12, 1 to 48), “Show the category filter” showFilter (on).Shortcode: category (all), per_page (12, max 48), filter (yes; no, false, 0 or off hide it). | Download catalogue |
| — | [edvera_cert_verify] | — | Certificate lookup form |
Retired: the edvera/quiz and edvera/reminders-settings blocks and the [edvera_quiz] shortcode are not used: quizzes are lessons, and reminder settings are under Courses → Settings → Emails. They are hidden from the inserter, and content that still contains them shows visitors nothing; the editor shows a note that they can be removed.
Connect AI assistants (MCP)
What this is for: letting an AI assistant such as Claude or ChatGPT build courses, look after students and read reports on your site while you chat with it, with the permissions you choose.
Edvera has a built-in MCP server. MCP, the Model Context Protocol, is an open standard that lets AI assistants use the tools of other software. Once you turn it on and connect an assistant, you can ask in plain words — “Turn these notes into a course with a quiz after each chapter”, “Who has stopped coming to Public Speaking?”, “How were sales this month?” — and the assistant does the work on your site through Edvera's tools.
It works with Claude (claude.ai, Claude Desktop, the mobile apps and Claude Code), ChatGPT, OpenAI Codex, Cursor, n8n and any other MCP client. Nothing extra is installed on your server: the MCP server runs inside WordPress, at your own site's address.
The assistant never gets more power than you give it. Every connection acts as one WordPress user and can do only what that account may do, within the permissions you chose for it. What it creates stays a draft until it is published, it must ask before it removes anything, and every call is written to an activity log. The server is off until an administrator turns it on. See How Edvera keeps it safe.
Turning it on
Open Courses → AI & MCP (administrators).
In the Server part, tick “Enable the MCP server” and click Save changes. The status line changes to “The MCP server is on.”
Under “Server address”, the MCP server URL is the address you give your assistant, with a Copy button:
https://example.com/wp-json/edvera/v1/mcpon a site athttps://example.com. With Plain permalinks it ishttps://example.com/?rest_route=/edvera/v1/mcp.Create an API key (next part) if your assistant needs one, then follow the steps for your assistant under Connecting your assistant.
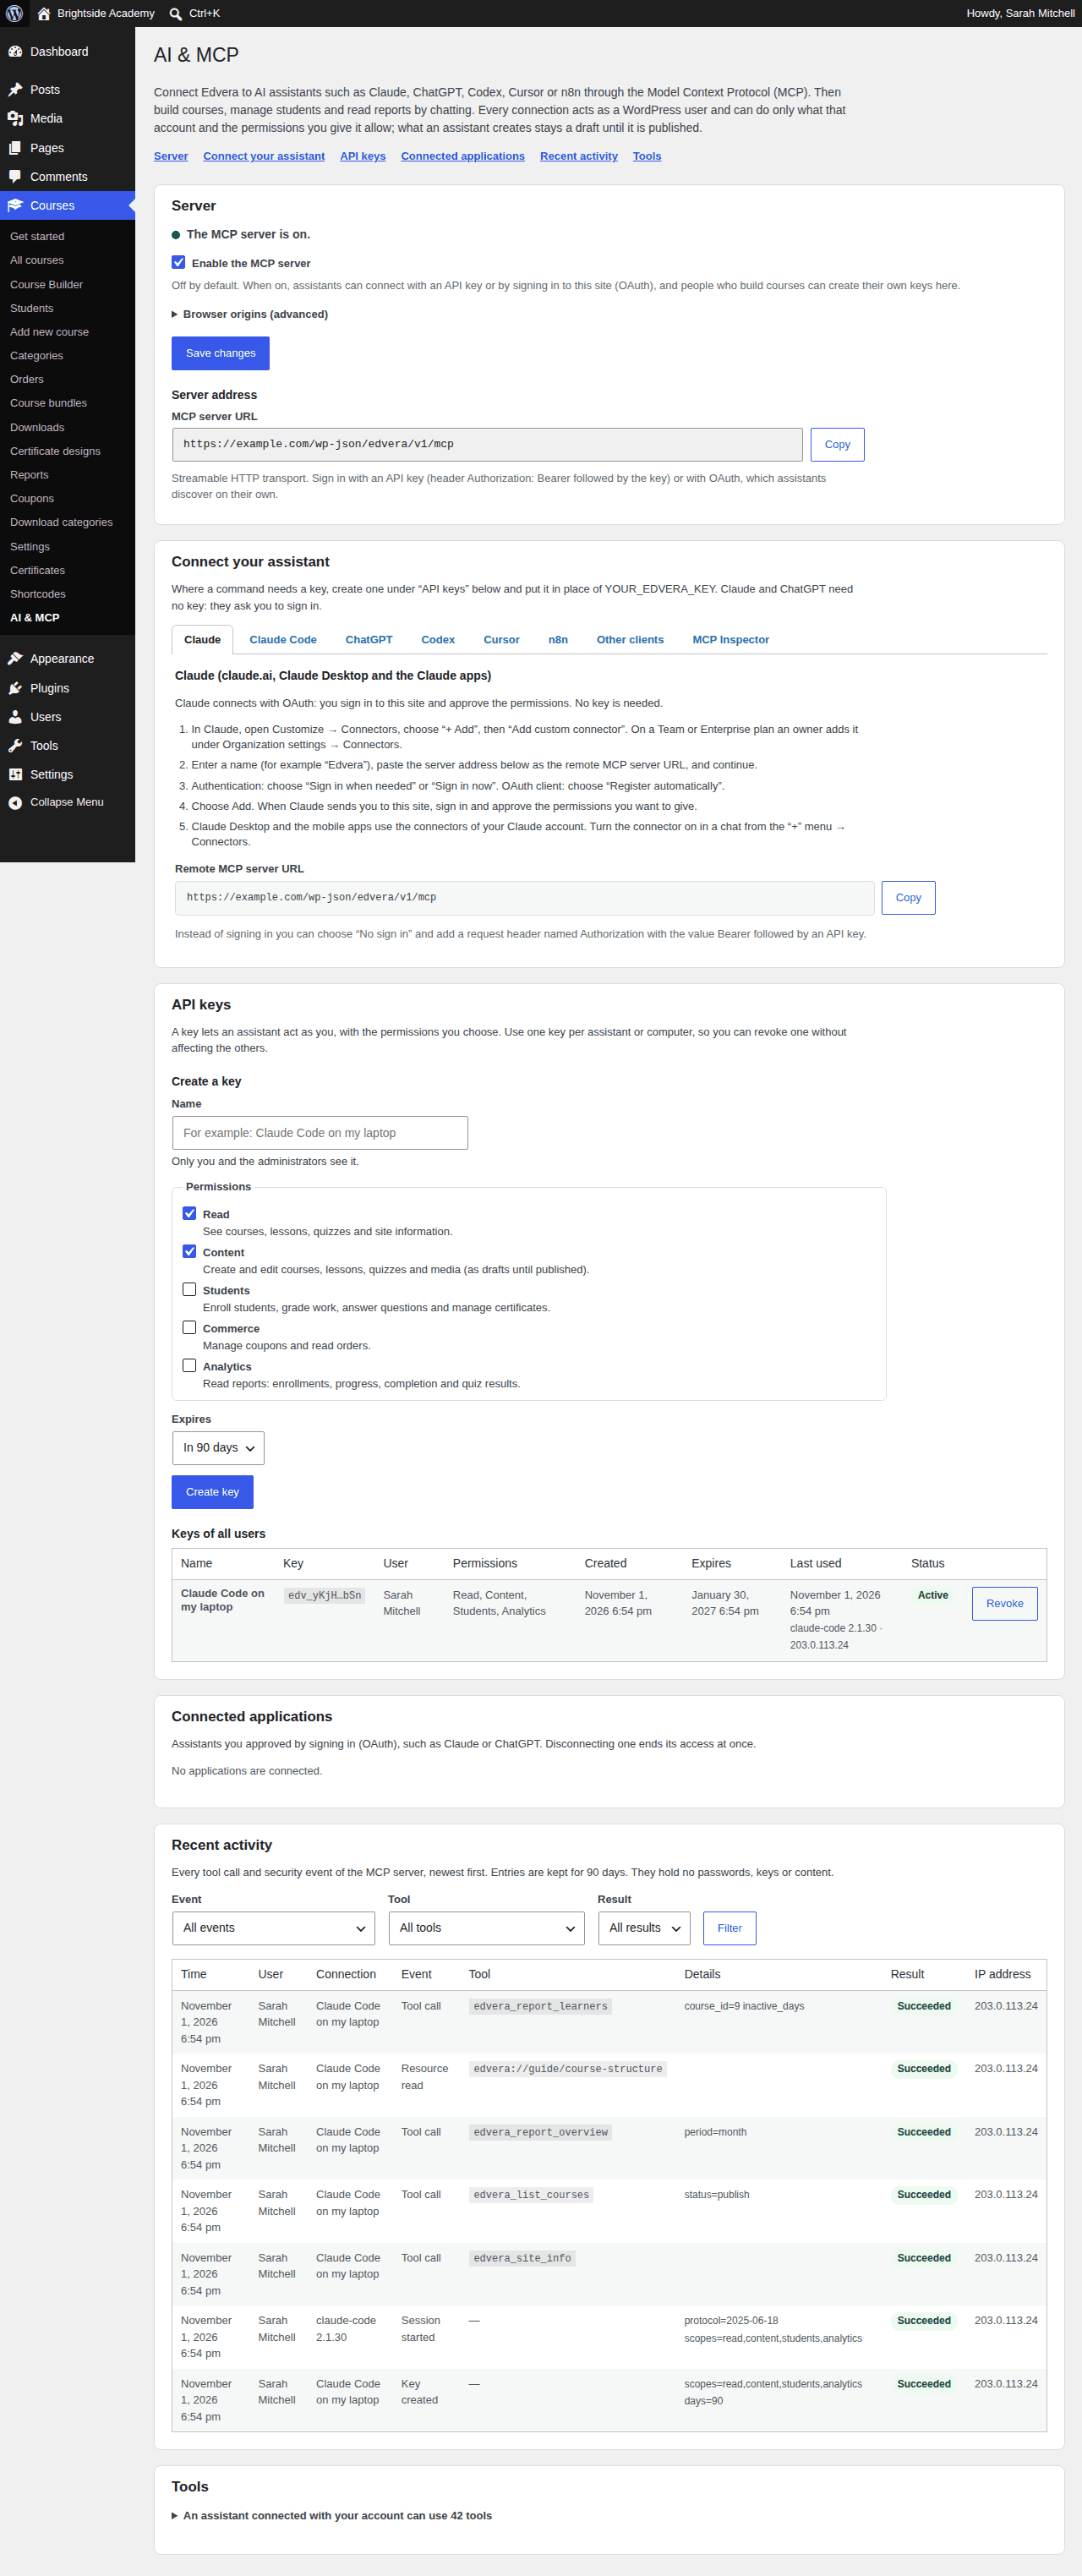
Who sees the screen: while the server is off, only administrators (they turn it on). Once it is on, everyone who builds courses — instructors, course managers and editors too — sees Courses → AI & MCP with their own keys, connections and activity. Administrators see everyone's.
The screen warns you when something will stop Claude or ChatGPT from connecting: a site without HTTPS, or a site where WordPress cannot answer the sign-in discovery addresses (see Requirements). API keys keep working in both cases.
Browser origins (advanced) is only for MCP clients that run inside a web page and call your site directly, such as the MCP Inspector at http://localhost:6274. Claude, ChatGPT, Claude Code, Codex, Cursor and n8n do not need it. Requests from any web page that is not listed are refused.
Turning it off (untick and save) stops every connection at once: the MCP address and the sign-in pages then answer “not found”. Keys and approved applications are kept, so they work again when you turn the server back on; revoke them if they should not.
API keys and permissions
An API key is a password for an assistant: whoever has it can act as you, within the permissions of the key. Claude and ChatGPT do not need one, because they ask you to sign in (see Claude). Everything else — Claude Code, Codex, Cursor, n8n, Claude Desktop through mcp-remote, the MCP Inspector — connects with a key.
On Courses → AI & MCP, go to API keys → “Create a key”.
Name: something you will recognise, for example “Claude Code on my laptop” (up to 60 characters; only you and the administrators see it).
Permissions: tick what this assistant needs (Read and Content are ticked to start with). Only the permissions your account has are offered.
Expires: in 7, 30 or 90 days (the default), in one year, or never. Then click Create key.
Copy the key from “Your new key — copy it now. For your security it is not shown again.” It starts with
edv_. The commands under “Connect your assistant” on the same page already contain it, so you can copy the one for your assistant right away.
The five permissions (the technical name is scopes):
| Permission | Lets the assistant | Your account needs |
|---|---|---|
Read (read) | See courses, lessons, quizzes and site information. | To build courses (instructors, course managers, editors, administrators) |
Content (content) | Create and edit courses, lessons, quizzes and media (as drafts until published), and bundles and downloads. | To build courses |
Students (students) | Enroll students, grade work, answer questions and manage certificates. | To grade (the same roles; instructors for their own courses) |
Commerce (commerce) | Manage coupons and read orders. | To manage orders and payments (administrators) |
Analytics (analytics) | Read reports: enrollments, progress, completion and quiz results. The sales report also needs an account that manages orders. | To build courses |
The permissions are checked on every call, together with the account's own capabilities: if the account later loses a capability, its keys lose the matching permission at once. Use one key per assistant or computer, so you can revoke one without affecting the others; each person can have up to 25 active keys.
The table under the form lists your keys (administrators: “Keys of all users”) with a hint of each key such as edv_Ab3x…9Qz, the permissions, when it was created, when it expires, when it was last used and by which client and address, and its status: Active, Expired or Revoked. Revoke stops a key at once (“Revoke the key …? Assistants using it stop working at once.”). Revoked and expired keys leave the list 30 days later. Edvera stores only a fingerprint of each key, never the key itself, which is why it cannot show it again: if a key is lost, revoke it and create a new one.
Connected applications lists the assistants you approved by signing in (Claude, ChatGPT and other OAuth clients) with the address they return to, their permissions, and when they connected and were last used. Disconnect ends an application's access at once; it has to ask for permission again to reconnect.
Connecting your assistant
The part “Connect your assistant” on Courses → AI & MCP has a tab for each assistant with these steps and ready-made commands, filled in with your site's address (and with your new key right after you created one). Below, https://example.com/wp-json/edvera/v1/mcp stands for your server address and YOUR_EDVERA_KEY for a key. There are two ways to sign in:
- OAuth (Claude, ChatGPT, and on request Claude Code and Codex): the assistant sends you to your own site, you log in and approve the permissions on a consent screen. No key to copy.
- API key (Claude Code, Codex, Cursor, n8n, mcp-remote, MCP Inspector): the key goes into the assistant's settings as the header
Authorization: Bearer YOUR_EDVERA_KEY.
Claude (claude.ai, Claude Desktop and the Claude apps)
Claude connects with OAuth: you sign in to your site and approve the permissions. No key is needed.
- In Claude, open Customize → Connectors, choose “+ Add”, then “Add custom connector”. On a Team or Enterprise plan an owner adds it under Organization settings → Connectors.
- Enter a name (for example “Edvera”), paste your server address as the remote MCP server URL, and continue.
- Authentication: choose “Sign in when needed” or “Sign in now”. OAuth client: choose “Register automatically”.
- Choose Add. When Claude sends you to your site, log in and approve the permissions you want to give.
- Claude Desktop and the mobile apps use the connectors of your Claude account. Turn the connector on in a chat from the “+” menu → Connectors.
https://example.com/wp-json/edvera/v1/mcpOn your site you see “Connect Claude?”: “Claude wants to connect to your site and act with your account.”, the account you are logged in as (with Use another account), the address you will be sent back to, and the permissions to grant, each with a checkbox. Untick what the assistant does not need — Commerce, for example — and click Approve (or Deny). Permissions your account does not have are shown greyed out with “Your account does not have this permission.” Because an application chooses its own name, approve only a connection you started yourself, as the screen reminds you. Once approved, the assistant appears under Connected applications.
Claude needs an HTTPS address that it can reach over the internet; see Requirements. Instead of signing in you can choose “No sign in” and add a request header named Authorization with the value Bearer followed by an API key.
Claude Code
Run this in a terminal, with a key from “API keys”:
claude mcp add --transport http --scope user edvera https://example.com/wp-json/edvera/v1/mcp \
  --header "Authorization: Bearer YOUR_EDVERA_KEY"
Or sign in with OAuth instead of a key: run the command without the header, then run /mcp in Claude Code and choose Authenticate. Claude Code opens your site in the browser: log in and approve the permissions.
claude mcp add --transport http --scope user edvera https://example.com/wp-json/edvera/v1/mcp--scope user makes the server available in all your projects; leave it out to add it to the current project only.
ChatGPT
ChatGPT connects with OAuth: you sign in to your site and approve the permissions.
- In ChatGPT, open Plugins (
chatgpt.com/plugins), choose “+” and then “Add custom MCP server”. Depending on your plan or workspace, developer mode or an administrator's approval may be needed first. - Enter a name and a description, choose a public HTTPS endpoint as the connection and paste your server address.
- Authentication: choose OAuth. ChatGPT registers itself with your site automatically.
- Accept the warning about custom servers and create it. When ChatGPT sends you to your site, log in and approve the permissions, as described for Claude.
- When Edvera's tools change (after an update), open the server on the Plugins page and choose Refresh.
OpenAI Codex (CLI and IDE extension)
Add this to ~/.codex/config.toml:
[mcp_servers.edvera]
url = "https://example.com/wp-json/edvera/v1/mcp"
bearer_token_env_var = "EDVERA_MCP_TOKEN"
Then set the environment variable before you start Codex (macOS, Linux):
export EDVERA_MCP_TOKEN="YOUR_EDVERA_KEY"On Windows (PowerShell): $env:EDVERA_MCP_TOKEN="YOUR_EDVERA_KEY". Or, for OAuth, leave out the bearer_token_env_var line and run:
codex mcp login edveraCursor
Add this to .cursor/mcp.json in your project (or ~/.cursor/mcp.json for every project), and set the environment variable EDVERA_MCP_TOKEN to your key:
{
    "mcpServers": {
        "edvera": {
            "url": "https://example.com/wp-json/edvera/v1/mcp",
            "headers": {
                "Authorization": "Bearer ${env:EDVERA_MCP_TOKEN}"
            }
        }
    }
}
You can also write the key itself in place of ${env:EDVERA_MCP_TOKEN}, but then keep the file out of version control.
n8n
In a workflow with an AI Agent, add the MCP Client Tool node (or the MCP Client node) and set:
MCP Endpoint URL: https://example.com/wp-json/edvera/v1/mcp
Server Transport: HTTP Streamable
Authentication:   Header Auth
  Name:  Authorization
  Value: Bearer YOUR_EDVERA_KEY
Create the Header Auth credential once; other workflows can reuse it. Under “Tools to include” choose All, or only the tools the workflow needs.
Other clients (mcp-remote)
For apps that can only start local servers, for example through the claude_desktop_config.json file of Claude Desktop, mcp-remote connects them to your server. It needs Node.js.
{
    "mcpServers": {
        "edvera": {
            "command": "npx",
            "args": [
                "-y",
                "mcp-remote",
                "https://example.com/wp-json/edvera/v1/mcp",
                "--header",
                "Authorization:${EDVERA_AUTH}"
            ],
            "env": {
                "EDVERA_AUTH": "Bearer YOUR_EDVERA_KEY"
            }
        }
    }
}
On a site without HTTPS the screen adds "--allow-http" to the arguments; use that only on a network you trust. Any other MCP client: use the server address with the Streamable HTTP transport and send the header Authorization: Bearer followed by your key, or let the client find the OAuth sign-in on its own.
MCP Inspector
The MCP Inspector lists the tools and lets you try them. It needs Node.js 22.19 or newer. Open it in the browser:
npx @modelcontextprotocol/inspector --server-url https://example.com/wp-json/edvera/v1/mcp --transport http \
  --header "Authorization: Bearer YOUR_EDVERA_KEY"
Or check from the command line (prints the tools):
npx @modelcontextprotocol/inspector --cli https://example.com/wp-json/edvera/v1/mcp --transport http \
  --header "Authorization: Bearer YOUR_EDVERA_KEY" --method tools/list
What an assistant can do
Edvera offers 42 tools, grouped by the permission they need. A connection sees only the tools of its permissions, and the account behind it must be allowed to do the same thing on the site: instructors work only with their own courses and students, course managers and administrators with all of them. The Tools part at the bottom of Courses → AI & MCP lists the tools your account can use, each marked “Reads only”, “Changes the site” or “Changes the site — asks first”.
| Group (permission) | Tools | Ask, for example |
|---|---|---|
| Site and courses (Read) | Site information, Who am I, Settings summary (language, currency, lesson and quiz types, upload limits, certificate designs; never credentials), List courses, Get course, Get lesson, Preview links, List course categories. | “Which courses are still drafts?” · “Show me the outline of Photography Basics.” |
| Build courses (Content) | Create course (with its chapters), Update course (price, category, level, access length, certificate rule, open/closed/archived…), Add chapter, Rename chapter, Add lesson, Update lesson, Move lesson, Reorder course, Set course image, Upload media, Publish course, Unpublish course, Publish lesson, Move course to Trash, Move lesson to Trash, Create bundle, Create download. | “Build a course from these notes.” · “Add a ten-question quiz after lesson 3.” · “Bundle my two beginner courses for 79.” |
| Students (Students) | List students, Get student, Enroll students (up to 200 at a time, by email or user ID), Unenroll student, Issue certificate, Work to grade, Grade submission, Student questions, Answer question. | “Enroll these twelve people in the spring course.” · “Draft answers to this week's unanswered questions.” |
| Selling (Commerce) | Create coupon, List orders. | “Make a code SPRING20 for 20% off, valid until the end of the month.” · “Show this week's orders.” |
| Reports (Analytics) | Overview report, Course report (completion funnel per lesson, the biggest drop-off, the hardest quiz questions), Learners at risk, Sales report, Compare courses, Export report (CSV). | “How are we doing this month?” · “Where do students drop out of the Excel course?” · “Export the at-risk list as CSV.” |
Lessons can be of every type: text (written in Markdown or HTML), video (a YouTube or Vimeo link, or an uploaded video, which is stored protected), files, quizzes (single choice, true/false, short answer and essay questions, with a pass mark, attempts and practice mode), assignments and interactive pages. Lessons can also get completion rules, free previews, drip release and prerequisites.
Media come from a public https:// address or are sent with the request; your site accepts only the file types that lessons and downloads accept, up to your upload limit, and videos and files attached to lessons are moved to protected storage. Paths on your server are never accepted.
Besides the tools, the server offers the assistant reading material and ready-made instructions:
- Guides it reads before working: how an Edvera course is built (chapters, lesson types, completion, drip, the draft → preview → publish workflow), the exact quiz format, your course categories, a site summary, and the outline of any course you can edit.
- Prompts, which clients that support them offer as ready-made tasks: Build a course from notes, Weekly report, Find learners at risk, Quiz from a lesson and Improve a course.
An assistant cannot send emails, change site or payment settings, or manage WordPress users: there are no tools for that. (Enrolling can create accounts for new students, for course managers only, and WordPress then emails them its usual “set your password” link.) Course reminder emails are set up under Courses → Settings → Emails (see Reminders).
How Edvera keeps it safe
- Off by default. Only an administrator can turn the server on, and turning it off stops every connection at once.
- A connection is a WordPress user. It can do only what that account may do (its role), and only within the permissions of its key or approval. Instructors reach only their own courses and students.
- Drafts first. New courses, lessons, bundles and downloads are drafts; new coupons are inactive unless you ask for a working code. Only the publish tools (and the publish option of bundles and downloads) make something visible to students, and the assistant is told to use them only when you ask. Before publishing it can give you preview links to check everything in the Course Builder and the lesson player.
- It asks first. The three tools that take something away — Move course to Trash, Move lesson to Trash and Unenroll student — refuse to run without an explicit confirmation, and the assistant is told to describe exactly what will happen and wait for your yes. Trashed courses and lessons can be restored in wp-admin; an unenrolled student keeps their progress.
- Keys are like passwords. They are shown once and stored only as a fingerprint (a keyed hash), never written to logs and never accepted in a web address. Keys can expire, and you can revoke a key or disconnect an application at any time.
- Limits. Each key or connection may make 120 requests a minute. An address that fails to sign in 10 times within 15 minutes is locked out for 15 minutes.
- Your login does not count. On the MCP address only a key or token signs anyone in, never the browser's login cookie, so other websites cannot use your session. Requests from web pages are refused unless you listed them under Browser origins.
- Safe sign-in. The OAuth sign-in follows OAuth 2.1: PKCE is required, the application must return to the exact address it registered (HTTPS, or localhost), access tokens last one hour and renewal tokens 30 days, and a renewal token that is used twice ends the whole connection.
- Activity log. “Recent activity” on the screen lists every tool call and security event — keys created and revoked, applications approved or disconnected, failed sign-ins, lockouts, rate limits, the server turned on or off — with time, user, connection, tool, a short summary and the result (Succeeded, Failed or Refused). The summary holds only argument names, IDs and flags, never passwords, keys or content. Entries are kept for 90 days.
What an assistant reads goes to its AI service. When you ask for a report, the names and results in it are sent to the service that runs your assistant (for example Anthropic for Claude or OpenAI for ChatGPT) and handled under that service's terms. Give the Students and Analytics permissions only to assistants that need them, and mention AI assistants in your privacy policy if you use them with student data (see Privacy).
Three example conversations
What you might type, and what the assistant does on your site. Assistants word things differently; the tools they use are the same.
A course from your notes
- You
- Here are my notes from last year's photography workshop. Turn them into a course for beginners with a short quiz after each chapter. Don't publish anything yet.
- Assistant
- Reads the course guide and the settings summary (site language, currency, lesson types), then proposes an outline: Photography Basics — 1. Your camera, 2. Exposure, 3. Light and composition, each with three or four lessons and a quiz. It asks whether the outline is right.
- You
- Good. Merge chapters 2 and 3, and set the price to 49.
- Assistant
- Creates the course as a draft with its two chapters (Create course), adds the lessons with their texts and the quizzes (Add lesson), sets the price (Update course) and returns the preview links (Preview links): “The draft course has 2 chapters, 9 lessons and 2 quizzes. Review it in the Course Builder: …/studio/123/. Shall I publish it?”
- You
- (after checking it) Publish it.
- Assistant
- Calls Publish course, which publishes the course and the lessons it created, and passes on the tool's warnings, for example that the course has no image yet.
Who is falling behind
- You
- Who is falling behind in Public Speaking with Confidence?
- Assistant
- Finds the course (List courses) and runs Learners at risk: students with no activity for 14 days and the lesson each one is stuck on, students who never started, and students who failed a quiz several times. It suggests what to do, for example rewording the quiz question most students miss (from the Course report).
- You
- Are there unanswered questions in that course?
- Assistant
- Lists them (Student questions), drafts a reply to each and shows you the drafts. After you approve, it posts them under your name (Answer question).
Sales this month against last month
- You
- How did sales go this month compared with last month?
- Assistant
- Runs the Sales report for this month and for last month: orders, gross, discounts, refunds and net per currency, the best-selling items, payment methods and the coupons used. Orders placed in a payment method's test mode are left out. It sums up: “This month so far: 31 orders, 1,840 net; last month: 52 orders, 2,960 net. SPRING20 was used 9 times.”
- You
- Give me the items as CSV for my spreadsheet.
- Assistant
- Returns the same report by item as CSV text (Export report).
The sales report needs an account that manages orders and payments (administrators) and the Analytics permission. The overview and sales reports also compare their period with the period of the same length just before it.
Requirements
- Edvera's own requirements; nothing else on the server.
- Claude and ChatGPT (sign-in with OAuth) call your site from their own servers, so your site must be reachable from the internet at an HTTPS address. They find the sign-in at
/.well-known/oauth-authorization-serveron your domain, which needs pretty permalinks (any setting except Plain) and WordPress at the root of its domain (https://example.com, nothttps://example.com/blog). Where that is not possible, connect Claude with “No sign in” and a key header. - Tools on your own computer (Claude Code, Codex, Cursor, the MCP Inspector) work with a key on any site, also a local test site without HTTPS. mcp-remote then needs
--allow-http. - Firewalls and security plugins must let
/wp-json/edvera/v1/mcpthrough with itsAuthorizationheader, and for OAuth also/wp-json/edvera/v1/oauth/,/edvera-oauth/authorize/and/.well-known/oauth-…. If your server answers/.well-known/addresses itself, let the twooauth-ones through to WordPress.
Troubleshooting
- 401 — “Authentication required: send an Edvera API key or an OAuth access token …”
-
No key reached Edvera. Check the header in your assistant's settings:
Authorization: Bearer YOUR_EDVERA_KEY, with the space afterBearer. Some hosts (Apache with CGI or FastCGI) remove theAuthorizationheader before WordPress sees it. Then send the key in the headerX-Api-Key: YOUR_EDVERA_KEYinstead, which Edvera also accepts, or ask your host to pass theAuthorizationheader on to PHP (for Apache,CGIPassAuth Onin.htaccess).Other 401 messages: “The key or token is not valid.” (mistyped or deleted; these failures count towards the lockout), “This key or token was revoked.”, “This key or token has expired.” and “The user of this key no longer exists.” Create a new key. For Claude and ChatGPT, 401 is also the normal first answer that tells them where to sign in.
- 403 — “Requests from this browser origin are not allowed …” or “This connection has no permissions left on this site …”
- The first comes from an MCP client that runs in a web page: add its address under Browser origins (advanced). The second means the account behind the key no longer has any of the key's permissions, for example after a role change. When a single tool answers “This connection was not granted the "students" scope …”, create a key (or reconnect) with that permission; “The WordPress account behind this connection is not allowed to do this.” means the account itself may not, for example an instructor and another instructor's course.
- 404 — “The MCP server is turned off on this site (Courses → AI & MCP).”
- Turn the server on. A 404 with “Session not found” is harmless: the client starts a new session by itself.
- 429 — “Rate limit reached (120 requests a minute) …” or “Too many failed sign-in attempts from your address …”
- The first clears within a minute: the answer says how many seconds to wait. The second locks the address out for 15 minutes after 10 failed sign-ins; fix the key in the assistant first, then wait. Both are listed in Recent activity.
- Claude or ChatGPT cannot connect, or the sign-in never appears
- Check the requirements: HTTPS, pretty permalinks, WordPress at the root of the domain, reachable from the internet (not
localhost, not behind a password). Openhttps://example.com/.well-known/oauth-authorization-serverin your browser: it must show a short JSON text. If it shows a page of your site or a server error, save Settings → Permalinks once and check that your server sends/.well-known/addresses to WordPress. - The assistant says an action “cannot be undone” and asks you to confirm
- That is the safeguard of the three tools that take something away. Read what it plans to do and answer yes or no.
- The assistant says a tool is missing or it is not allowed
- The connection lacks the permission, or the account lacks the capability. Compare with the Tools part of the screen. After an Edvera update, refresh the server in ChatGPT (Plugins → the server → Refresh) or restart your local client.
- 413 — “Request too large.”
- A file sent inside the request is over the 8 MB limit of one request (files sent this way are also capped at 15 MB). Let the assistant upload it from an
https://address instead.
For developers
You do not need this part to connect an assistant; it is for developers who check the protocol or add their own tools.
Endpoints
| Address | Does |
|---|---|
POST /wp-json/edvera/v1/mcp(also /?rest_route=/edvera/v1/mcp) | The MCP server: Streamable HTTP transport, JSON-RPC 2.0. Protocol versions 2025-11-25, 2025-06-18, 2025-03-26 and 2024-11-05, negotiated on initialize. Methods: initialize, notifications, ping, tools/list, tools/call, resources/list, resources/templates/list, resources/read, prompts/list, prompts/get. Lists are paged with cursors (100 items); batches of up to 20 messages are accepted. initialize returns an Mcp-Session-Id (stateless, signed and bound to the credential). GET answers 405 (no server-initiated stream); DELETE ends a session (204). Tool results carry a short text and structuredContent; tool failures come back as results with isError: true. Bodies up to 8 MB. |
/.well-known/oauth-protected-resource/wp-json/edvera/v1/mcp | Protected resource metadata (RFC 9728). The 401 answers point to it: WWW-Authenticate: Bearer realm="Edvera", resource_metadata="…". |
/.well-known/oauth-authorization-server | Authorization server metadata (RFC 8414). Both documents are also served at /wp-json/edvera/v1/oauth/protected-resource and /wp-json/edvera/v1/oauth/authorization-server, and answer 404 while the server is off. |
POST /wp-json/edvera/v1/oauth/register | Dynamic client registration (RFC 7591): redirect URIs must use HTTPS or a loopback address; 20 registrations an hour per address, 1,000 applications at most; applications that never connect are removed after a day. |
/edvera-oauth/authorize/(Plain permalinks: /?edvera_oauth=authorize) | Authorization: authorization code with PKCE (S256 only), WordPress login and the consent screen. The answer includes iss (RFC 9207). |
POST /wp-json/edvera/v1/oauth/token, POST /wp-json/edvera/v1/oauth/revoke | Token endpoint (authorization_code, refresh_token; client authentication none, client_secret_post or client_secret_basic) and revocation (RFC 7009). Access tokens last 1 hour, renewal (refresh) tokens 30 days and rotate; a reused renewal token revokes its whole grant. |
Credentials: Authorization: Bearer …, a bare edv_… key in Authorization, or X-Api-Key; never a URL parameter. Prefixes: API keys edv_, access tokens edvat_, renewal tokens edvrt_. On the MCP route, WordPress's login cookie is ignored. A request with an Origin header must come from the site itself or a listed browser origin (403 otherwise), and CORS headers are sent only for those.
Adding your own tools
Register tools, resources and prompts on the edvera_mcp_register action, which fires once per request when the registry is first needed (an MCP request, the Abilities API, the AI & MCP screen), so ordinary page views do not load any of it. Tool names and descriptions are read by the assistant: write them in English. The registry checks the arguments against your input_schema, the connection's permission (scope) and the acting user's capability, requires confirm: true for tools marked destructiveHint, and runs the handler as the acting user. Return an array (a summary key becomes the text the assistant sees first) or a WP_Error.
add_action( 'edvera_mcp_register', function () {
	edvera_mcp_register_tool( 'myschool_room_bookings', array(
		'title'        => 'Room bookings',
		'description'  => 'Lists the classroom bookings of a course for the next 30 days.',
		'scope'        => 'read',                 // read, content, students, commerce or analytics.
		'capability'   => 'edvera_build',         // Or a callable( $args, $ctx ): bool.
		'annotations'  => array( 'readOnlyHint' => true ),
		'input_schema' => array(
			'type'       => 'object',
			'properties' => array( 'course_id' => array( 'type' => 'integer', 'minimum' => 1 ) ),
			'required'   => array( 'course_id' ),
		),
		'handler'      => function ( $args, $ctx ) {
			// $ctx: user_id, scopes, key_id, client. Runs as that user.
			if ( ! Edvera_Studio_API::can_edit_course( $args['course_id'] ) ) {
				return new WP_Error( 'myschool_forbidden', 'You cannot see this course.' );
			}
			$rows = myschool_bookings( $args['course_id'] ); // Your own code.
			return array( 'summary' => count( $rows ) . ' bookings', 'bookings' => $rows );
		},
	) );
} );
edvera_mcp_register_resource( $uri, $def ) adds a resource (name, description, mimeType, scope, handler returning the text); a URI with a variable such as edvera://course/{id} becomes a resource template. edvera_mcp_register_prompt( $name, $def ) adds a prompt (title, description, arguments, handler returning the messages). Edvera's own resources are edvera://guide/course-structure, edvera://guide/quiz-format, edvera://site/categories, edvera://site/summary and the template edvera://course/{id}.
WordPress Abilities API
When the WordPress Abilities API is available (WordPress 6.9 and later) and the server is on, every tool is also registered as an ability named edvera/<tool> (without the edvera_ prefix, with dashes: edvera_create_course becomes edvera/create-course) in the category edvera, marked public for MCP. So the official WordPress MCP Adapter and other ability clients can use Edvera's tools too. An ability runs as the current WordPress user with every permission that user's capabilities allow (the Abilities API has no keys or scopes); argument checks and the confirmation of destructive tools still apply. Change or skip an ability with the edvera_mcp_ability_args filter (return a non-array to skip it).
Hooks, options and tables
| Hook | Parameters | Use |
|---|---|---|
| Actions | ||
edvera_mcp_register | $registry | Register tools, resources and prompts (above). |
edvera_mcp_audit | $row | After an activity-log row is written (created_at, user_id, key_id, client, ip, event, tool, summary, outcome; no secrets), for example to forward security events to your monitoring. |
| Filters | ||
edvera_mcp_enabled | $enabled | Whether the server, its sign-in pages and its abilities are on (default: the “Enable” setting). |
edvera_mcp_scopes | $scopes | The permissions: slug => [ 'label', 'description', 'cap' ]. |
edvera_mcp_allowed_scopes | $slugs | The permissions this site allows. Keys and approvals outside the list stop working at once, and the screens no longer offer them. |
edvera_mcp_rate_limit | $limit, $ctx | Requests per minute for one key or connection (120; 0 = unlimited). |
edvera_mcp_lockout | $lockout | The sign-in lockout: [ 'attempts' => 10, 'window' => 900, 'duration' => 900 ] (seconds). |
edvera_mcp_client_ip | $ip | The client address used by the lockout and the activity log (default REMOTE_ADDR). Behind a reverse proxy, read the forwarded address here — only from a header your proxy sets. |
edvera_mcp_audit_retention_days | $days | How long activity-log rows are kept (90). |
edvera_mcp_max_keys | $max, $user_id | Active API keys per user (25). |
edvera_mcp_token_lifetimes | $lifetimes | OAuth lifetimes in seconds: [ 'code' => 300, 'access' => 3600, 'refresh' => 2592000 ]. |
edvera_mcp_registration_limits | $limits | OAuth client registration: [ 'per_ip_hour' => 20, 'max_clients' => 1000 ]. |
edvera_mcp_redirect_uri_allowed | $ok, $uri | Whether an OAuth redirect URI may be registered and used (default: HTTPS, or HTTP on localhost, 127.0.0.1 or [::1]). |
edvera_mcp_allowed_origins | $origins | Browser origins allowed to call the server (default: the Browser origins setting). |
edvera_mcp_instructions | $text, $ctx | The instructions the server gives the assistant on initialize (the site, the acting user and the rules: look things up first, drafts, confirmation, privacy). |
edvera_mcp_tool_text | $text, $result, $name | The text content of a tool result (default: its summary, then the result as JSON). |
edvera_mcp_page_size | $size | Items per page of the lists (100). |
edvera_mcp_max_body | $bytes | The largest request body (8 MB). |
edvera_mcp_upload_types | $types | File types the media tool may upload (ext => mime), already narrowed to what WordPress lets the user upload. |
edvera_mcp_base64_max | $bytes | The largest file sent inside a request (the upload limit, at most 15 MB). |
edvera_mcp_ability_args | $args, $tool, $name | The arguments a tool is registered with as an ability; a non-array skips it. |
Functions: edvera_mcp_enabled(), edvera_mcp_url() (the server address), edvera_mcp_settings(), edvera_mcp_scopes(), edvera_mcp_allowed_scopes(), edvera_mcp_user_scopes( $user_id ), edvera_mcp_registry(), and the three register functions.
Stored data: the option edvera_mcp_settings (enabled, origins), the schema version edvera_mcp_db and the hashing key edvera_mcp_pepper; the tables edvera_mcp_tokens (API keys, authorization codes, access and renewal tokens — hashes only, with label, permissions, expiry and last use), edvera_mcp_clients (registered OAuth applications) and edvera_mcp_audit (the activity log), with your database prefix; the daily clean-up event edvera_mcp_prune; short-lived transients for rate limits and lockouts (edvera_mcp_rate_…, edvera_mcp_fail_…, edvera_mcp_lock_…, edvera_mcp_dcr_…); and post meta: _edvera_mcp_created (lessons created by the tools, which Publish course publishes), _edvera_mcp_prereq (prerequisites waiting for their lessons to be published), _edvera_mcp_upload and _edvera_mcp_filename (media uploaded by the tools).
Translation and RTL
What this is for: showing Edvera in your language (four translations are included) and translating it into others.
Edvera is translation-ready. Text domain: edvera-lms. The translation template edvera-lms.pot is in the plugin's languages/ folder.
Edvera ships with four complete translations — every string in the template is translated — in the same languages/ folder:
| Language | Locale | Files in languages/ |
|---|---|---|
| Persian | fa_IR | edvera-lms-fa_IR.po, edvera-lms-fa_IR.mo and thirteen edvera-lms-fa_IR-….json files |
| German | de_DE | edvera-lms-de_DE.po, edvera-lms-de_DE.mo and thirteen edvera-lms-de_DE-….json files |
| Turkish | tr_TR | edvera-lms-tr_TR.po, edvera-lms-tr_TR.mo and thirteen edvera-lms-tr_TR-….json files |
| Arabic | ar | edvera-lms-ar.po, edvera-lms-ar.mo and thirteen edvera-lms-ar-….json files |
The .po file is the editable source, the .mo file is what WordPress reads for PHP strings, and the JSON files hold the strings of the Course Builder, the lesson player and Edvera's other scripts. The German translation uses the informal “du”, like WordPress's own German; the Arabic translation follows the terms of WordPress's own Arabic.
The optional CJK certificate fonts add-on has its own text domain, edvera-cjk-fonts, and ships the same four languages (.po and .mo files) in its own languages/ folder.
WordPress shows the translation that matches the site language (Settings → General → Site Language). In wp-admin, a user who chose another language in their profile sees Edvera's admin screens in that language. For any other language, create a translation as described below.
With Loco Translate
- Install the free Loco Translate plugin.
- Open Loco Translate → Plugins → Edvera LMS and click New language.
- Choose the language. As the location, choose System (
wp-content/languages/plugins/), so plugin updates never overwrite your work. - Translate and save. Loco Translate writes the
.poand.mofiles and the JSON files used by Edvera's scripts.
With Poedit
- Open
edvera-lms.potin Poedit and create a new translation. - Save it as
edvera-lms-<locale>.po, for exampleedvera-lms-fr_FR.po. Poedit also writes the.mofile. - Upload both files to
wp-content/languages/plugins/. - Strings in the Course Builder, the player and other scripts need JSON files. Create them with WP-CLI:
wp i18n make-json wp-content/languages/plugins/edvera-lms-fr_FR.po --no-purge
Right-to-left languages
Edvera's styles use logical CSS properties, so layouts mirror automatically for right-to-left languages such as Persian and Arabic. Directional icons (arrows, chevrons, and the text and list icons) mirror with them; the play symbol never does. On Persian sites, numbers are shown with Persian digits and certificate dates use the Persian calendar. Arabic sites are right-to-left too and keep Western digits, like WordPress's own Arabic; their certificate dates follow the site's date format with Arabic month names. Certificates in Arabic-script languages, Arabic and Persian included, use the bundled Vazirmatn font.
For developers The edvera_locale_digits filter gives any language its native digits in Edvera's screens.
Accessibility
What this is for: how Edvera works for students who use a keyboard or a screen reader, and how it keeps text readable.
Edvera's screens are built to be used with a keyboard and a screen reader:
- Keyboard. Everything in the Course Builder works without a mouse: lessons and chapters move with their up and down buttons as well as by dragging, and the lesson and quiz editors are modal dialogs that keep the Tab key inside, close with Esc and give the focus back to the button that opened them (see Editing a lesson). The “Course actions” menu closes with Esc. The tabs of the management panel follow the arrow keys, Home and End, and the player's “Course content” list on phones closes with Esc.
- Labelled controls. The fields of the Course Builder are tied to their visible labels or have their own names — lesson name, completion rule, release schedule, certificate design, passing score, attempts, total score, scoring method, question type, the options and the correct-answer choice — so screen readers name them. In the management panel, the enrolment and bulk enrolment fields and the per-student checkboxes and buttons of the student list (“Select …”, “Revoke access for …”, “Issue a certificate to …”) are named too. In the player, each quiz question is a group named by the question.
- Announcements. Results that appear without a page change are read out: quiz results, a completed lesson and a ready certificate in the player; a posted question or reply; enrolments, revoked access, issued certificates, saved essay grades and bulk enrolment results in the management panel; and the “Saving…”, “Saved” and error messages and file uploads in the Course Builder. When an action reloads the page, its message is read once the new page is ready.
- Structure. The player, the Course Builder and the stand-alone management panel have a main landmark and a top-level heading; the management panel's tabs are real tabs for screen readers; in the player the lesson on screen is marked as the current page and completed lessons are announced as “Completed”.
- Contrast. With the default Appearance settings, Edvera's text meets the WCAG 2 AA contrast levels: 4.5:1 for text, 3:1 for large text. When you change the colours, Edvera keeps text readable: “Text on accent” must reach 4.5:1 with the accent or a readable colour is used instead, accent-coloured text and the text shades of the dark colour are darkened until they read at 4.5:1 on the background, and a background that is too dark is refused.
- Right to left. Layouts and directional icons mirror for right-to-left languages, see Right-to-left languages.
For developers The player, Q&A and dashboard scripts share a small announcement helper, window.edveraA11y, that your own scripts on those screens can use (it is not loaded in the Course Builder):
if ( window.edveraA11y ) {
	window.edveraA11y.say( 'Bookmark saved' );       // read out now, through one polite live region (#edv-live)
	window.edveraA11y.later( 'Your answer was sent' ); // kept for the next page: read once the reloaded page is ready
}Privacy and personal data
What this is for: answering a person's request to see or delete their data, and the text for your privacy policy.
Edvera works with WordPress's own privacy tools, so you can answer a person's request to see or erase their data (for example under the GDPR). Both tools work by email address, under Tools in wp-admin.
Exporting a person's data
Tools → Export Personal Data includes five Edvera exporters:
| Exporter | Contents |
|---|---|
| Edvera LMS: courses and progress | Course enrolments (course, status, how access was given, enrolment and end dates); progress per course (completed lessons, last lesson completed, videos watched, last visit, whether the course is completed); points, day streak and badges; assignment submissions with grade and feedback; video notes and bookmarks; bundle and download access. |
| Edvera LMS: quiz attempts | Each attempt: course, quiz, date, score, passed or not, and the answers. |
| Edvera LMS: certificates | Certificate ID, name, course, issue date, whether it was revoked, and its verification address. |
| Edvera LMS: orders | The orders placed with that email address — guest orders without an account included — and the orders of the account that has it: number, date, status, items, total, coupon, payment method, payment reference, name, email address and billing address — and the billing address saved in Account details. |
| Edvera LMS: questions and answers | The questions the person asked and the answers they posted in lessons. |
Erasing a person's data
Tools → Erase Personal Data runs three Edvera erasers:
- Edvera LMS: courses and progress deletes the person's enrolments (they lose access), progress, points and badges, quiz attempts, certificates (they no longer verify), bundle and download access, assignment submissions with their uploaded files, video notes and reminder records.
- Edvera LMS: orders keeps the orders as financial records, but replaces their name and email address with anonymised values, removes their billing address and the link to the account, and deletes the billing address saved in Account details. Guest orders placed with that email address are included. The result reports them as retained: “Edvera LMS orders were kept as financial records, without the name, email address and billing address.”
- Edvera LMS: questions and answers leaves the person's questions and answers in the lessons, because other answers refer to them, but removes their name.
The erasers work on the site where the request is made; on a network, run the request on each site where the person studied.
For developers Developers can keep a kind of data with the edvera_privacy_erase_data filter; the eraser then reports it as retained (“Edvera LMS kept this data on purpose: …”):
// Keep issued certificates and orders when a person's data is erased.
add_filter( 'edvera_privacy_erase_data', function ( $erase, $group, $user_id ) {
	return in_array( $group, array( 'certificates', 'orders' ), true ) ? false : $erase;
}, 10, 3 );
Groups: enrollments, progress (everything Edvera stores with the user account: progress, points, notes, reminder records and the like), quiz, certificates, bundles, downloads, assignments (submissions and their files), orders and qa. For a guest's orders, $user_id is 0. After Edvera deleted a user's data on a site, the edvera_user_data_deleted action fires (see Actions).
Privacy policy text
Settings → Privacy → Policy Guide has an Edvera LMS section with suggested text for your privacy policy. It explains what Edvera stores about students (enrolments, progress, quiz answers, submissions, notes, questions and answers, points and badges), what certificates and the verification page show, what is kept with an order and what the payment provider receives, course reminders and sign-in phone numbers, videos from video services, and the right to an export or erasure. Copy the parts that match the features and payment methods you use.
Deleting a user
Deleting a user in Users also deletes their Edvera data on the site: enrolments, quiz attempts, certificates, bundle and download access and assignment files, together with their progress, points and notes. Their orders stay as financial records, with the name and email address; run the “orders” eraser above when these must be anonymised (it finds orders by email address, also after the account is gone). Their questions and answers stay in the lessons unchanged.
Deleting a user also deletes their AI & MCP keys and OAuth connections (see AI & MCP).
On a network, removing a user from one site (Users → Remove on that site) deletes their Edvera data on that site, including their progress, points and notes there; their account and their data on the other sites stay. Deleting a user from the network (Network Admin → Users) deletes their Edvera data on every site.
AI & MCP
While the MCP server is off, it records nothing. Once it is on, Edvera keeps, in three tables of its own:
- API keys and OAuth tokens: the name and permissions of each key, its expiry, and when, from which IP address and by which client it was last used. Keys and tokens themselves are stored only as fingerprints. Revoked and expired keys are deleted 30 days later, used-up tokens after they expire.
- Registered OAuth applications: the name the application gave, its return addresses and the IP address it registered from. Applications that never connect are deleted after a day, unused ones after 90 days.
- The activity log: time, user, connection name, IP address, event, tool, a short summary (argument names and IDs, no content) and the result. Rows are deleted after 90 days (developers:
edvera_mcp_audit_retention_days).
These records are not part of the personal data export and erasure tools. Deleting a user deletes their keys and tokens at once; their activity-log rows stay until they are 90 days old. What an assistant reads through the tools — for example the names and progress of students in a report — is sent to the AI service that runs the assistant and handled under that service's terms, so mention AI assistants in your privacy policy if you use them with student data.
Deactivating and uninstalling
What this is for: what happens to your school's data when you switch Edvera off or delete it.
Deactivating stops Edvera's scheduled tasks (the daily clean-up of unpaid orders, the course reminders, any pending bundle update, which brings a bundle's owners up to date after its items change, and the daily clean-up of the AI & MCP records) and removes its address rules from WordPress's stored rewrite rules, so no Edvera address is left behind. Nothing is deleted. Network deactivation does this on every site. Activating Edvera again brings back its addresses and its daily tasks (the reminders only while they are turned on).
Deleting the plugin (Plugins → Delete) keeps your school's data by default: courses, lessons, students, progress, orders and certificates. Only scheduled tasks and temporary cached data are removed, so you can reinstall and carry on — with one exception: the AI & MCP credentials (API keys, OAuth tokens and registered applications, and the key that fingerprints them) are always deleted, because they are security material rather than school data, so a reinstalled Edvera never revives an old key. The AI & MCP settings and activity log stay.
To remove everything, first tick “Delete all data on uninstall” in Courses → Settings → General, then delete the plugin. Edvera then removes:
- all courses, lessons, bundles, downloads, coupons, cohorts and certificate designs;
- course and download categories;
- its database tables (enrolments, quiz attempts, orders, certificates, bundle and download access, and the AI & MCP activity log);
- its options (the AI & MCP settings included), user data, roles and capabilities;
- the marks the AI tools left on media they uploaded (the files stay in the Media Library);
- the protected files folder and certificate caches in
wp-content/uploads/; - the pages Edvera created itself: the Checkout and My courses pages made on activation and the Courses catalogue page made by “Create the missing pages”.
Pages you created yourself stay, even when they are selected in Settings or contain Edvera blocks.
On a multisite network, deleting the plugin cleans every site according to that site's own “Delete all data on uninstall” setting: a site with the box unticked keeps all its data. The learning data stored with user accounts is removed only for the sites that are cleaned. The sign-in phone numbers, which the whole network shares, are removed only when every site has been cleaned (or never ran Edvera).
This cannot be undone. Back up your database first.
Settings reference
What this is for: every field of Courses → Settings, in one place to look things up.
Courses → Settings (administrators) has four tabs: General, Appearance, Payments and Emails. The AI assistant server has its own screen, Courses → AI & MCP, with its settings stored in the option edvera_mcp_settings; see Connect AI assistants (MCP).
For developers All values are stored in the edvera_settings option; read them with edvera_setting( $key ). The Key columns below give each field's name in that option.
General
| Field | Key | Type | Default | Notes |
|---|---|---|---|---|
| Checkout page | page_checkout | Page | Created on activation | A page with the checkout block or [edvera_checkout]. |
| Student dashboard page | page_dashboard | Page | Created on activation | A page with the dashboard block or [edvera_dashboard]. |
| Terms and conditions page | page_terms | Page | None | When set, buyers must accept it at checkout. |
| Bundle URL base | bundle_slug | Text | bundle | Lowercase letters, numbers and hyphens. Checked for clashes. |
| Download URL base | download_slug | Text | download | Lowercase letters, numbers and hyphens. Checked for clashes (see below). |
| Course URL base | course_slug | Text | course | The part of each course's address before its name. Checked for clashes. |
| Course archive base | course_archive_slug | Text | courses | The address of the list of all courses. It must not be the address of a page. May be the same as the course base. |
| Course category base | course_category_slug | Text | course-category | Must differ from the course and archive bases. Checked for clashes. |
| Delete all data on uninstall | delete_data | Checkbox | Off | See Uninstalling. |
Certificates (see Certificate settings): cert_issuer, cert_logo, cert_signature, cert_signer_name, cert_signer_title, cert_accent, cert_paper, cert_template, cert_prefix, cert_verify_slug (checked for clashes). | ||||
| Add the buy box and curriculum to course pages | course_auto_layout | Checkbox | On | Turn off to place the course parts yourself. |
| Show the number of students on course pages | course_show_students | Checkbox | Off | |
Address checks. When you save a new course base, bundle base, download base or verification page address, Edvera checks that nothing else already answers there: another Edvera screen (/studio/, /learn/, /manage/, the verification page, the bundle and download bases), a WordPress address (wp-admin, feed, category…) or a published page; the bundle base, the download base and the verification address are also checked against the bases of other content types and taxonomies. A clashing value is not saved; the old one stays and a message at the top of the screen explains why. Changed bases take effect at once; old links to the previous addresses stop working.
Appearance
The Appearance tab sets the colours, corners and font of every Edvera screen, so the school matches your brand without custom CSS.
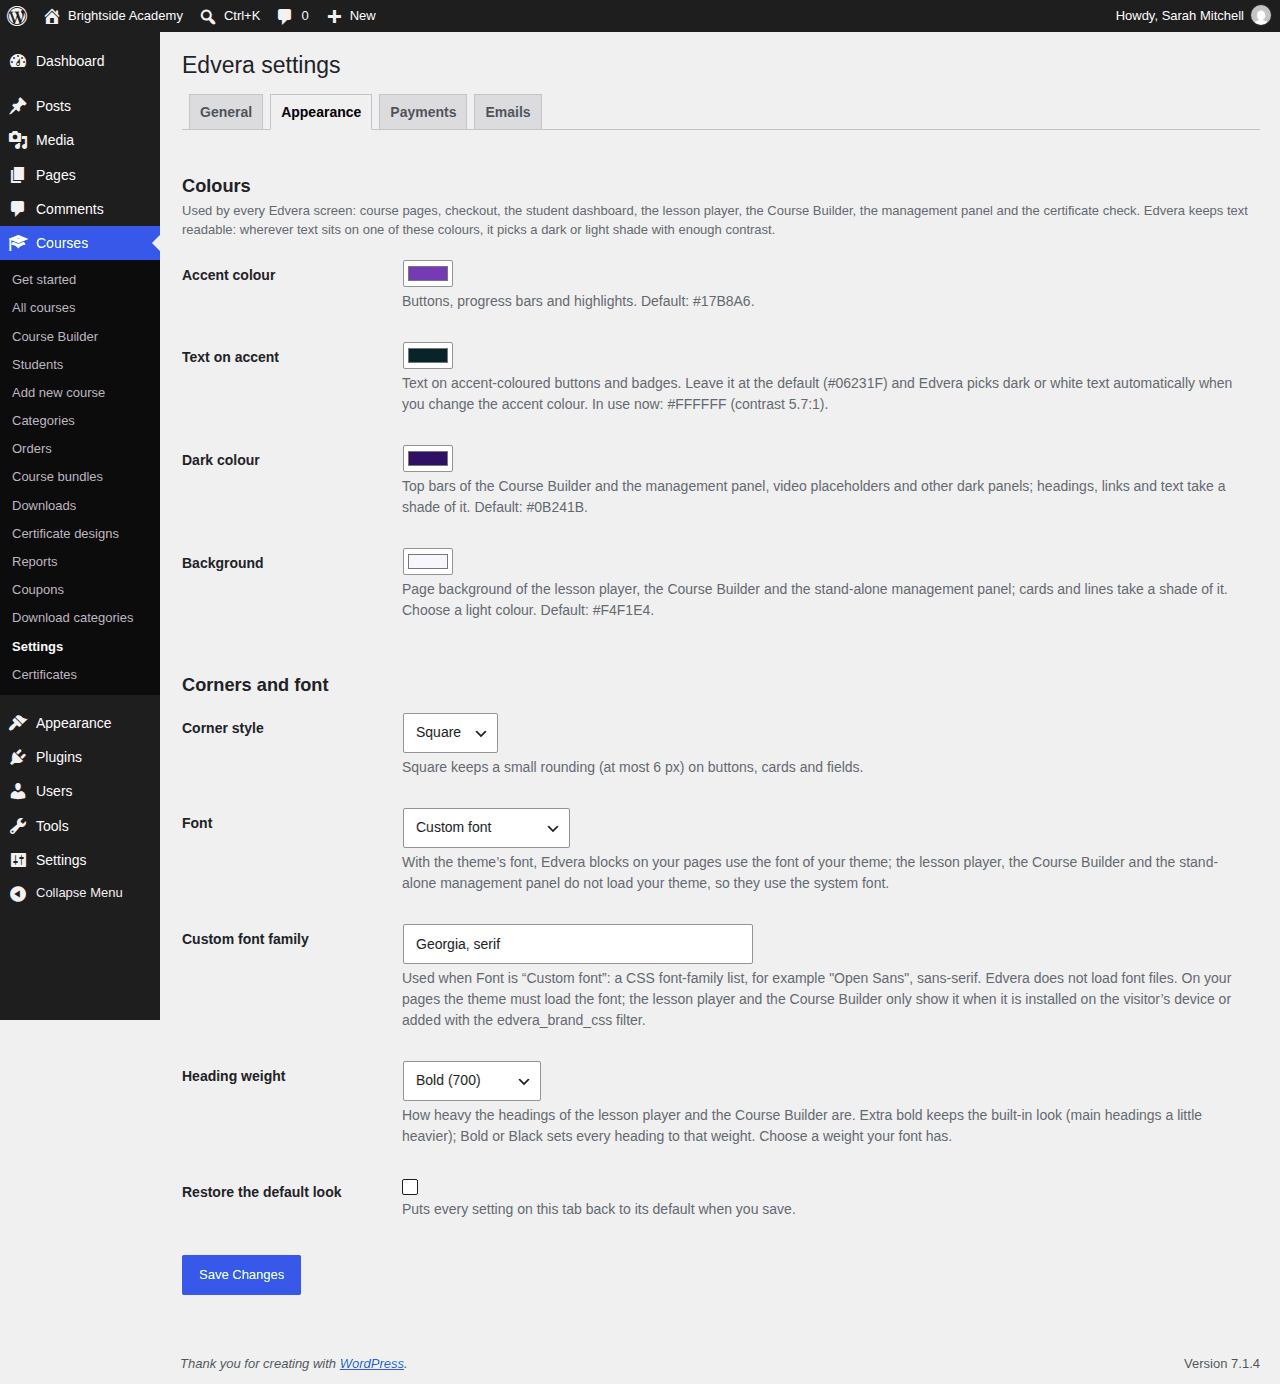
| Field | Key | Default | Notes |
|---|---|---|---|
| Accent colour | brand_accent | #17B8A6 | Buttons, progress bars and highlights. |
| Text on accent | brand_on_accent | #06231F | Text on accent-coloured buttons and badges. Automatic contrast: leave it at the default and Edvera keeps the default dark text when it is readable on your accent, and otherwise switches to white (or near-black). The help text shows the colour in use and its contrast, for example “In use now: #FFFFFF (contrast 5.7:1)”. A colour you choose yourself is used only when it reaches a contrast of 4.5:1 with the accent; otherwise saving shows a message and Edvera uses a readable colour instead. The hover colour of buttons is derived from the accent, and its text is checked the same way. |
| Dark colour | brand_dark | #0B241B | Top bars of the Course Builder and the management panel, video placeholders and other dark panels. Headings, links and text take a shade of it, darkened where needed to stay readable on the background. |
| Background | brand_paper | #F4F1E4 | Page background of the lesson player, the Course Builder and the stand-alone management panel; cards and lines take a shade of it. It must be light (roughly a grey of #CCCCCC or lighter; relative luminance 0.6): a darker colour is refused with “The background … is too dark: the lesson player and the Course Builder are designed for a light background. The previous background was kept.” |
| Corner style | brand_corners | Rounded (rounded) | “Rounded” or “Square”. Square keeps a small rounding (at most 6 px) on buttons, cards and fields. |
| Font | brand_font | Use the theme’s font (theme) | “Use the theme’s font”: Edvera blocks on your pages use your theme's font; the lesson player, the Course Builder, the stand-alone management panel and the verification page do not load your theme, so they use the system font. “System font” (system): the system font everywhere. “Custom font” (custom): the family below everywhere. |
| Custom font family | brand_font_custom | Empty | A CSS font-family list, for example "Open Sans", sans-serif, used when Font is “Custom font”. Up to 200 characters of font names (any script), digits, spaces, paired quotes, commas, dots, hyphens and underscores; anything else is refused and the previous value kept. When the list names no generic family (such as serif or sans-serif), Edvera adds the system font stack after it. With “Custom font” and no family, a message says so and the theme’s font is used. Edvera does not load font files: on your pages the theme must load the font; the player and the Course Builder show it only when it is installed on the visitor's device or added with the edvera_brand_css filter (see Styling and icons). |
| Heading weight | brand_heading_weight | Extra bold (800) | “Bold (700)”, “Extra bold (800)” or “Black (900)”: how heavy the headings of the lesson player and the Course Builder are. Extra bold keeps the built-in look (main headings a little heavier, at 900); Bold or Black sets every heading there to that weight. Choose a weight your font has. |
| Restore the default look | brand_reset | Off | When ticked, saving puts every setting on this tab back to its default. The box itself is not stored. |
Where the settings apply
- Your theme's pages: the course buy box, curriculum and catalogue, the checkout, bundles and downloads take the accent, text on accent, corner style and font, and keep your theme's text colour. The student dashboard, the leaderboard, essay grading and a management panel hosted in a page use the whole palette (accent, dark colour, background shades and text colours).
- Stand-alone screens: the lesson player, the Course Builder, the management panel at
/manage/and the certificate verification page use the colours, the background, the corner style and the font; the lesson player and the Course Builder also take the heading weight. - Not affected: Edvera's wp-admin screens keep the WordPress admin look, and certificate PDFs use the “Accent colour” of the certificate settings.
Edvera prints only the settings that differ from the built-in look, as CSS custom properties on :root next to its own stylesheet, once per page. With every setting at its default nothing is printed, and the screens look exactly as before. Developers can change or extend the output, see Styling and icons.
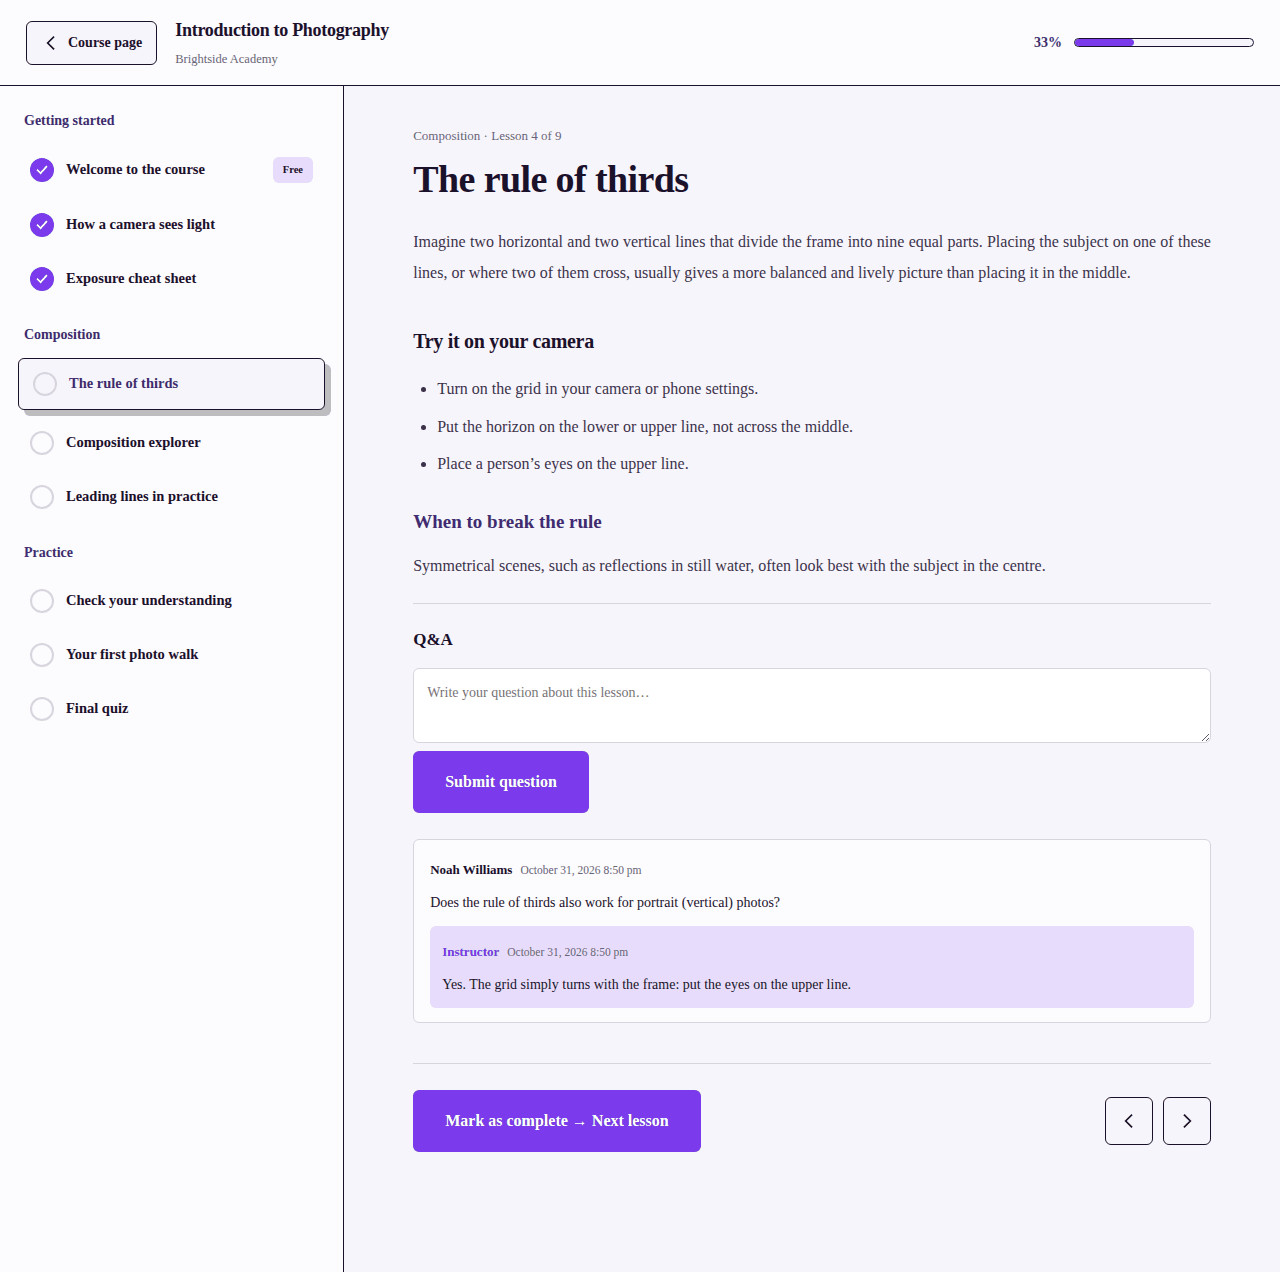
#7C3AED, dark colour #2E1065, background #F7F5FC, square corners, custom font Georgia, serif and Bold (700) headings.Payments
| Fields | Keys | Defaults |
|---|---|---|
| Currency, Currency position, Thousand separator, Decimal separator | currency, currency_pos, thousand_sep, decimal_sep | USD, left, ,, . (the separators are chosen from lists, see Currency) |
| Every method: Enable, Title at checkout | gw_<id>_enabled, gw_<id>_title | Off; the method's name |
| Stripe: Test mode, Test secret key, Test webhook signing secret, Live secret key, Live webhook signing secret, Connection (the Test connection button; nothing stored), Webhook URL (read-only) | gw_stripe_test_mode, gw_stripe_secret_key_test, gw_stripe_webhook_secret_test, gw_stripe_secret_key_live, gw_stripe_webhook_secret_live | Test mode on |
| PayPal: Sandbox mode, Client ID, Secret, Connection (the Test connection button; nothing stored), Webhook ID (optional), Webhook URL (read-only) | gw_paypal_sandbox, gw_paypal_client_id, gw_paypal_secret, gw_paypal_webhook_id | Sandbox on |
| Bank transfer: Payment instructions, Cancel unpaid orders after (days) | gw_offline_instructions, gw_offline_expire_days | —; 14 (0 = never) |
| Zarinpal: Sandbox mode, Merchant ID | gw_zarinpal_sandbox, gw_zarinpal_merchant | Sandbox on |
| WooCommerce: Sell through WooCommerce (only while WooCommerce is active) | wc_enabled | Off |
Stripe and PayPal keys are checked when you save them, and a value of the wrong form is not stored; see Checking your keys.
For developers Payment method IDs: stripe, paypal, offline (bank transfer) and zarinpal.
Emails
| Field | Key | Default |
|---|---|---|
| “From” name | email_from_name | Site title |
| “From” address | email_from_address | Admin email |
| Email the site admin about new paid orders | email_admin_orders | On |
| Email the site admin about new bank-transfer orders awaiting payment | email_admin_on_hold | On. The buyer always receives the payment instructions. |
| Course reminders (see Reminders) | ||
| Send course reminders | reminders_enabled | Off |
| “You haven’t visited in a while” reminder | reminders_inactive | On |
| “Your quiz is waiting” reminder | reminders_quiz | On |
| After how many days of inactivity | reminders_days | 3 |
| Minimum gap between two reminders | reminders_gap | 5 |
Settings in other places
- Per course: the Course settings box (status, featured, protection, access length, level, price) and the Course Builder certificate box.
- Per lesson: the Course Builder lesson and quiz editors.
- Per bundle and download: their settings boxes in the editor.
Site addresses
What this is for: the full list of web addresses Edvera uses, with and without pretty permalinks.
Edvera's screens have short addresses with pretty permalinks (any structure in Settings → Permalinks except Plain). With Plain permalinks a short address cannot be routed, so every link Edvera prints uses the query form on your home address instead, for example https://example.com/?edvera_learn=1&edvera_lcourse=12. Both forms open the same screen, and the query form also works with pretty permalinks.
| Address | With Plain permalinks | What |
|---|---|---|
/studio/, /studio/<course id>/ | ?edvera_studio=1, ?edvera_studio=1&edvera_studio_course=<course id> | Course Builder |
/learn/<course id>/, /learn/<course id>/<lesson id>/ | ?edvera_learn=1&edvera_lcourse=<course id>, adding &edvera_llesson=<lesson id> | Lesson player |
/manage/, /manage/<course id>/ | ?edvera_manage=1, ?edvera_manage=1&edvera_manage_course=<course id> | Management panel (no page needed) |
/verify-certificate/, /verify-certificate/<ID>/ | ?edvera_cert_verify=1, ?edvera_cert_verify=1&edvera_cert_code=<ID> | Certificate verification (set in Settings) |
/course/<slug>/, /courses/, /course-category/<slug>/ | WordPress's own plain addresses for posts, archives and categories | Course page, course archive, course category (bases set in Settings) |
/bundle/<slug>/ | Bundle page (base set in Settings) | |
/download/<slug>/, /downloads/, /download-category/<slug>/ | Download page (base set in Settings), archive, category | |
/wp-json/edvera/v1/webhook/<method id> | ?rest_route=/edvera/v1/webhook/<method id> | Payment webhooks. Always copy the “Webhook URL” shown in the Payments settings. |
/edvera-file/…, /edvera-download/…, /edvera-asg/…, /edvera-ix/… | ?edvera_file=1&…, ?edvera_dl=<id>&…, ?edvera_asg_dl=1&…, ?edvera_ix=1&… | Protected delivery of lesson files, downloads, assignment files and interactive pages |
With “PATHINFO” permalinks (a structure that starts with /index.php/, for servers without address rewriting), Edvera's own addresses — the Course Builder, the lesson player, the management panel, the verification page, lesson files, downloads, assignment files and interactive pages — include it too, for example /index.php/learn/12/ or /index.php/edvera-download/5/.
For developers Developers can change the Course Builder, player and management panel bases with the edvera_studio_slug, edvera_learn_slug and edvera_manage_slug filters. Every short address Edvera prints follows them; the query form is the same whatever the base.
Developer reference
What this is for: functions and hooks for developers who extend Edvera with code. You do not need this section to run your school.
Use these functions and hooks from a theme's functions.php or your own plugin. Check that Edvera is active first, for example with function_exists( 'edvera_enroll' ). Prices are integers in the currency's smallest unit (for example cents) unless stated otherwise.
Loading and requirements
The main plugin file, edvera-lms.php, is only a guard. It defines the constants EDVERA_VERSION, EDVERA_FILE, EDVERA_DIR, EDVERA_URL and EDVERA_MIN_PHP ('8.1'), checks the running PHP with edvera_php_compatible() and only then loads the plugin from includes/load.php, which loads every module and boots Edvera on plugins_loaded. The guard is kept free of PHP 8 syntax, so an older PHP can still read it: there it registers only the paused notice and the edvera_php Site Health test (see Edvera on an older PHP version) and returns. While Edvera is paused, edvera_php_compatible() exists but edvera_enroll() and the rest of the API do not, so keep testing for edvera_enroll.
The server checks live in includes/class-edvera-requirements.php (Edvera_Requirements). Each check has an ID — php, gd, mbstring, fileinfo, intl, libraries, uploads, permalinks, https, limits — and becomes the Site Health test edvera_<ID>; recorded errors add the test edvera_errors, and the Info section has the key edvera-lms. A check is an array with status (good, recommended or critical), label, description (plain text), name (a short name used in lists such as “Missing: …”) and action (an optional [ url, link text ]). Checks you add with the edvera_requirement_checks filter appear in Site Health, and a critical one also in the admin notice and on Get started:
add_filter( 'edvera_requirement_checks', function ( $checks ) {
	$checks['my_smtp'] = array(
		'status'      => defined( 'MY_SMTP_HOST' ) ? 'good' : 'recommended',
		'label'       => __( 'Course emails are sent through SMTP', 'my-plugin' ),
		'description' => __( 'Receipts and reminders reach inboxes more reliably through an SMTP service.', 'my-plugin' ),
		'name'        => __( 'SMTP for emails', 'my-plugin' ),
		'action'      => array(),
	);
	return $checks;
} );
Record an error your add-on recovered from with edvera_log_error( 'my_addon', 'What went wrong' ): it joins the recorded errors (never pass secrets or personal data).
Functions
Enrolment and access
| Function | Returns | Notes |
|---|---|---|
edvera_enroll( $user_id, $course_id, $args = array() ) | bool | $args: source (string, default admin); ref (the order or bundle ID that grants access); expires_at ('Y-m-d H:i:s' in site time, or null for no expiry; leave it out to use the course's access length). |
edvera_unenroll( $user_id, $course_id ) | bool | Removes all access to the course. |
edvera_is_enrolled( $course_id, $user_id = null ) | bool | Active and not expired. |
edvera_can_access( $course_id, $user_id = null ) | bool | Administrators always; otherwise enrolled, and the course is not in the Trash. |
edvera_can_preview( $course_id, $user_id = null ) | bool | Whether the user may preview the course's lessons as its editor (they can edit the course). The player uses preview only for users without access. |
edvera_can_grade_course( $course_id, $user_id = null ) | bool | Whether the user may grade the course's quizzes and assignments, answer its questions and download its students' assignment files: the courses they can edit, or every course with edvera_manage. |
edvera_find_or_create_user( $email, $create = true ) | array|WP_Error | [ 'user' => WP_User, 'created' => bool ]. New accounts get WordPress's “set your password” email. With $create = false an unknown address returns a no_account error instead of creating an account. |
edvera_can( $cap, $user_id = null ) | bool | Checks an Edvera capability or its fallback. |
edvera_add_role( $slug, $name, $caps ), edvera_remove_role( $slug ) | — | Custom roles. The slug is prefixed with edvera_. |
Courses and curriculum
| Function | Returns |
|---|---|
edvera_course_states() | [ 'open' => label, 'closed' => label, 'archived' => label ] |
edvera_course_state( $course_id ), edvera_set_course_state( $course_id, $state ) | open, closed or archived; bool |
edvera_course_accepts_enrollment( $course_id ) | bool — published and open |
edvera_course_student_count( $course_id ) | int |
edvera_course_protected( $course_id ) | bool |
edvera_course_post_type(), edvera_lesson_post_type() | edvera_course, edvera_lesson |
edvera_lesson_types(), edvera_completion_rules() | Lists of slugs: video, file, text, quiz, assignment, interactive; video, download, manual |
edvera_get_curriculum( $course_id ) | Chapters with their lessons |
edvera_get_lesson( $lesson_id ), edvera_lesson_course( $lesson_id ) | Lesson array or null; course ID |
edvera_course_lessons( $course_id ), edvera_first_lesson( $course_id ), edvera_next_lesson( $course_id, $lesson_id ), edvera_prev_lesson( $course_id, $lesson_id ) | Ordered lesson IDs; lesson IDs |
Edvera_Progress::progress( $user_id, $course_id ) | [ 'done', 'total', 'percent' ] |
Edvera_Progress::is_complete( $user_id, $course_id, $lesson_id ), Edvera_Progress::mark_complete( $user_id, $course_id, $lesson_id ) | Lesson completion |
Edvera_Progress::done_ids( $user_id, $course_id ) | Every lesson ID the student has completed in the course on this site (strings), including lessons no longer in the course |
Edvera_Progress::completed_ids( $user_id, $course_id ) | The completed lessons that count toward progress: those in the course's current curriculum, after the edvera_course_completed_items filter |
Edvera_Progress::effective_rule( $lesson_id ) | The rule that really completes the lesson for students: quiz, video, download or manual (see edvera_lesson_completion_rule) |
edvera_ix_attach( $lesson_id, $src, $title ) | array|WP_Error. Stores an HTML file from disk as the lesson's interactive page, replacing a previous one (for importers; it does no checks). $src is the path to the HTML file; $title is the frame's accessible title. |
edvera_ix_get( $lesson_id ), edvera_ix_detach( $lesson_id ) | The lesson's page [ 'file', 'title' ] or null; removes the page and its file |
edvera_ix_max_size() | Largest interactive page accepted, in bytes (10 MB, or the server limit when lower) |
Addresses
Build links to Edvera's own screens with these functions (in includes/urls.php); they follow the slug filters, subdirectory installs and the permalink setting (the query form with Plain permalinks, index.php/ with PATHINFO permalinks, see Site addresses). Each returns a full URL.
| Function | Returns |
|---|---|
edvera_pretty_permalinks() | bool — whether any permalink structure other than Plain is set |
edvera_route_url( $path, $query ) | The address of a route of your own: /$path/ with pretty permalinks (/index.php/$path/ with PATHINFO), or the $query variables on the home URL with Plain permalinks. Pass the query variables your rewrite rule maps the path to, for example edvera_route_url( 'learn/12', array( 'edvera_learn' => 1, 'edvera_lcourse' => 12 ) ). |
edvera_learn_url( $course_id, $lesson_id = 0 ) | The lesson player for a course; 0 resumes where the student left off |
edvera_studio_url( $course_id = 0 ) | The Course Builder; 0 = the course list |
edvera_manage_url( $course_id = 0 ) | The management panel; 0 = the course picker |
edvera_manage_slug() | The management panel's address part (default manage) |
edvera_catalog_url() | The course archive (the home page if there is none) |
Commerce
| Function | Returns |
|---|---|
edvera_price( $minor, $code = '' ) | Formatted price |
edvera_buy_button( $item_id ) | Buy button HTML for a course, bundle or download |
edvera_checkout_url( $args = array() ), edvera_receipt_url( $order ) | URLs |
edvera_gateways( $all = false ), edvera_gateway( $id ) | Available (or all) payment methods; one method |
edvera_order_note( $order_id, $note ) | Adds a line to an order's history |
edvera_coupon_check( $code, $lines, $user_id = 0, $email = '' ) | Discount (smallest unit) or WP_Error |
edvera_setting( $key, $fallback = '' ) | A value from Courses → Settings |
Edvera_Orders::is_test( $order ) | bool — whether the order was placed in a payment method's test or sandbox mode (order meta test; older Stripe orders whose Checkout Session ID starts with cs_test_ count too) |
Edvera_Orders::deletable( $order ) | true, or a WP_Error that says why the order must stay (see Deleting orders), after the edvera_order_deletable filter |
Edvera_Orders::delete( $id ) | true or WP_Error. Deletes an order that deletable() allows, with its items; a paid test order first takes back what it granted, like a refund. Fires edvera_before_delete_order and edvera_order_deleted. |
Edvera_Emails::in_locale( $who, $callback ) | The callback's result. Runs the callback in a reader's language and switches back afterwards: 'site' for the site language, or a user ID for that user's profile language (the site language when they have none, or when it is not installed). Use it for emails of your own. |
Edvera_Emails::site_locale() | The site language (Settings → General), also while another language is switched on with switch_to_locale() |
Certificates
| Function | Returns |
|---|---|
edvera_cert_issue( array $args ) | [ 'code', 'id', 'url' ] or WP_Error. $args: user_id, full_name, course_id, course_title, lang. |
edvera_cert_get( $code ), edvera_cert_verify_url( $code ) | Certificate array or null; URL |
edvera_user_course_cert( $user_id, $course_id ) | The student's certificate for a course |
edvera_maybe_issue_cert( $user_id, $course_id ) | Checks the course condition and issues when it is met |
edvera_cert_settings( $course_id ), edvera_cert_templates() | A course's certificate settings; the designs |
Edvera_Cert_PDF::try_pdf_for( array $rec ) | The PDF of a certificate record as a string, or a WP_Error with a message for visitors when it cannot be created on this server; a failure is recorded with edvera_log_error() instead of stopping with a fatal error |
Edvera_Cert_PDF::unavailable_reason() | Why this server cannot create certificate PDFs: '' (it can), 'library' (the bundled PDF library is missing) or 'mbstring' (the PHP extension is missing) |
Requirements and errors
| Function | Returns |
|---|---|
edvera_php_compatible( $version = PHP_VERSION ) | bool — whether that PHP version can run Edvera (EDVERA_MIN_PHP or newer). Defined by the guard, so it also exists while Edvera is paused. |
edvera_log_error( $source, $message ) | — Records an error Edvera (or your add-on) recovered from: $source is a short key such as certificate_pdf, $message plain text (up to 500 characters). The last 20 are kept in the option edvera_error_log and shown in Site Health; with WP_DEBUG_LOG they also go to the PHP error log (filter edvera_error_log_php). Fires edvera_error_logged. Never pass secrets or personal data. |
Edvera_Requirements::checks(), Edvera_Requirements::missing() | Every server check ([ id => check ], after the edvera_requirement_checks filter, see Loading and requirements); only the failing required ones |
Downloads
| Function | Returns |
|---|---|
edvera_download_grant( $user_id, $download_id, $source = 'manual' ), edvera_download_revoke( $user_id, $download_id, $source = '' ) | bool |
edvera_download_user_has( $user_id, $download_id ), edvera_download_can_download( $download_id, $user_id = 0 ) | bool |
edvera_download_url( $download_id, $user_id = 0 ) | Signed, personal download URL |
edvera_download_file( $download_id ) | [ 'name', 'size', 'mime', 'ext', 'type' ] or null |
edvera_download_attach_file( $download_id, $path, $name = '' ) | true or WP_Error — attaches a file from disk (for importers) |
edvera_download_states(), edvera_download_state( $download_id ), edvera_set_download_state( $download_id, $state ), edvera_download_accepts_sales( $download_id ), edvera_download_owner_count( $download_id ) | Lifecycle helpers |
edvera_user_files( $user_id ) | [ [ 'id', 'title', 'url' ], … ] |
Bundles
| Function | Returns |
|---|---|
edvera_bundle_items( $bundle_id ) | Published items in order: [ [ 'type' => 'course'|'download', 'id', 'key' ], … ] |
edvera_bundle_mode( $bundle_id ) | all or sequential |
edvera_bundle_price( $bundle_id ), edvera_bundle_items_value( $bundle_id ) | Smallest unit |
edvera_bundle_has_access( $bundle_id, $uid = null ) | bool |
edvera_bundle_grant_manual( $uid, $bundle_id ), edvera_bundle_revoke( $uid, $bundle_id ) | bool |
edvera_bundle_user_bundles( $uid ) | Dashboard rows with item states |
edvera_bundle_states(), edvera_bundle_state( $bundle_id ), edvera_set_bundle_state( $bundle_id, $state ), edvera_bundle_accepts_sales( $bundle_id ), edvera_bundle_owner_count( $bundle_id ) | Lifecycle helpers |
edvera_render_bundle( $bundle_id, $args = array() ) | Bundle card HTML |
Files, points and cohorts
| Function | Notes |
|---|---|
edvera_protect_file_attachment( $attachment_id ) | Moves a Media Library file into protected storage; its public URL stops working. Returns bool. |
edvera_stream_download( $path, $filename, $mime = 'application/octet-stream' ) | Sends a file and exits. It does no access check, so check access first. |
edvera_points( $uid ), edvera_award_points( $uid, $n ), edvera_badges( $uid ), edvera_leaderboard_data( $limit = 10 ) | Points and badges. edvera_award_points() always adds. |
edvera_award_points_once( $uid, $key, $n ) | Adds $n points only the first time this user gets the event $key (for example 'webinar:12'); returns whether points were added. Edvera's own keys are lesson:<course>:<lesson>, course:<id> and cert:<id>. |
edvera_cohort_add_member( $cohort, $uid ), edvera_user_cohorts( $uid ), edvera_course_cohorts( $course ) | Cohorts |
edvera_reminders_run() | Runs the reminder scan now (when reminders are turned on) and returns the counts sent: [ 'inactivity' => n, 'quiz' => n ]. |
edvera_format_datetime( $mysql ) | A stored local date-time (Y-m-d H:i:s) in the site's date and time format and the site language's digits; '' when empty |
Appearance, icons and quizzes
| Function | Returns |
|---|---|
edvera_brand_defaults() | The built-in Appearance values: brand_accent, brand_on_accent, brand_dark, brand_paper (#RRGGBB), brand_corners, brand_font, brand_font_custom, brand_heading_weight |
edvera_brand_settings() | The stored Appearance settings, with anything invalid replaced by its default |
edvera_brand_vars( $brand = null ) | The brand custom properties ([ '--edv-brand-accent' => '#7C3AED', … ]) for a set of Appearance settings (default: the stored ones). Only properties that differ from the built-in look are returned; none with the defaults. |
edvera_brand_css() | The CSS Edvera prints with its stylesheets (:root{…}), after the edvera_brand_css_vars and edvera_brand_css filters; '' when there is nothing to print |
edvera_brand_style_handles() | The stylesheet handles the brand CSS is attached to |
edvera_color_contrast( $a, $b ), edvera_color_readable( $background, $prefer = array(), $min = 4.5 ) | The WCAG 2 contrast ratio of two hex colours (1 to 21); a readable text colour for a background: the first of $prefer that reaches $min, else white, else near-black |
edvera_icon( $name, $args = array() ) | A line icon as inline SVG, or '' for an unknown name. $args: class (extra CSS classes), label (text for screen readers, printed visually hidden after the icon). See Styling and icons. |
edvera_icon_defs() | The icon set: [ name => [ 'svg' => inner SVG markup, 'dir' => mirrors in right-to-left ] ] |
Edvera_Quiz::normalize_answer( $answer ) | A short answer (or answer key) in the form used for matching, see Short-answer matching |
Per-site user data
The learning data Edvera keeps with a user account (completed lessons, resume position, video progress, last visit, reminder dates, points, streak and ledger, certificate name prompts, video notes, assignment submissions) belongs to one site. Its user meta keys carry the site's table prefix, like WordPress's own per-site user options: wp_edvera_points on a single site and on the main site of a network, wp_3_edvera_points on site 3. Only the sign-in phone number, edvera_phone, is network-wide. Read and write these values through the functions below rather than get_user_meta(), so your code works on every site and while an old install is still being moved to the new keys (see Updating).
| Function | Returns |
|---|---|
edvera_umeta_key( $key ) | The full user meta key on the current site, for example wp_3_edvera_points for edvera_umeta_key( 'edvera_points' ) on site 3 |
edvera_get_umeta( $user_id, $key, $single = true ) | A per-site value of the current site (as get_user_meta()); $key without the site prefix |
edvera_update_umeta( $user_id, $key, $value ), edvera_delete_umeta( $user_id, $key ) | Store or delete a per-site value of the current site (as update_user_meta() and delete_user_meta()) |
An add-on that stores its own per-site keys with edvera_update_umeta() can add them to the edvera_user_meta_site_keys filter, so they are moved from an old unprefixed form too.
Actions
An $order array has id, user_id, email, status, currency, subtotal, discount, total, coupon, gateway, items and meta. An $item has item_type (course, bundle or download), item_id, title and price. The WooCommerce bridge fires the item actions with a pseudo order: [ 'id' => 0, 'user_id' => …, 'source' => 'woocommerce' ].
| Action | Parameters | Fires when |
|---|---|---|
| Learning | ||
edvera_enrolled | $user_id, $course_id, $source | A user is enrolled (also when another grant is added) |
edvera_unenrolled | $user_id, $course_id | All access is removed |
edvera_sv_item_completed | $user_id, $lesson_id, $course_id | A lesson is completed for the first time |
edvera_course_completed | $user_id, $course_id | A course is completed (once per user) |
edvera_quiz_attempted | $user_id, $course_id, $result | A quiz is submitted. $result has score, passed, points and total. |
| Courses | ||
edvera_course_state_changed | $course_id, $state, $old | Open, closed or archived changes |
edvera_course_deleted | $course_id | A course and its learning data were deleted |
edvera_curriculum_saved | $course_id, $tree | The chapter and lesson tree is saved |
edvera_course_settings_fields | $post | Inside the Course settings box — print your own fields |
edvera_course_settings_save | $post_id | Course settings are saved (nonce and capability already checked) |
| Certificates | ||
edvera_course_certificate_issued | $user_id, $course_id, $result | A certificate is issued for a course (for a bundle, with the bundle ID) |
edvera_cert_issued | $code, $id, $args | A certificate record is created |
edvera_cert_name_saved | $user_id | A student saves their certificate name |
edvera_cert_mpdf | $mpdf, $lang | Before a PDF is written — adjust the mPDF instance |
| Orders | ||
edvera_order_created | $order_id | An order is created |
edvera_order_paid | $order | An order is paid and fulfilled (once) |
edvera_order_on_hold | $order | A bank-transfer order is placed |
edvera_order_refunded | $order | An order is refunded |
edvera_order_problem | $order, $reason | A paid order could not create the buyer's account (no_account) |
edvera_fulfil_item | $item, $order | For each item of a paid order — grant your own item types here |
edvera_revoke_item | $item, $order | For each item of a refunded order |
edvera_coupon_used | $coupon_id, $order | A coupon use is recorded |
edvera_before_delete_order | $order | An order is about to be deleted (it passed Edvera_Orders::deletable()), before a paid test order takes back its access |
edvera_order_deleted | $order | An order and its items were deleted; $order is the deleted order. The coupons module forgets the order's coupon use here; delete your own data about the order here. |
| Bundles | ||
edvera_bundle_granted | $user_id, $bundle_id, $source, $order_id | A bundle is granted |
edvera_bundle_revoked | $user_id, $bundle_id, $row | A bundle is revoked |
edvera_bundle_item_unlocked | $user_id, $bundle_id, $item | A bundle item unlocks |
edvera_bundle_state_changed | $bundle_id, $state, $old | The status changes |
edvera_bundle_deleted | $bundle_id | A bundle is deleted permanently |
edvera_bundle_settings_fields, edvera_bundle_settings_save | $post; $post_id | Add and save fields in the bundle box |
| Downloads | ||
edvera_download_granted, edvera_download_revoked | $user_id, $download_id, $source | Access is granted or revoked |
edvera_download_downloaded | $user_id, $download_id | A file download starts |
edvera_download_state_changed | $download_id, $state, $old | The status changes |
edvera_download_file_changed | $download_id, $old | The file is replaced or removed |
edvera_download_settings_save | $post_id | Download settings are saved |
edvera_download_deleted | $download_id | A download is deleted permanently |
| Screens | ||
edvera_standalone_body_open | $screen: player, studio or manage | Right after the opening <body> tag of the lesson player, the Course Builder and the stand-alone management panel. These screens do not use your theme, so wp_body_open never fires there; use this action for site-wide notices. Their styles are printed before it, so style your markup inline. (When a page hosts the management panel, your theme's own wp_body_open runs instead.) |
| Privacy | ||
edvera_user_data_deleted | $user_id | After a user's Edvera data was deleted on the current site: the user was deleted (on a network: removed from this site, or deleted from the network, once per site), or their data was erased with Tools → Erase Personal Data. Delete your add-on's own data for that user here. See Privacy and personal data. |
| Server requirements | ||
edvera_error_logged | $source, $message | An error Edvera recovered from was recorded with edvera_log_error(), for example to forward it to your monitoring |
| AI & MCP | ||
edvera_mcp_register | $registry | The MCP registry is first needed in a request: register tools, resources and prompts. See Adding your own tools. |
edvera_mcp_audit | $row | An AI & MCP activity-log row was written (no secrets) |
| Notifications | ||
edvera_send_reminder | $user_id, $message, $user | A reminder is sent (after the email) |
edvera_notify | $user_id, 'reminder', [ 'text' => $message ] | A generic notification, for SMS or push add-ons |
Filters
| Filter | Parameters | Use |
|---|---|---|
| Access and learning | ||
edvera_can_access | $ok, $course_id, $user_id | Grant or deny course access |
edvera_can_preview | $ok, $course_id, $user_id | Whether a user may preview a course's lessons as its editor (default: they can edit the course) |
edvera_can_grade_course | $ok, $course_id, $user_id | Whether a user may grade a course's quizzes and assignments, answer its questions and download its students' assignment files, for example for a teaching-assistant role |
edvera_lesson_completion_rule | $rule, $lesson_id, $lesson | The rule that completes a lesson for students: quiz, video, download or manual. $lesson is the edvera_get_lesson() array. Any other value means manual. |
edvera_video_complete_percent | $percent (90) | Share of a video to watch to complete a lesson (1 to 100) |
edvera_video_max_rate | $rate (2.5) | Fastest playback speed accepted when checking watch reports (at least 1) |
edvera_ix_max_size | $bytes | Largest interactive page an instructor may upload (default 10 MB, or the server limit when lower) |
edvera_course_accepts_enrollment | $ok, $course_id | Open or close enrolment |
edvera_course_protected | $protected, $course_id | Content protection per course |
edvera_course_total_items | $count, $course_id | Number of items progress is measured against (default: the published lessons in the curriculum) |
edvera_course_completed_items | $ids, $done, $user_id, $course_id | The completed items that count toward progress. $ids: the completed lessons that are in the current curriculum; $done: every completed ID on record. Use it together with edvera_course_total_items when other items make up 100%. |
edvera_video_watermark | $text, $user, $lesson_id | Watermark text; return '' to remove it |
edvera_file_mimes, edvera_file_max_size | $types; $bytes | Lesson attachment types and size limit |
edvera_asg_mimes | $types | Assignment upload types |
edvera_quiz_normalize_answer | $normalized, $raw | A short answer or answer key in the form used for matching (after the built-in steps of Short-answer matching); two answers match when their forms are equal. $raw is the text as typed. |
| Pages and addresses | ||
edvera_course_slugs | $slugs (course, archive, category) | Course URL bases |
edvera_studio_slug, edvera_learn_slug, edvera_manage_slug | $slug | Course Builder, player and management panel bases (defaults studio, learn, manage) |
edvera_studio_nav | $links | Course Builder top navigation: [ 'key', 'label', 'url' ] items |
edvera_studio_role_label | $label, $user | The role shown next to the user's name in the Course Builder |
edvera_slug_in_use | $clash, $slug, $ignore | Report your own address as taken when Edvera checks a new base: return a description such as 'the shop', or '' when free. $ignore lists the post types and taxonomies being changed. |
edvera_course_details | $details, $course_id | Detail rows in the buy box |
edvera_catalogue_query | $query_args, $atts | Course catalogue query (WP_Query arguments), after every selection and order attribute is applied; an orderby you set here wins. $atts holds every attribute under its block name, validated: perPage, category, excludeCategory, featured, price, instructor, level, ids, exclude, orderby, order, layout, columns, show, buttonText, title, viewAll, viewAllText, emptyText, filters, pagination (and className). The block and the shortcode also pass attributes Edvera does not know, as given, so attributes of your own can steer the query (example in For developers). |
edvera_course_rank_counts | $counts, $type | The counts the catalogue orders popular and bestselling sort by: [ course ID => count ]; $type is popular or bestselling. The result is cached (see how they are counted). |
edvera_shortcodes_registry | $list | The shortcodes listed on Courses → Shortcodes, in the reference, the builder and the preview: tag => [ 'title', 'desc', 'block', 'atts' => [ name => [ 'type', 'default', 'desc', 'values' ] ], 'aliases' ]. Attribute types: text, number (with min, max), select, yesno, course, categories, instructor, page, ids, show. Add-ons add theirs. |
edvera_bundle_slug, edvera_download_slugs | $slug; $slugs | Bundle and download URL bases |
edvera_downloads_query_args | $query_args, $args | Download catalogue query |
edvera_bundle_block_editor | false | Return true to edit bundles in the block editor |
| Commerce | ||
edvera_currencies | $currencies | Add or change currencies |
edvera_format_price | $formatted, $minor, $code | Price formatting |
edvera_item_price | $price, $item_id | Current price (smallest unit) |
edvera_sellable_types | $map | Post type ⇒ item type map |
edvera_user_owns_item | $owns, $user_id, $type, $item_id | Ownership check |
edvera_item_purchasable | true|WP_Error, $item_id, $user_id | Block a purchase with a message |
edvera_coupon_discount | $discount, $code, $lines, $user_id, $email | Coupon discount (smallest unit) or WP_Error |
edvera_coupon_amount | $amount, $coupon_id, $lines, $user_id | Adjust a coupon's discount |
edvera_gateway_classes | $classes | Register payment methods |
edvera_buy_button_url | $url, $item_id | Where the buy button goes |
edvera_receipt_item_link | $cta, $item, $order | The link beside an item on the receipt: an array with url and label, or empty for none |
edvera_checkout_show_coupon | $show | Whether the checkout shows the coupon field (default: while a coupon can be used) |
edvera_checkout_rate_limit | $max, $key | Checkout attempt limits; 0 turns a limit off |
edvera_email | $mail, $kind | Change an email (to, subject, body) or return false to skip it. Kinds: receipt, instructions, admin_order, admin_on_hold, admin_problem. |
edvera_send_order_receipt | $send, $order | Whether the buyer gets the receipt email (default: paid orders above zero, and free orders that created the buyer's account) |
edvera_new_student_notify | true, $user_id | Whether new accounts get WordPress's “set your password” email |
edvera_order_deletable | $ok, $order | Whether an order may be deleted: true, or a WP_Error whose message says why not. Default: unpaid orders and test-mode orders, but not a live pending order in its first hour (see Deleting orders). |
| Bundles and downloads | ||
edvera_bundle_live_items | $items, $bundle_id | The items a bundle currently contains |
edvera_bundle_accepts_sales, edvera_download_accepts_sales | $ok, $id | Open or close sales |
edvera_bundle_has_access | $ok, $bundle_id, $user_id | Bundle access |
edvera_bundle_item_done | $done, $user_id, $item | When a sequential item counts as done |
edvera_bundle_can_use_item | $ok, $item_id | Which items an editor may add to a bundle |
edvera_download_user_has | $has, $user_id, $download_id | Download ownership |
edvera_download_mimes, edvera_download_max_size | $types; $bytes | Allowed types; a lower size limit |
edvera_download_link_lifetime | $seconds | Signed link lifetime (default one day, minimum 60 seconds) |
| Certificates | ||
edvera_cert_placeholders | $map, $record | Add design placeholders |
edvera_cert_pdf_access | true, $record | Restrict who may open a PDF |
edvera_cert_date | $date, $timestamp, $lang | The date printed on certificates |
edvera_cert_font_dirs | $dirs | Folders certificate fonts are read from (mPDF's fonts and assets/fonts); add your own folder |
edvera_cert_fontdata | $fonts, $dirs | The fonts available to certificate PDFs (mPDF fontdata, reduced to files that exist). Every file named must be in one of the font folders. |
edvera_cert_font_map | $map, $fonts | Fonts mPDF would choose that are not shipped, mapped to a shipped font for the same script: [ 'missing family' => 'replacement family' ] |
| Student dashboard | ||
edvera_dashboard_courses | $rows, $user_id | The enrolments listed under “My courses” and counted in the counters, for example to hide or reorder courses. Rows of Edvera_Enroll::user_courses(), newest first, each with course_id, user_id, status, source, enrolled_at, expires_at (null = lifetime) and grants. Rows without a course_id are skipped. |
edvera_dashboard_files | $files, $user_id | The files under “My files” (and the Files counter): [ 'id' => download ID (0 for a WooCommerce download), 'title', 'url' ] items, without duplicates. |
edvera_dashboard_certificates | $certs, $user_id | The certificates under “My certificates” (and the Certificates issued counter): certificate records with at least cert_code and course_title. |
edvera_dashboard_orders | $orders, $user_id | The orders under “My orders”: the latest 20, without cancelled ones; rows with at least id, status, total and currency. |
| Appearance and icons | ||
edvera_brand_css_vars | $vars, $brand | The custom properties printed with Edvera's stylesheets (name => value); only those that differ from the built-in look are present. Add or change any. Names must look like --my-name; values containing ; { } < or > are dropped. $brand is the normalised Appearance settings. |
edvera_brand_css | $css, $vars | The CSS printed after Edvera's stylesheets ('' when every Appearance setting is at its default), for example to add @font-face rules for a custom font. |
edvera_brand_style_handles | $handles | The stylesheets the brand CSS is attached to: edvera-lms, edvera-lms-player, edvera-lms-studio, edvera-course, edvera-checkout, edvera-bundles, edvera-downloads, edvera-cert-verify. Add-ons with their own stylesheet add its handle. |
edvera_icon_defs | $defs | The icon set: name => [ 'svg' => inner markup of a 24 × 24 SVG, 'dir' => mirror in right-to-left ]. Redraw or add icons; also used by window.edveraIcon. |
edvera_icon | $out, $name, $args | The markup of one icon printed by PHP (return safe HTML). Icons built in the browser do not pass through it. |
| Settings, roles and users | ||
edvera_settings_fields | $fields, $tab | Add fields to a settings tab (general, appearance, payments, emails). A field is [ type, label, default, help, options ]; types: text, email, textarea, checkbox, select, password, media, color, number, heading, readonly, connection (a “Test connection” button for a payment method: [ 'connection', label, '', help, gateway ID ]; nothing is stored, see Adding a payment method). |
edvera_settings_payments_fields | $fields | Payments tab fields |
edvera_settings_validate | $values, $tab, $errors | Check a tab's sanitised values before they are stored. To refuse a value, unset it from $values (the stored value stays) and add a message with $errors->add(); it is shown on the settings screen. |
edvera_grant_label | $label, $source, $ref | How an access source your code adds (with edvera_enroll( …, [ 'source' => … ] )) is shown in the Course students box |
edvera_capabilities, edvera_roles | $caps; $roles | Capability and role registry |
edvera_phone_identity | false | Return true to accept phone numbers (user meta edvera_phone) as a student identity |
edvera_normalize_phone, edvera_phone_variants | $normalized, $raw; $variants, $normalized | Phone number matching |
edvera_locale_digits | $digits, $locale | Native digits per locale |
edvera_user_meta_site_keys | $keys: [ 'exact' => [ … ], 'prefix' => [ … ] ] | The user meta keys Edvera keeps per site (without the site prefix): exact keys such as edvera_points, and prefixes followed by an ID such as edvera_course_done_. Add your add-on's per-site keys so they are moved from their old, unprefixed form along with Edvera's, see Per-site user data. |
| Server requirements | ||
edvera_php_extension_loaded | $loaded, $ext | Whether Edvera treats a PHP extension (gd, mbstring, fileinfo, intl) as loaded, for tests and special set-ups. Used by the server checks, certificate PDFs and QR codes. |
edvera_requirement_checks | $checks | The server checks shown in Site Health, the admin notice and on Get started: id => [ 'status', 'label', 'description', 'name', 'action' ]. Change Edvera's or add your own, see Loading and requirements. |
edvera_error_log_php | $write, $source, $message | Whether a recorded error is also written to the PHP error log (default: when WP_DEBUG_LOG is on) |
| AI & MCP | ||
edvera_mcp_enabled, edvera_mcp_allowed_scopes, edvera_mcp_rate_limit and 17 more | — | The MCP server, its permissions, limits and tools. Every filter with its parameters: Hooks, options and tables. |
| Privacy | ||
edvera_privacy_erase_data | $erase, $group, $user_id | Whether Tools → Erase Personal Data removes (for orders and qa: anonymises) one kind of data. Return false to keep it; it is then reported as retained. Groups: enrollments, progress, quiz, certificates, bundles, downloads, assignments, orders, qa. See Erasing a person's data. |
Styling and icons
Brand custom properties
The Appearance settings reach the screens as CSS custom properties on :root. Edvera prints them as an inline style attached to the first of its stylesheets on the page (edvera_brand_style_handles()), and only the ones that differ from the built-in look: each stylesheet carries the built-in value as the fallback, for example var(--edv-brand-accent,#17b8a6).
| Property | Printed when | Used for |
|---|---|---|
--edv-brand-accent, --edv-brand-on-accent | Accent colour or Text on accent changed | Buttons, progress bars and highlights; the text on them |
--edv-brand-accent-hover, --edv-brand-on-accent-hover | Hover state of accent buttons and its text | |
--edv-brand-accent-soft | Light accent backgrounds, such as instructor answers | |
--edv-brand-accent-text | Accent colour or Background changed | An accent shade for text on light backgrounds (darkened until it reads at 4.5:1) |
--edv-brand-dark, --edv-brand-on-dark, --edv-brand-on-dark-muted | Dark colour changed | Dark top bars and panels, their text and secondary text |
--edv-brand-dark-2, --edv-brand-on-dark-2 | Headings, links and dark buttons, and the text on those buttons | |
--edv-brand-paper, --edv-brand-surface, --edv-brand-surface-2, --edv-brand-line, --edv-brand-line-strong, --edv-brand-ink, --edv-brand-ink-soft, --edv-brand-muted | Background or Dark colour changed | Page background, cards, lines, body text, softer text and muted text |
--edv-brand-radius | Corner style is Square | The largest corner radius (6px); each element uses the smaller of its own radius and this one |
--edv-font-stack | Font is System font or Custom font | The font family of every Edvera screen. Unset, Edvera blocks on your pages inherit the theme's font and the stand-alone screens use the system font. |
--edv-heading-weight | Heading weight is Bold or Black | The weight (700 or 900) of every heading in the lesson player and the Course Builder |
Set them in code with the edvera_brand_css_vars filter rather than in your theme's stylesheet: theme CSS never reaches the lesson player, the Course Builder, the stand-alone management panel or the verification page. Add CSS of your own, such as @font-face rules, with edvera_brand_css:
// Courses → Settings → Appearance: Font = “Custom font”, family = "Open Sans", sans-serif.
// The player and the Course Builder do not load your theme, so give them the font file too.
add_filter( 'edvera_brand_css', function ( $css ) {
	$url = get_stylesheet_directory_uri() . '/fonts/open-sans.woff2';
	return '@font-face{font-family:"Open Sans";src:url("' . esc_url( $url ) . '") format("woff2");'
		. 'font-weight:400 800;font-display:swap}' . $css;
} );

// Any custom property, on every Edvera screen.
add_filter( 'edvera_brand_css_vars', function ( $vars ) {
	$vars['--edv-lb-gold'] = '#C9A227';
	return $vars;
} );
On your theme's pages, the course buy box, curriculum and catalogue, the course pieces (categories, search, price, my courses), the checkout, bundles and downloads also read their own variables --edv-accent, --edv-accent-ink, --edv-line and --edv-radius, set on their outer elements (.edv-cbox, .edv-curr, .edv-cat, .edv-ccat, .edv-csearch, .edv-cprice, .edv-cprice-block, .edv-mine, .edv-buy, .edv-checkout, .edv-bundle, .edv-dls, .edv-dl-box). A theme can override them on those classes to style one part differently.
| Variable | Set on | Default | Used for |
|---|---|---|---|
--edv-muted | .edv-cbox, .edv-curr, .edv-cat, .edv-ccat, .edv-csearch, .edv-cprice, .edv-mine, .edv-buy, .edv-checkout | The theme's text colour at 80% | Secondary text: details, hints, durations, struck-through prices. It follows the theme's text colour, so it stays readable on light and dark themes. |
--edv-ok | .edv-buy, .edv-checkout, .edv-bundle | #256B29 | Success colour: text and border of the receipt's “Thank you! Your payment was received and your access is ready.”; in bundles, completed items and the saving |
--edv-ok-bg | .edv-buy, .edv-checkout | #EDF7EE | Background of that success message |
--edv-bad | .edv-buy, .edv-checkout | #A3261B | Checkout error messages |
When you change --edv-ok or --edv-ok-bg, keep the two at a contrast of 4.5:1 or more.
Course lists and pieces
The catalogue and the pieces of Use Edvera in your own site print these classes (stylesheet handle edvera-course). A shortcode's class attribute, or a block's “Additional CSS class(es)”, adds your own classes to the outer element.
| CSS hook | What it is |
|---|---|
.edv-cat with .edv-cat--grid, .edv-cat--list or .edv-cat--compact | A catalogue, or a single course card (then also .edv-cat-one), in its layout |
.edv-cat-head, .edv-cat-heading, .edv-cat-all | The heading row above a list: the heading (an h2) and the “View all courses” link |
.edv-cat-grid with .edv-cols-1 … .edv-cols-4 | The list of cards; the column class only when columns is set |
.edv-cat-card (with .has-btn), .edv-cat-link, .edv-cat-img, .edv-cat-term, .edv-cat-title, .edv-cat-excerpt, .edv-cat-foot, .edv-cat-n, .edv-cat-price, .edv-cat-actions, .edv-cat-btn | A course card and its parts: image, category, title, excerpt, the footer with the number of lessons and the price, and the button |
.edv-ccat with .edv-ccat--grid or .edv-ccat--list; .edv-ccat-list (with .edv-cols-1 … .edv-cols-4), .edv-ccat-item, .edv-ccat-link, .edv-ccat-name, .edv-ccat-count | Course categories (a nav), each category and its number of courses |
.edv-csearch | The course search form |
.edv-cprice, .edv-cprice-block | The course price (a span with a del for the regular price and a strong for the current one); the block wraps it in .edv-cprice-block |
.edv-buy.edv-enroll, .edv-buy-btn, .edv-buy-note | The enroll button, and the reason shown when nobody can enrol |
.edv-mine, .edv-mine-list, .edv-mine-item (with .is-done), .edv-mine-link, .edv-mine-img, .edv-mine-title, .edv-mine-status, .edv-mine-bar, .edv-mine-pct, .edv-mine-note | My courses: the list, a course (completed ones with .is-done), its title, status, progress bar and percentage, and the notes for visitors and empty lists |
Icons
Every Edvera screen uses one set of inline SVG line icons: 24 × 24, drawn with a 1.5 stroke in the current text colour, 1em in size, and hidden from screen readers (the text next to an icon, or its label, carries the meaning). No icon font is loaded. The names are check, close, plus, minus, lock, clock, download, file, paperclip, image, video, play, text, quiz, pencil, interactive, award, book, medal, star, flame, sparkles, timer, chevron-start, chevron-end, arrow-start, arrow-end, arrow-up, arrow-down, list, grip, trash and alert.
// PHP: an icon with a visually hidden label.
echo edvera_icon( 'lock', array( 'label' => __( 'Locked', 'my-plugin' ) ) );
// <svg class="edv-icon edv-icon-lock" width="1em" height="1em" viewBox="0 0 24 24" … aria-hidden="true">…</svg><span class="edv-vh">Locked</span>

// Redraw an icon and add one of your own.
add_filter( 'edvera_icon_defs', function ( $defs ) {
	$defs['lock']['svg'] = '<rect x="5" y="10" width="14" height="11" rx="2"/><path d="M8 10V7a4 4 0 0 1 8 0v3"/>';
	$defs['globe']       = array(
		'svg' => '<circle cx="12" cy="12" r="9"/><path d="M3 12h18M12 3a14 14 0 0 1 0 18M12 3a14 14 0 0 0 0 18"/>',
		'dir' => false, // true: mirror in right-to-left languages
	);
	return $defs;
} );
Icon markup may contain path, circle, ellipse, rect, line, polyline, polygon and g elements; anything else is removed. Add the edvera_icon_defs filter in your plugin's main file or your theme's functions.php, not inside an init callback: the browser copy of the set is prepared early on init.
In JavaScript, make your script depend on the edvera-lms-icons handle. window.edveraIcon( name, extraClass ) returns an <svg> element (an empty, hidden one for an unknown name), and window.edveraIcon.set( node, name, text ) replaces a node's content with an icon followed by the text:
wp_enqueue_script( 'my-script', $url, array( 'edvera-lms-icons' ), '1.0', true );

// my-script.js
button.appendChild( window.edveraIcon( 'trash' ) );
window.edveraIcon.set( message, 'check', 'Saved' );| CSS hook | What it is |
|---|---|
.edv-icon | Every icon (an inline-block svg) |
.edv-icon-{name} | One icon, for example .edv-curr .edv-icon-lock{color:#b23a3a} |
.edv-i-dir | Directional icons — chevron-start, chevron-end, arrow-start, arrow-end, text and list — drawn for left-to-right reading and mirrored (transform:scaleX(-1)) inside [dir=rtl], but not inside an element marked dir="ltr". Media symbols such as play never mirror. |
.edv-vh | The visually hidden label printed after an icon given a label |
The mirroring rules ship in Edvera's main, course page, player and Course Builder stylesheets. If you print icons on a page that loads none of them, copy the two rules: [dir=rtl] .edv-i-dir{transform:scaleX(-1)} and [dir=rtl] [dir=ltr] .edv-i-dir{transform:none}.
Leaderboard
The leaderboard is a .edv-lb box with a .edv-lb-h heading and an ol.edv-lb-list. Each li.edv-lb-row holds .edv-lb-rank (the rank number in .edv-lb-n), .edv-lb-name and .edv-lb-pts. The first three rows also have the classes is-top and is-rank-1, is-rank-2 or is-rank-3, and a medal icon in their rank, tinted with --edv-lb-gold (default #B8860B), --edv-lb-silver (#7C8691) and --edv-lb-bronze (#A0522D).
Adding a payment method
Extend Edvera_Gateway and register the class with edvera_gateway_classes. Its settings appear on the Payments tab automatically.
add_action( 'plugins_loaded', function () {
	if ( ! class_exists( 'Edvera_Gateway' ) ) {
		return;
	}

	class My_Gateway extends Edvera_Gateway {
		public $id = 'mygateway';

		public function title() {
			return __( 'My gateway', 'my-plugin' );
		}

		public function start( $order ) {
			// Create the payment at your provider, then send the buyer there.
			// Return addresses: $this->return_url( $order ) and $this->return_url( $order, 'cancel' ).
			return array( 'redirect' => 'https://provider.example/pay/…' );
		}

		public function handle_return( $order, $query ) {
			// Verify the payment with the provider on the server first.
			Edvera_Orders::mark_paid( $order['id'], $transaction_id );
		}
	}

	add_filter( 'edvera_gateway_classes', function ( $classes ) {
		$classes[] = 'My_Gateway';
		return $classes;
	} );
}, 20 );
Optional methods to override: fields(), admin_description(), checkout_description(), is_configured(), supports_currency( $code ), webhook( $request ) (served at /wp-json/edvera/v1/webhook/<id>; webhook_url() returns it), can_refund() and refund( $order ). Read your settings with $this->opt( $key ). The bundled methods in includes/commerce/gateways/ are complete examples.
Also optional:
is_test_mode()— return true while your method is in its test or sandbox mode. Orders placed then (with a total above zero) get the order metatest, are labelled Test mode and can be deleted (see Deleting orders).validate_settings( $values, $errors )— check your fields' values (keysgw_<id>_<field>) before they are saved. To refuse one, call$this->reject( $errors, $field, $problem ), which shows “Label was not saved: problem”, and unset the value so that the stored one stays. Return$values.connection_fields()andtest_connection( $creds )— a “Test connection” button. Add a field'test_connection' => array( 'connection', __( 'Connection', 'my-plugin' ), '', $help, $this->id )tofields(), return the keys of the fields the button sends fromconnection_fields()(without thegw_<id>_prefix), and check them with the provider intest_connection(): return a success message or a WP_Error.$this->credential( $creds, $key )gives the typed value or, when the field is empty, the saved one;$this->unreachable( $provider, $error )turns a transport error into “Could not reach …”. The request comes from an administrator through admin-ajax with a nonce; never log the credentials.
REST routes and data
Edvera's screens talk to the server through REST routes under edvera/v1, authenticated with the logged-in user's cookie and a nonce (X-WP-Nonce, action wp_rest). The only routes you set up yourself are the payment webhooks. Routes you may meet when extending the player or the Course Builder:
| Route | Parameters | Does |
|---|---|---|
POST /edvera/v1/complete | course_id, lesson_id | Marks a lesson complete for the current student and returns ok, progress and, when it changed, cert (issued or needs_name). Refused with 403 and an error code when the lesson completes another way: watch_required (video rule, less than 90% watched), download_required (download rule, no file downloaded yet) or quiz; also not enrolled (403), locked (403, drip or prerequisite) and not_in_course (400). |
POST /edvera/v1/video-progress | course_id, lesson_id, watched (distinct seconds played), duration (seconds) | Records how much of a lesson's video the student watched, for lessons whose effective rule is video (otherwise 400 not_video_rule). Returns watched (percent on record) and complete; at the threshold the lesson is completed and the response carries the same fields as /complete. |
POST /edvera/v1/studio/lesson/{id}/interactive | multipart: file (one .html/.htm file), title (optional) | Uploads or replaces a lesson's interactive page (users who can edit the lesson's course). Returns 201 with interactive: title, size, previewUrl. Errors: 400 no_file, 413 edvera_ix_too_large, 415 edvera_ix_type, each with a message. |
DELETE /edvera/v1/studio/lesson/{id}/interactive | — | Removes the lesson's interactive page and its file; returns { "interactive": null }. |
POST /edvera/v1/studio/course/{id}/lesson | title, type, topic_id (chapter) | Adds a lesson to a chapter (users who can edit the course), as a draft marked with the post meta _edvera_builder_draft. Returns 201 with the course's builder data (chapter tree and lesson summaries) and created, the new lesson's summary. |
PUT /edvera/v1/studio/lesson/{id} | Any of title, type, free, body, video, rule, duration, drip, prereq, worksheet, ix_title; publish (boolean) | Saves the fields sent. With publish: true (the lesson editor's “Save”), a lesson the builder added as a draft is published and its _edvera_builder_draft mark removed; lessons unpublished in other ways are left as they are. Returns lesson, the summary. |
PUT /edvera/v1/studio/lesson/{id}/quiz | pass, attempts, total, mode, practice, questions | Saves the quiz and, like publish above, publishes a quiz lesson the builder added as a draft. Returns the saved quiz and lesson, the summary. |
A lesson summary in the Course Builder's answers is { id, title, type, free, draft }; draft is true while the lesson is not published, and the builder then shows its “Draft” badge.
Edvera's tables use your database prefix: edvera_enrollments, edvera_quiz_attempts, edvera_orders, edvera_order_items, edvera_certificates, edvera_bundle_grants and edvera_download_access; the AI & MCP server adds edvera_mcp_tokens, edvera_mcp_clients and edvera_mcp_audit. The MCP routes (/edvera/v1/mcp and /edvera/v1/oauth/…) authenticate with API keys and OAuth tokens instead of the cookie: see Endpoints.
An order's meta (a JSON column, the meta key of an $order array) holds "test": 1 when the order was placed with a total above zero while its payment method was in test or sandbox mode; read it with Edvera_Orders::is_test(). The best-selling count leaves these orders out.
Troubleshooting and FAQ
What this is for: answers to common problems, each with the message you see and what to do.
- Installing the plugin fails, for example with “No valid plugins were found” or an upload limit message
- See If the upload fails: every WordPress message with its fix.
- /studio/, /learn/, /manage/ or the verification page shows “Page not found”
-
- Open Settings → Permalinks and click Save Changes to rebuild WordPress's address rules. Edvera rebuilds them itself after activation, but another plugin, a migration or a restored database can leave old rules behind.
- With Plain permalinks the short addresses do not exist. Edvera's own links then use query addresses such as
?edvera_studio=1,?edvera_learn=1&edvera_lcourse=12or?edvera_cert_verify=1, which always work (see Site addresses). A short address bookmarked or printed while pretty permalinks were on stops working when you switch to Plain; switch back, or use the query form. - With PATHINFO permalinks (a structure starting with
/index.php/) the addresses needindex.php, for example/index.php/studio/; Edvera's own links include it.
- /manage/ shows one of my pages instead of the management panel
- A published page with the slug
managetakes over that address. Add the Course management panel block or[edvera_manage]to it, so it hosts the panel, or change the page's slug. See Managing students. - Twenty Twenty-Five shows “Written by … in” above courses and downloads
- That line comes from the theme's single-item template, not from Edvera. Open Appearance → Editor → Templates, add a Single item: Course (and Single item: Download) template and remove the “Written by” row.
- A video lesson shows “Mark as complete” although it should complete by watching
- Only uploaded videos and direct links to a video file can report what was watched. Videos embedded from YouTube, Vimeo or Aparat always use the button. See Completion.
- Students get “403 Forbidden” when they open the protected video's address
- That is intended: an uploaded video is stream-only for students and plays only inside the lesson player. See Secure video.
- “This embed code is not from a supported video site”
- The Course Builder accepts embed code from YouTube, Vimeo and Aparat only. For other sites, paste a direct link to the video file, or upload the video.
- Stripe or PayPal orders stay “Pending payment”
-
- Check that the webhook URL in Stripe or PayPal is exactly the “Webhook URL” shown in Edvera.
- Stripe: subscribe to the four events listed under Stripe, and paste the signing secret of the endpoint that matches the current mode (test or live). Stripe's webhook log shows Edvera's answer;
400 bad_signaturemeans the secret does not match. - PayPal: fill in “Webhook ID (optional)”. Without it, Edvera rejects PayPal's webhook calls.
- Security plugins, firewalls and “disable REST API” settings must allow
/wp-json/edvera/v1/webhook/. - Providers cannot reach a site on
localhostor behind a password. Card payments still complete when the buyer returns to your site.
- A payment method does not appear at checkout
- It must be enabled, its credentials filled in, and it must support your store currency (see Currency). With no method available, the checkout shows “Online payment is not available right now. Please contact us.” An order with a total of 0 needs no method: it shows “Complete order” instead.
- “The PDF library is missing from this installation”
- The plugin's
vendorfolder is incomplete. Uploadedvera-lms.zipagain from your CodeCanyon download under Plugins → Add Plugin → Upload Plugin and choose Replace current with uploaded (or delete the plugin folder by FTP and upload it again); your data stays. PDFs also need the PHP mbstring extension, and logos, signatures and image QR codes need GD; your host can enable both. Tools → Site Health shows which is missing, see Server requirements and Site Health. - “Certificate PDF not available” or “The certificate PDF could not be created on this server.”
- The certificate is valid and can be checked online with the link on that page; only its PDF failed. Open Tools → Site Health → Status: the test “Edvera LMS recorded … errors in the last 7 days” shows the reason, and the other Edvera LMS tests show whether something is missing on the server. An error about memory or a time limit usually means that the host's PHP limits are too low for creating the PDF; ask your host to raise them. See When a certificate PDF cannot be created.
- “Edvera LMS: this server is missing something Edvera needs.”
- A required PHP extension, the PDF library or a writable uploads folder is missing. The notice names it; click Open Site Health for what each item is for and what to ask your host. The notice disappears once it is fixed. See When something required is missing.
- “Edvera LMS needs PHP 8.1 or newer, but this site now runs PHP …, so Edvera is paused”
- Your host switched the site to an older PHP. Choose PHP 8.1 or newer in your hosting control panel, or ask your host; Edvera starts again by itself, and nothing was deleted. See Edvera on an older PHP version.
- “Test secret key was not saved: …” (or another key field)
- The value has the wrong form for that field, for example a publishable key (
pk_…) or a key from the other mode. The message says which key to paste; the key saved before is kept. See Checking your keys. - “Test connection” says “Could not reach Stripe: …” (or PayPal)
- Your server could not open a connection to the provider at all, so the keys were not checked. Hosts and firewalls sometimes block outgoing connections, and WordPress itself blocks them when
WP_HTTP_BLOCK_EXTERNALis set inwp-config.php. Ask your host to allow outgoing HTTPS connections from your site; payments need them too. A message that starts with “Stripe refused the key” or “PayPal refused the credentials” means the provider was reached but did not accept the keys. - I cannot delete an order
- Paid and refunded orders that were not placed in a test or sandbox mode are kept as the record of real payments, and a live order still pending payment is kept for its first hour. Bank-transfer and free orders count as live. The order screen shows the reason below its actions. See Deleting orders.
- Certificate designs show no preview
- Previews need the PHP Imagick extension with Ghostscript. Without them, designs still work; only the preview image is missing.
- A student finished but has no certificate
- Check that the course issues certificates and that the condition is met (graded quizzes passed, average reached). If the account has no real name, the student must enter it on their dashboard first. You can also issue the certificate by hand in the management panel.
- Emails do not arrive
- Edvera sends through WordPress's
wp_mail. Many hosts block PHP mail or it lands in spam: install an SMTP plugin and use a “From” address on your own domain (Courses → Settings → Emails). - Caching plugins
- The checkout sends
DONOTCACHEPAGEand no-cache headers, and the Course Builder, player and verification page send no-cache headers. Most caching plugins respect them. If yours does not, exclude the checkout page, the student dashboard page,/learn/,/studio/and/manage/, and URLs containingadd=,order=oredvera-pay, from the page cache. Do not serve cached pages to logged-in users. - A video or file upload fails
- The limit is your server's upload limit; the Course Builder shows it under the file list. Raise PHP's
upload_max_filesizeandpost_max_size(and nginx'sclient_max_body_size). Check that the type is allowed; files whose content does not match their extension are refused. Interactive pages are limited to 10 MB (or the server limit when it is lower). - A student can't open a lesson
- Check that their enrolment has not expired (Access length), the course is not in the Trash, and the lesson is not locked by a release date or prerequisite. Hover the lesson in the player's sidebar to see the reason.
- A guest buyer is told their email already has an account
- Ask them to log in, or reset their password, and then complete the order. This protects existing accounts.
- How do I stop selling a course without affecting its students?
- Use “Close enrollment” (still visible) or “Archive” (hidden). Do not move it to the Trash. See Course lifecycle.
- Does Edvera need a particular theme?
- No. Course pages get the buy box and curriculum through the page content, and every part is available as a shortcode. The player and the Course Builder are full pages of their own. To match them to your brand, use Courses → Settings → Appearance (see Appearance).
- My buttons show white (or dark) text instead of the “Text on accent” colour I chose
- Edvera uses your “Text on accent” colour only when it reaches a contrast of 4.5:1 with the accent colour; otherwise it uses white or near-black, and saving the tab shows a message saying so. Left at its default, the colour is chosen for you whenever the accent changes. The help text under the field shows the colour in use and its contrast.
- The background colour I chose was not saved
- The lesson player and the Course Builder are designed for a light background, so a darker colour (darker than about
#CCCCCC) is refused with “The background … is too dark” and the previous one is kept. Use the dark colour for dark panels instead. - My custom font shows on my pages but not in the lesson player or Course Builder
- Edvera does not load font files, and the player, the Course Builder, the stand-alone management panel and the verification page do not load your theme. Visitors see the font there only when it is installed on their device, or when a developer adds its
@font-facerule with theedvera_brand_cssfilter (see Styling and icons). Check also that the font has the chosen heading weight. - A short answer was marked wrong although it looks right
- Matching ignores letter case, spacing, the kind of digits and common Arabic/Persian letter variants, but not punctuation or spelling. Check the “Correct answer” for a trailing full stop or another spelling, see Short-answer matching. A developer can accept more variants with the
edvera_quiz_normalize_answerfilter. - Does Edvera send data anywhere?
- Only to the payment providers you enable, when a buyer chooses them: order amount, currency, item names, return addresses and (for Stripe and Zarinpal) the buyer's email address. There is no tracking or telemetry. The AI & MCP server, off by default, sends nothing on its own: it answers the assistants you connect, and what they read goes to the AI service that runs them. When an assistant asks Edvera to upload a file from a web address, your site downloads that file (public
https://addresses only).
Changelog
What this is for: what changed in each version.
1.0.0
- First release.
Support
What this is for: how to reach AyanTheme for help.
Support is provided by AyanTheme through the item's page on CodeCanyon (the Comments and Support tabs). AyanTheme's author profile: themeforest.net/user/ayantheme.
What to include, where to find your purchase code and what support covers: Getting help. In short: include your WordPress, PHP and Edvera versions, your theme, and the steps that show the problem. If you can, turn on WP_DEBUG_LOG and include the lines from wp-content/debug.log that mention Edvera.
Edvera LMS is released under the GNU General Public License, version 2 or later. Third-party libraries and fonts are listed on the credits and licences page.